15 Mac-Hardening Security Tips to Protect Your Privacy
Posted on
by
Kirk McElhearn
When you get a new Mac, it’s pretty easy to set it up and get started using it, but if you’re concerned about your privacy, you need to spend some time to ensure that the Mac’s security settings match your needs. Mac security settings can be especially challenging to configure, as there are more and more of them as Apple increases its push to protect users. Whether you’re setting up a new Mac or upgrading to the latest version of macOS, it’s a good idea to check your privacy settings.
There are many ways you can lose data, and each is a reason to regularly back up your files. Furthermore, downloading files and exchanging files with others is fraught with risks, and the number of threats targeting Macs continues to rise. Whether you use a personal computer or a public computer, there are plenty of actions you can take to improve your security and privacy. Here are 15 Mac-hardening security tips to lock down your Mac and your data.
Lock Down Access to Your Mac
1. Create a standard (non-admin) account for everyday activities
When setting up a new Mac, the macOS setup assistant asks you for your name, a user name, and a password, and uses this information to set up your first user account. Since there has to be at least one user with administrative privileges on your Mac, that first account is an administrator account. While this is useful — you can install software, and perform other actions, after entering your password — it can also be risky.
An administrator may make mistakes, and they can change or delete some files that are essential to the Mac. They can also install any software, which may be a risk, if the software is malicious. Standard users, however, have limited access rights on a Mac. They can use, change, and create files in their home folder, access folders on shared volumes if the permissions allow it, change settings to non-secure preferences in System Preferences, and install some software (if it doesn’t need to install items in the System or Library folders). While standard accounts are more limited, they can be useful for daily work, just to be safe.
Log into that second account, and use it for your everyday activities, and to store your personal files. Whenever an administrator’s password is required, type the admin user name and the appropriate password. While this will lead to more password requests than if you were working under an admin account, each of these requests should raise a red flag and make you think whether you should be entering your password.
While using a standard account is not full blown protection from malware, it does protect from some types of malware, and can provide a warning that something is going on. It can also prevent you from blundering by deleting files that you didn’t mean to erase. So using two accounts is a tiny bit of hassle that is worth trying out to save you from potential disasters.
See Understanding User Accounts in macOS to find out more about the difference between these types of accounts, and to learn how to create a new, standard user account for your everyday use.
2. Don’t enable automatic login
When you first set up a new Mac, or when you do a clean installation of a new version of OS X, you create a user account, you can set that account to log in automatically at startup. You may want to do this if you’re at home, but if you use a laptop and travel, this is a serious risk. Automatic login means that anyone who finds – or steals – your Mac only needs to start it up to have access to your files.
The automatic login setting is in the Users & Groups pane of System Preferences. You’ll notice in the screenshot below that it’s dimmed; this option is not available if you have FileVault enabled on your Mac. (See below for more on FileVault.) This full-disk encryption requires that the computer – and its disk – be unlocked with the appropriate password for its files to be accessible.
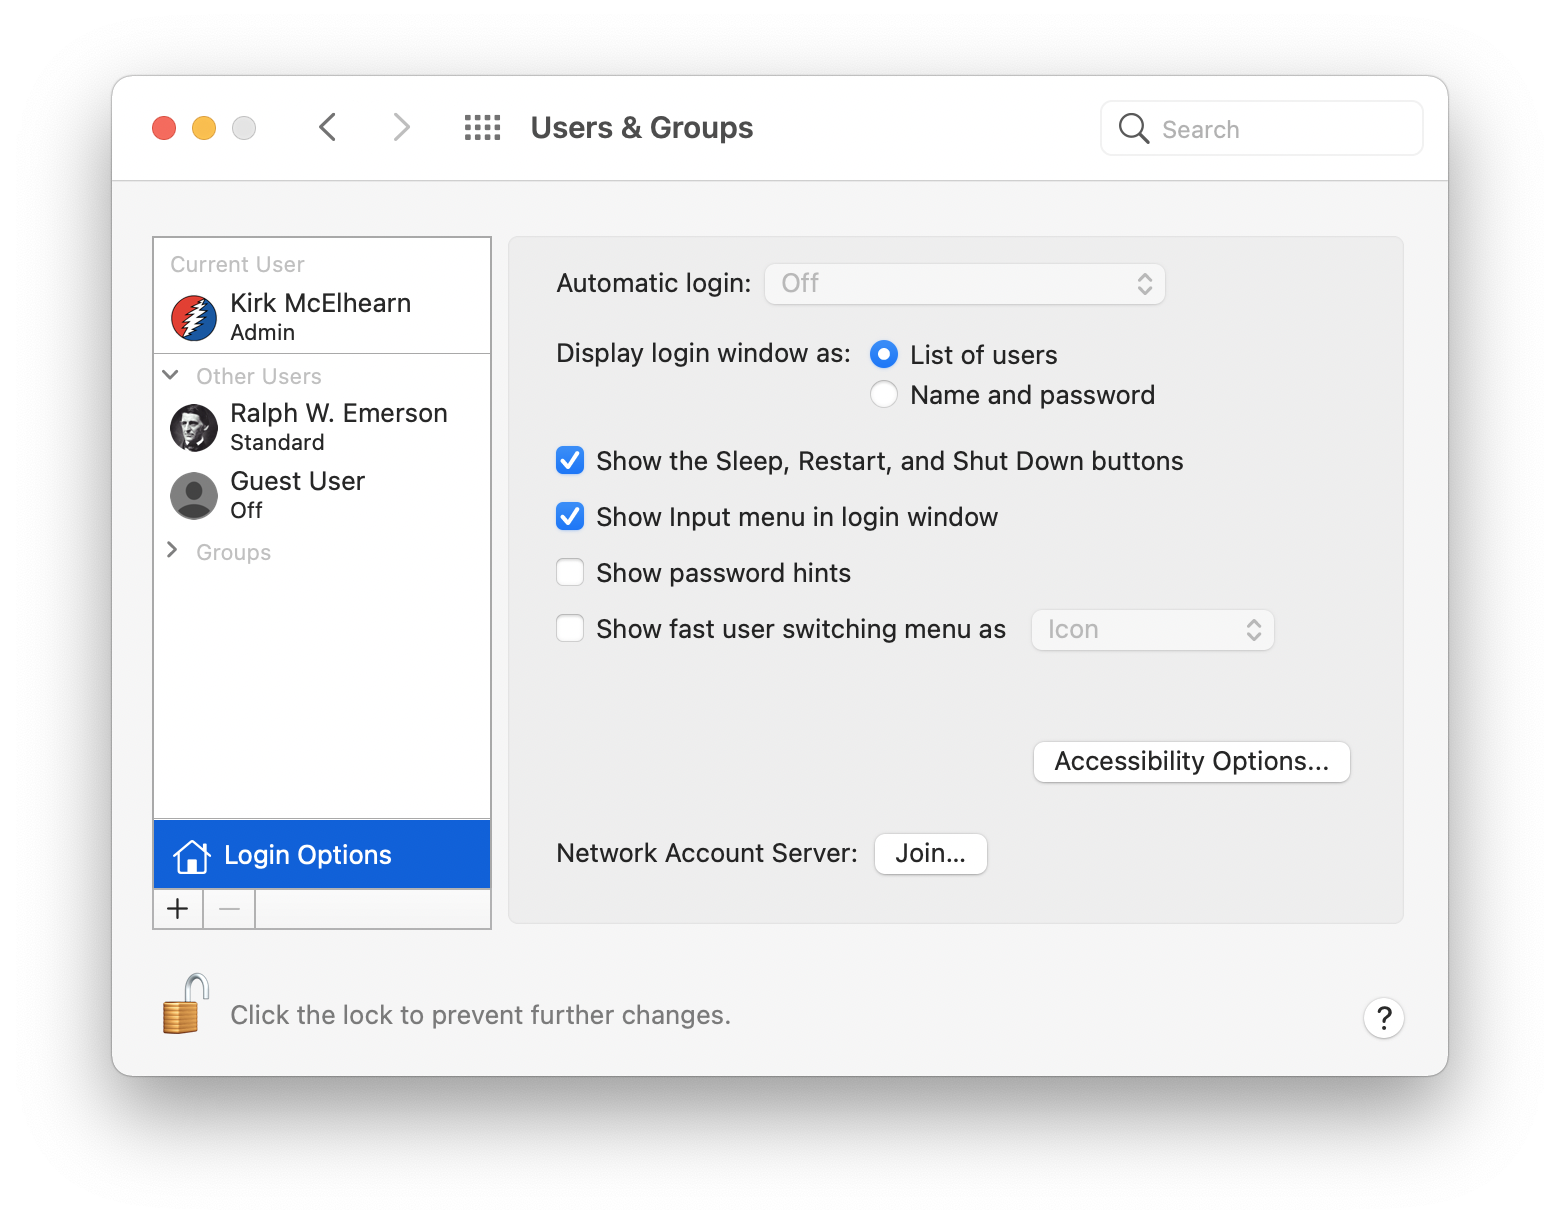
And if you use your iCloud password to log into your account, you won’t be able to turn on automatic login.
3. Use a password manager to ensure that data breaches don’t put your identity at risk
We routinely recommend that all Mac users create secure passwords; it’s important to create complex, unique passwords so they’re more difficult to crack. If you use simple passwords, and especially if you re-use passwords on multiple websites, data breaches on one site may expose your user name and password combination that cybercriminals may try to use on other sites.
Unfortunately, the more complicated your passwords, the easier they are to forget. Password managers mean that you only have to remember a single, master password to access your hard-to-remember passwords. Take a look at our list of How to Choose the Right Password Manager for You, to find a password manager that can keep you secure.
You can also use the macOS and iOS Keychain, which can store your passwords, auto-fill them, and sync your passwords across your devices via your iCloud account. Read Mac and iOS Keychain Tutorial: How Apple’s iCloud Keychain Works to understand how to use this.
4. Install a two-way firewall for outbound/inbound protection
Apple’s built-in firewall offers inbound network protection. But inbound firewalls only protect against certain kinds of attacks. With the increasing frequency of new malware and targeted attacks, the best defense is implementing multiple layers of protection. If there is unknown malware on your Mac, you want to be able to prevent it from connecting to the Internet — only firewalls with outbound protection offer this security. Outbound firewall protection is arguably the most important component of two-way firewall software, at least from an anti-malware perspective. Outbound firewalls are remarkably good at alerting you about a piece of software that you know full well you downloaded, but didn’t think would be connecting to the Internet. A two-way firewall like Intego NetBarrier, which is part of Intego Mac Premium Bundle X9, offers real protection, because it combats inbound threats and can prevent malicious programs on your Mac from calling out to the Internet. This locks down access to your Mac while preventing data from leaking out.
5. Be wary of software that instructs you to reduce the security of your Mac
In recent years, Apple added System Integrity Protection to Macs. This feature makes it much more difficult for software to install at a low level on your Mac. This affects certain locations where files are installed in the System and Library folder, and protects elements that integrate directly with the kernel, the most important part of macOS.
With the arrival of Apple’s M1 Macs in late 2020, some security procedures have changed. Kernel Integrity Protection goes a step further, making the installation of some software much more laborious. Previously, you could install certain system extensions by authorizing them in the Security & Privacy pane of System Preferences, but you know have to go through a complex process of rebooting into the Recovery partition and changing the security policy, temporarily, then rebooting again.
While there are some legitimate apps that require this procedure – one such app is Rogue Amoeba’s Audio Hijack, which can record audio on a Mac – malware has been distributed that attempts to convince users to circumvent this protection and install the software. Rogue Amoeba explains how this process is done here, but you should be very careful if any software suggests that you install it in this manner. Make sure that you are installing legitimate software or this workaround could give full access to your Mac to malware.
Check your macOS settings
1. Enable FileVaut full-disk encryption
To protect the data on your Mac, you should use Apple’s FileVault full disk encryption. This feature has been available on Macs for about ten years, and is robust and doesn’t slow down your Mac. FileVault encrypts your entire hard drive using XTS-AES 128 withe 256-bit key, a very secure encryption algorithm.
If your Mac’s drive isn’t fully encrypted, anyone who steals your computer can access any data on it. With FileVault enabled, as soon as your Mac is shut down, its drive is locked. Only when an authorized user turns the Mac on and logs in are the drive’s contents unlocked. (Yet another reason why it’s a good idea not to have an obvious password.)
To enable FileVault, first make sure you have logged into macOS with an administrator’s account, and go to System Preferences > Security & Privacy > FileVault. Once there, click Turn on FileVault.

FileVault is transparent, and, after the initial encryption, that can take some time on large drives, it encrypts and decrypts files when necessary. Read How to Use Apple’s Built-in Features to Encrypt Files and Folders for more on using FileVault.
2. Keep your location private
How comfortable are you with sharing your physical location with different apps? Do you even know which apps are receiving details of where you are? A quick visit into System Preferences can reveal all. Click the Security & Privacy icon, then click the Privacy tab. To make changes to these settings, you may need to unlock the padlock by entering an administrator password.
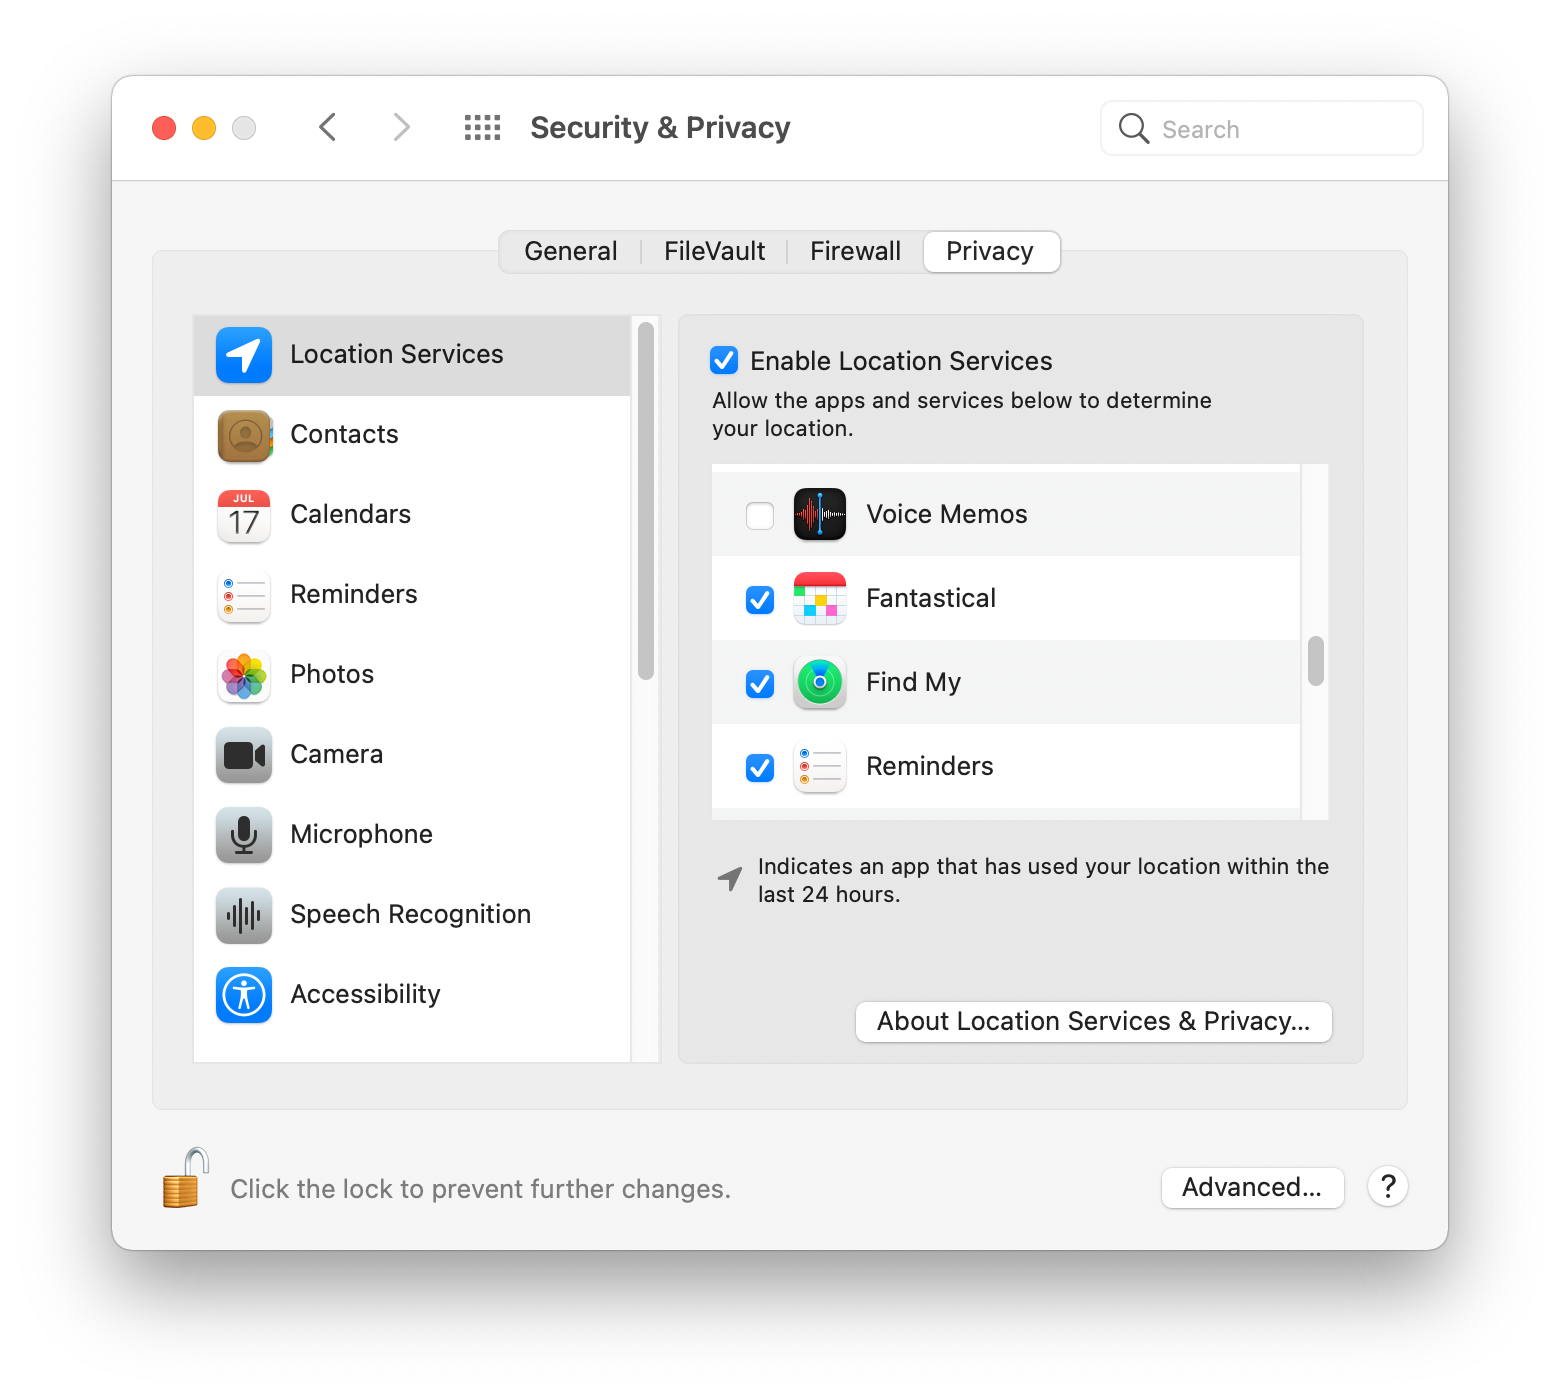
Once there, choose Location Services and view whether they are enabled and, if so, which apps can access your location. Allowing certain apps to access your location is useful: for example, if you want Maps to give you directions, it’s easier to give it access to your location. Weather apps work better if they know where you are. And the Find My app (see below) should be able to access your location.
3. Use Safari’s Intelligent Tracking Prevention
One of the biggest threats to privacy is the information collected about you when you surf the web. Websites use trackers to collect data, identify you, then funnel the data into a profile that is sold and traded among advertisers.
Apple’s Safari web browser uses what Apple calls Intelligent Tracking Prevention to limit the amount of data that websites can collect. If you go to Safari > Preferences > Privacy, Prevent cross-site tracking should be enabled. (It’s on by default.) This turns on some sophisticated cloaking features that Apple uses to protect your privacy. And in Safari, if you disable this setting for a while, you can see how many trackers are blocked; you may be surprised by the number of trackers you encounter on the web.
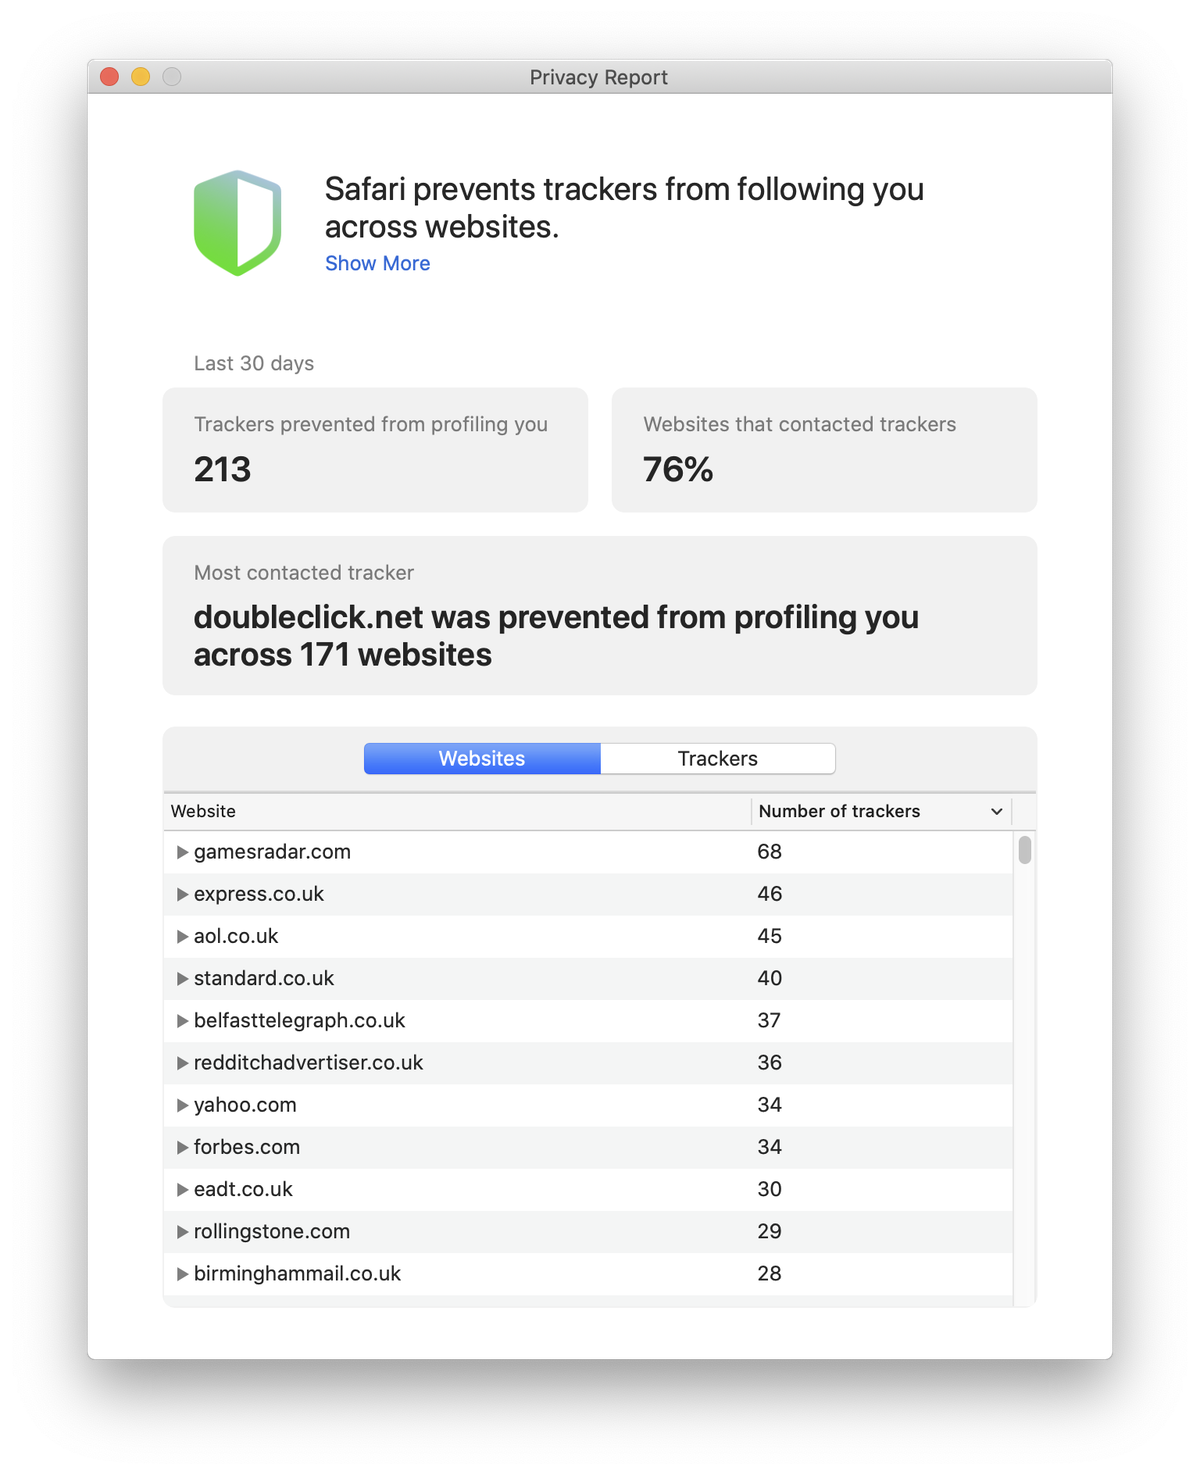
Read Understanding Safari’s New Privacy Report to learn more about Intelligent Tracking Prevention, and to understand what the Privacy Report tells you.
4. Check for software updates often
There are myriad security threats to Macs, from malware to vulnerabilities, and, like all operating systems, macOS regularly gets updates to fix security issues. Just look at the Apple Security Updates page to see how many updates there are to Apple’s operating systems and to specific Apple apps. For this reason, it’s important to keep your software up to date to thwart new security threats.
To ensure that macOS is up to date, go to System Preferences > Software Update. It’s a good idea to click the Advanced button and adjust some settings.
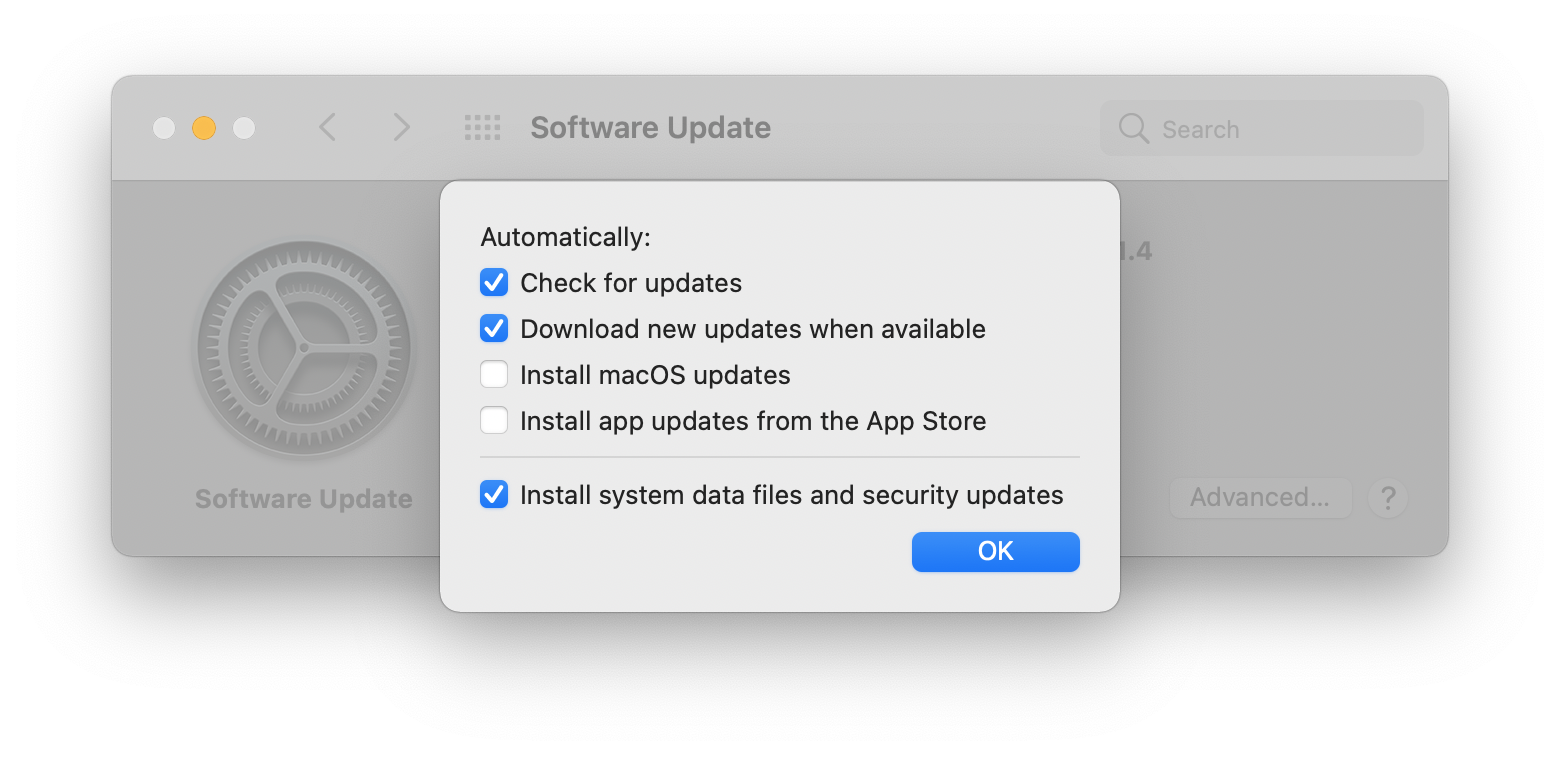
I like to have my Macs automatically check for updates and download updates, but not install them automatically. I wanted to be alerted when an update is available, so I can make sure to back up my Mac before updating, just in case there are problems. I want system data files and security updates installed automatically. These sometimes don’t require a restart, whereas macOS updates always do.
But you also need to update the apps you use to stay secure. You can update some apps in the Mac App Store, and others directly from the apps. Read What every Apple user should know about software updates for more on
software updates.
5. Don’t leave your computer unlocked and unattended
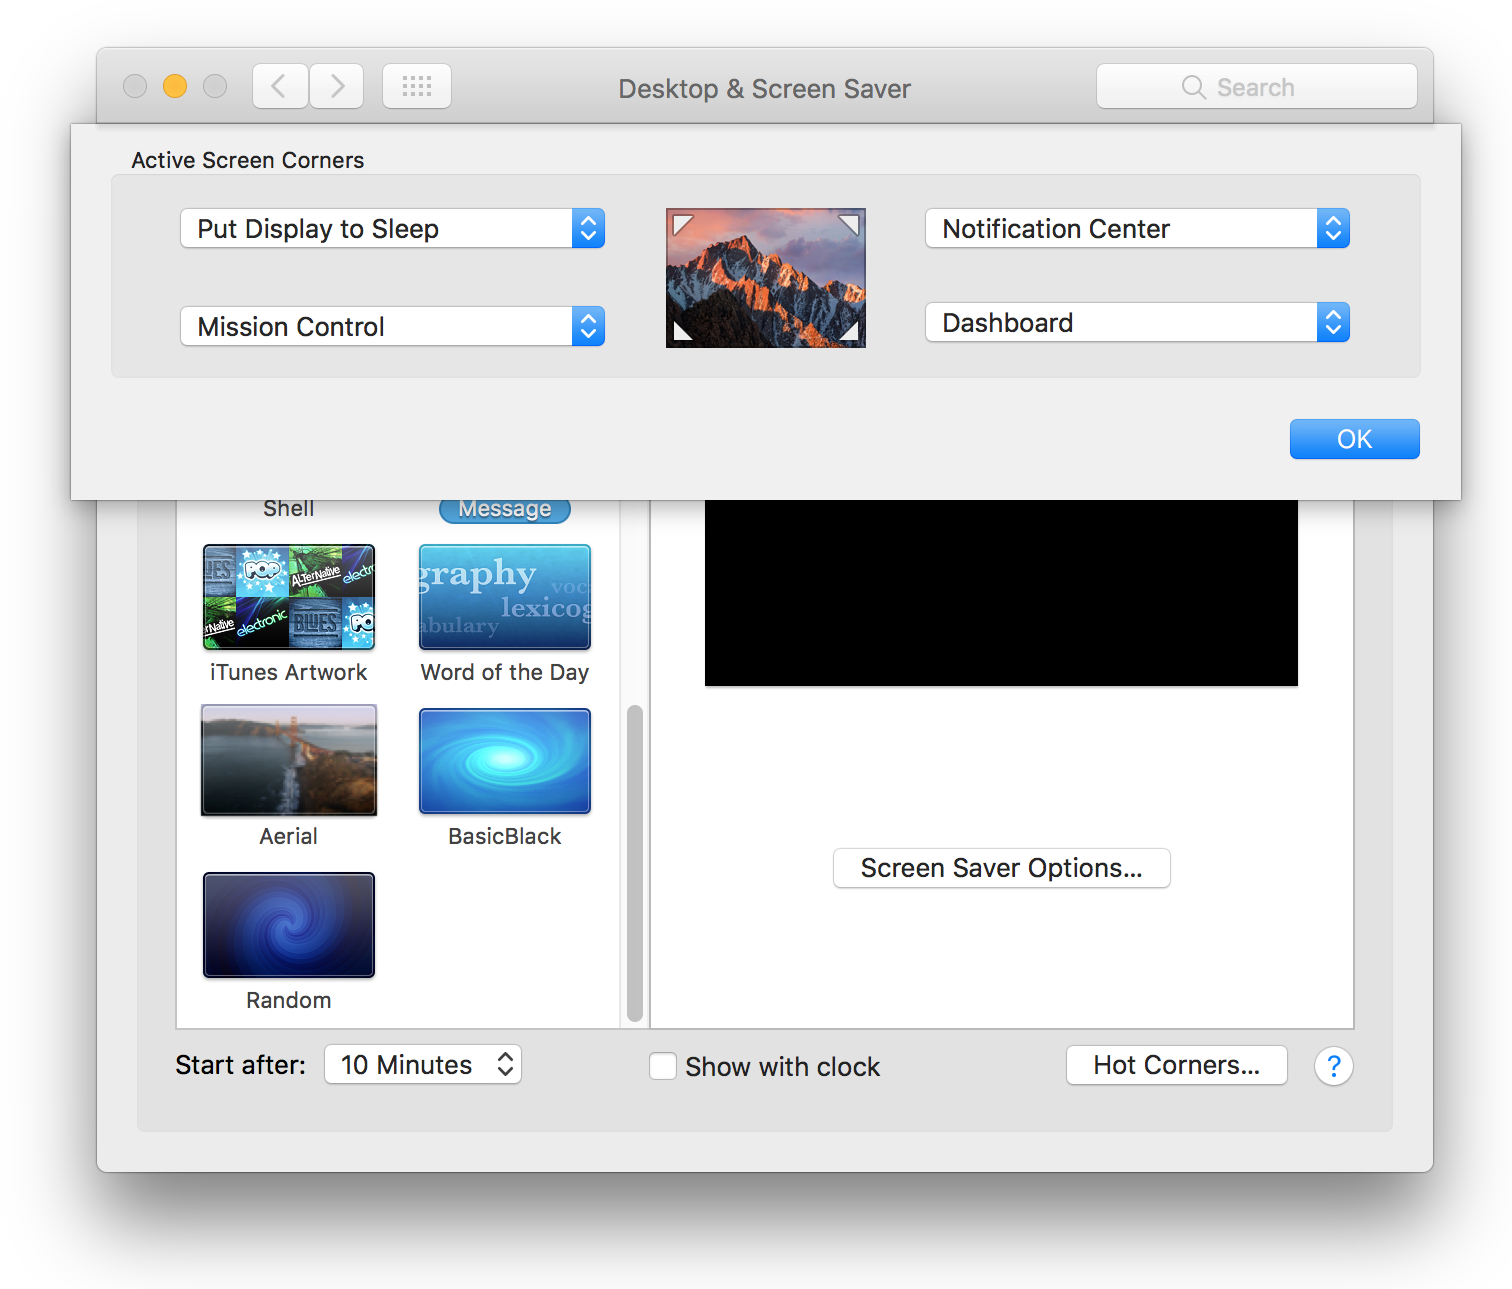
If you step away from your Mac, you should lock it to prevent prying eyes from snagging your information. You can enable a setting that requires a password to unlock your Mac as soon as it goes to sleep, or when the screen saver kicks in. And when you step away from your Mac, there’s an easy way to turn on the screen saver. You can set up hot corners, so when you move your cursor into the corner of your screen, the display goes to sleep and the screen saver engages immediately.
The above is useful if you want to leave your Mac on when you step away from it; for example, if you’re downloading something, and don’t want to interrupt the download.
Read How to Lock Your Mac Screen and Protect It from Prying Eyes for more tips on protecting your Mac when you step away from it.
Protect Your Mac and Your Data
1. Turn on Find My
Many Apple devices use the Find My app to indicate their presence. You can use Find My to locate a lost iPhone, track AirTags, and find your Mac if it gets stolen. The Find My app is more than just a tracker; it also locks your device, and allows you to erase it if it is lost or stolen.
Find My is linked to your iCloud account, so to find a device, mark it as lost, or erase it, you can use any other Apple device, or even use the iCloud.com website.
Find My is one of the best ways to protect your data. Read How to Use the Find My App to Locate Friends, Apple Devices, and AirTags to learn more about the Find My app.
2. Install Mac antivirus software
Most universities recommend that their students install antivirus software, in part because of the vast number of people using their computer labs, swapping data files, and a wide range of other online activities students take part in. Downloading files and exchanging files with others is fraught with risks. Wherever there are a large number of computer users concentrated in a small area who feel safe exchanging files with each other — such as in a university or large company — security is only as strong as the weakest link.
3. Use VPN software
If you absolutely must go shopping online and only have access to public Wi-Fi, such an at an airport, a coffee shop, or some other location on a free, public Wi-Fi network, consider using VPN software. Virtual Private Networks (VPN) encrypt all data from your computer or mobile device, protecting your Mac from people sniffing the network, attempting to grab data to look for user names, passwords, credit card numbers, and more. They also prevent your privacy by masking your IP address, so websites won’t know where you are. And since your communications are encrypted, your ISP can’t keep track of your browsing history.
4. Avoid illegal file sharing
Installing pirated software is not only illegal, but it also puts your personal information at risk. Pirated software is a common way for malware authors to spread their wares, as many people still believe they can get something for free without realizing the potential consequences. Plenty of Mac software has been laden with malware in recent years, and downloading this type of software is extremely dangerous.
5. Establish a backup solution
Using Time Machine backups, you can have a snapshot of your Mac to return to in case disaster strikes. But the best backup is one that you have in multiple locations. It’s important to have another copy of important data (or a clone of your whole system) on an external hard drive. Intego Personal Backup, part of Mac Premium Bundle X9 lets you schedule automatic backups for quick and easy recovery from unfortunate incidents life theft, data corruption, or natural disasters. You can synchronize files between two Macs, so that each machine has the latest, most updated files, as well as create a bootable backup in case you’re having system problems and can’t access your files.
These are all good security rules to adhere to, ensuring you don’t fall victim to the next big threat. There are no perfect remedies to protect your Mac and your privacy, but these tips will make it much more difficult for attackers to access your data. Take heed and your Mac should be secure and your information private.
How can I learn more?
 Each week on the Intego Mac Podcast, Intego’s Mac security experts discuss the latest Apple news, security and privacy stories, and offer practical advice on getting the most out of your Apple devices. Be sure to follow the podcast to make sure you don’t miss any episodes.
You can also subscribe to our e-mail newsletter and keep an eye here on Mac Security Blog for the latest Apple security and privacy news. And don’t forget to follow Intego on your favorite social media channels: Facebook, Instagram, Twitter, and YouTube.

