How To + Recommended + Software & Apps
Why and how to use a VPN on your Mac or iPhone
Posted on
by
Derek Erwin

We’re firm believers that if you wish to stay safe online, you should use more than one layer of security. Mac anti-virus software, for instance, protects you from malware, but it doesn’t hide your digital footprints. So long as your Internet use can be tied to your unique IP address, this information can be used to track you. This is why some people choose a virtual private network (VPN) to connect a device or computer to the Internet.
There are many ways to maintain online privacy, and we’ve previously outlined some steps you can take to keep your digital life hidden from others. If your goal is to avoid being tracked online, then you should definitely consider using a trusted VPN when accessing the Internet.
While many VPN options exist, if you’re on the road and want to avoid the dangers of public Wi-Fi hotspots that could enable “man-in-the-middle” attacks, you can use a VPN on a router to protect your mobile devices on the go. But most VPNs are subscription services, which we’ll cover in this article, and do not require purchasing a new router.
There is nothing illegal about using a VPN to access online content — if you stay within the confines of what content you are allowed to access and from where — and VPNs can provide a powerful extra security measure in your fight to protect your data. Today we’ll explain how VPNs work, and what you can do to set up a VPN with iOS and macOS.
How does a VPN work?
Virtual Private Networks involve accessing a server run by a provider via an encrypted connection. VPNs offer a number of distinct advantages, including the following:
- Privacy: because the connection between your device and the VPN server is encrypted, nobody can see what data passes along that “tunnel.” The VPN provider can see your data (since it is at the end of the tunnel), but effective providers go to great lengths to distance themselves from knowing anything about their customers and their online activities; they keep little or no logs, use shared IPs so individual users cannot be identified and utilize other measures.
- Hiding your IP address: all of your Internet traffic will appear to originate from the IP address of the VPN server rather than your own.
- Location spoofing: because your IP address appears to be that of the VPN server you are connected to, and because most VPN providers offer servers in numerous different countries, it is easier to access global information and content using a VPN.
- Safe access to public Wi-Fi hotspots: all data between your device and the VPN server is encrypted, so even if you connect to a fake or a hacked public Wi-Fi hotspot, your data is safe.
What do you need to use a VPN?
There are different methods used to connect to a VPN server, known as “protocols.” Of the classic VPN protocols, OpenVPN is the most secure, followed by IPSec (either L2TP or IKEv2) and lastly PPTP. By its self, however, OpenVPN is technically not the protocol, it is open source software that implements its own proprietary, incredibly secure protocol. IPSec and PPTP are actual protocols built into iOS and macOS, and can be configured manually in the operating system’s settings, while OpenVPN requires additional software. More recently, WireGuard and Lightway have become popular VPN protocols offered by some commercial VPN solutions.
Many VPN service providers have dedicated OpenVPN clients for macOS that make the setup process a breeze. Yet for the iPhone and iPad, while iOS VPN apps can be easily downloaded from the App Store, these all use IPSec and PPTP. There are, however, generic open source apps available for both iOS and macOS that allow OpenVPN to be configured manually.
In addition to a VPN app (that is not required if configuring L2TP or PPTP manually), you may need a subscription to a VPN service, which typically costs between $5 to $10 per month. Cheaper and free VPN services are available, although care should be taken with these if it is not clear how the organizations finance their expensive-to-run operations.
Finding the right VPN service provider
Choosing to use a VPN is a common decision these days, but finding the right service can be a bit challenging. There are many VPN providers to choose from; here are some of the ones we trust:
- Intego Privacy Protection (Mac and Windows)
- Private Internet Access (Mac, Windows, iPhone, Android, and Apple TV)
- ExpressVPN (Mac, Windows, iPhone, Android, and Apple TV)
- CyberGhost (Mac, Windows, iPhone, and Android)
While there are quite a few options, there are also various factors you should consider when identifying which VPN service provider is right for you. In terms of both features and services, what makes one VPN service stand out from another?
There are several things that can differentiate VPN services: price, speed, locations, additional services (DNS proxy, socks5, http proxy), and, of course, privacy (if they log a user’s activity). As you can see, the most effective VPN solution will vary depending on your particular needs.
Is a free VPN safe to use?
If price is a concern for you, you might be curious about “free” VPN services. The idea of getting anything for free can be alluring, but think carefully when it comes to protecting your privacy. It costs a lot of money to run a VPN service; you need to pay for servers and bandwidth, pay your staff salaries, and more. Therefore, if a VPN service claims to be “free,” it’s wise to be very skeptical; chances are, if you’re not paying for it, then you’re the product—in other words, the company might be using and selling your data.
Related article:
Now, on to the practical elements of setting up a VPN. In the examples below — first with iOS, then with macOS — we’ll explain the setup steps to access a VPN service provider using the OpenVPN application.
How to use your VPN with your Mac
Just as with getting set up on mobile, for maximum compatibility and features using your VPN with your Mac, your best bet is to download and install the app designed for your chosen VPN service. The aforementioned recommended VPN services all have apps available via their Web sites for macOS (as well as Windows, Android, and other platforms):
- Intego Privacy Protection (macOS 10.14 or later)
- Private Internet Access for Mac (macOS 10.14 or later)
- ExpressVPN for Mac (macOS 10.13 or later)
- CyberGhost VPN for Mac (macOS 10.13 or later)
One you’ve installed the app, you’ll then have a new menu in the bar across the top of your screen, from which you can activate or deactivate the VPN or change your settings.
How to use your VPN with iPhone or iPad
For maximum compatibility and features, your best bet is to download and install the VPN app designed for your chosen VPN service. The VPN services mentioned above all have apps in the App Store (for iOS and iPadOS, and in two cases tvOS):
- VPN by Private Internet Access (iPhone/iPad/Apple TV)
- ExpressVPN – VPN Fast & Secure (iPhone/iPad/Apple TV)
- CyberGhost VPN: Safe Wi-Fi Proxy (iPhone/iPad)
One you’ve installed the app, open the app and follow the instructions to begin using the VPN on your device.
What if your VPN service doesn’t have its own app?
Most commercial VPN solutions for consumers have their own apps. It’s generally best to use the app provided by the VPN company whenever possible, for maximum compatibility, support, and server options.
But perhaps the company you work for runs its own VPN, and they don’t officially support Apple devices. Then what can you do? We’ve got you covered. Here are our guides on how to use OpenVPN apps on your iOS/iPadOS devices or on your Mac.
How to manually configure a VPN on iOS
If your preferred VPN service doesn’t have its own app for Apple mobile devices (iPhone, iPad, or iPod touch), you can download the OpenVPN Connect app from the iOS App Store, and set it up as follows.
1. Your VPN provider will supply you with OpenVPN configuration files (.ovpn). Follow its directions on how to find these, and then download them onto your device.
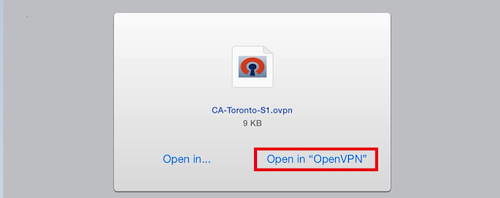
2. Once downloaded, select the .ovpn profile you want (these are typically named after the location of the servers they point to) and select Open in “OpenVPN”
3. Click the + icon to import the new profile configuration

4. Enter the username (in this example: User ID) and password given to you by your VPN provider, and then ensure the Safe slider is switched to On.
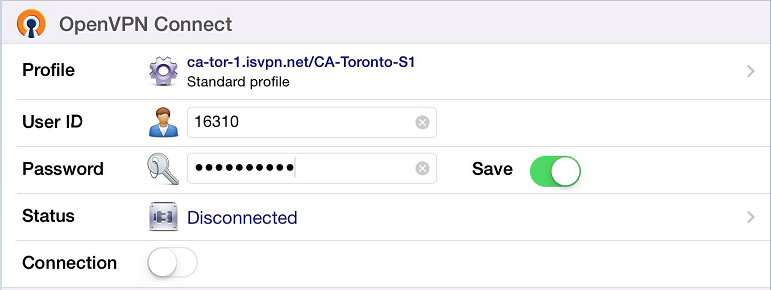
5. Tap the Connection slider to connect…
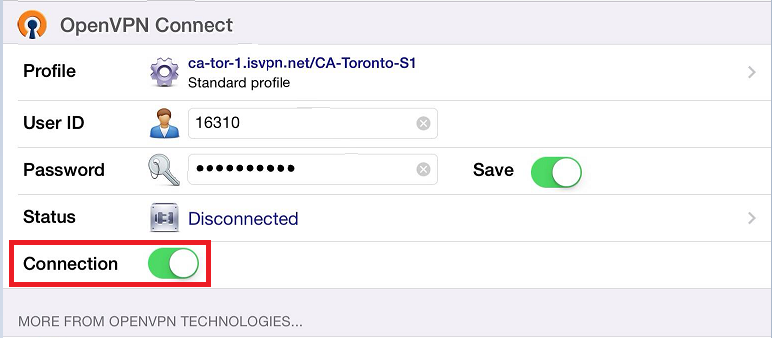
7. And voilà! Your iOS device is now connected to the VPN server. Just swipe the Connection slider left to disconnect once you have finished using the service.
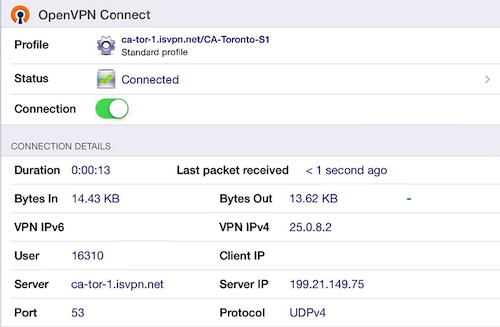
8. Additional profiles for alternative locations can be imported (simply repeat steps 3 – 4 for each profile). Then select a profile by tapping the arrow to the left of Profile in the main window and choose a profile.
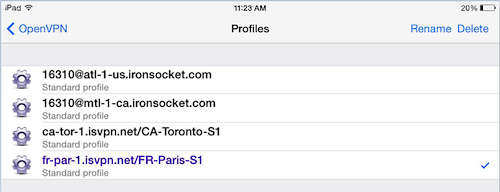
Tap OpenVPN at the top once a profile is selected to return to the main screen.
How to manually configure a VPN on macOS
If your preferred VPN provider doesn’t have its own Mac app, you can follow the steps below to set up an OpenVPN client.
1. Download, mount, and open an OpenVPN client installer for Mac (the instructions below are for OpenVPN Connect, but another popular OpenVPN client for macOS is Tunnelblick).
2. Install OpenVPN Connect (follow the guided steps in the installer).
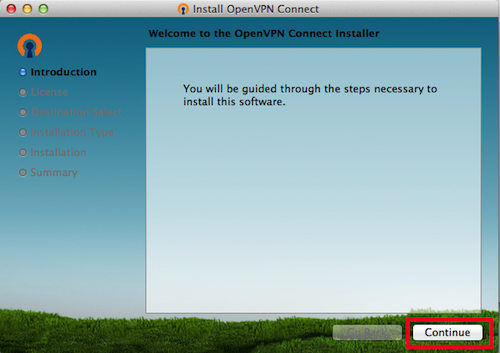
3. Your VPN provider will supply you with OpenVPN configuration files (.ovpn). Follow its directions on how to find these, and then download them onto your Mac.
4. Now that you have installed OpenVPN Connect, you will see an orange icon with an “X” on it in your menu bar. Click on it, and select Import > From local file.
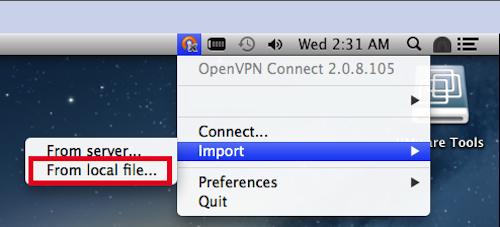
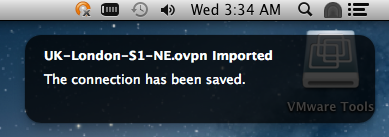
Once this is done, you will see a notification that tells you, “The connection has been saved.” Repeat this step to import more profiles.
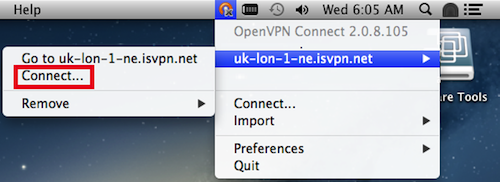
5. Click the OpenVPN Connect icon on the menu bar, and select the VPN profile you wish to use, and then click Connect…
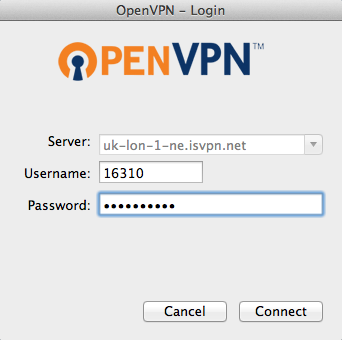
6. Agree to any warning messages about allowing VPN connection, and enter the username and password (given to you by your VPN provider) into the OpenVPN Login dialogue, before hitting Connect.
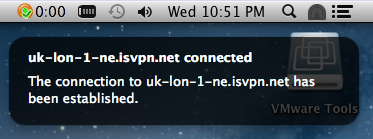
And, ta-da! You are now connected to the VPN service (a bubble notification will alert you to this).
To disconnect, click the OpenVPN Connect icon on the menu bar, which opens the OpenVPN menu, and then click Disconnect > the profile you are connected to (e.g. Disconnect > uk-lon-1.isvpn.net).
Stay invisible, my friends…
VPNs are a fantastic tool for improving your Internet security, and are something of a Swiss Army knife for protecting your privacy by allowing you to geo-spoof your location. OpenVPN is by far the most secure VPN protocol commonly used, and although setting it up can be a bit more laborious than simply using a provider’s custom software or manually configuring L2TP or PPTP, its use is strongly recommended (this is a particular issue with iOS, where OpenVPN is not built into custom apps).
Bottom line: Use a VPN to stay much more invisible online!
Where can I learn more?
Check out episode 15 of the Intego Mac Podcast, in which Intego’s experts discuss why you should use a VPN to protect your privacy online. Be sure to follow the podcast to make sure you don’t miss any episodes.
You can also subscribe to our e-mail newsletter and keep an eye here on The Mac Security Blog for the latest Apple security and privacy news. And don’t forget to follow Intego on your favorite social media channels: ![]()
![]()
![]()
![]()
![]()
![]()
![]()