How to use the Find My app to locate people, Apple devices, AirTags, and more
Posted on
by
Kirk McElhearn
Apple’s Find My app is a versatile tool for finding your friends and keeping track of your Apple devices. You can even use it to locate lost items that you’ve protected with AirTags, as well as some compatible third-party items. Perhaps you misplace your iPhone or your keys a lot; you can easily track them down. Need to meet a friend in a busy shopping mall? Apple’s got you covered there, too.
Find My is not only for finding people and items, but also for protecting your Apple devices. You can mark them as lost, and even erase them remotely, protecting your data. Here’s everything you need to know about how to use the app.
Find your devices
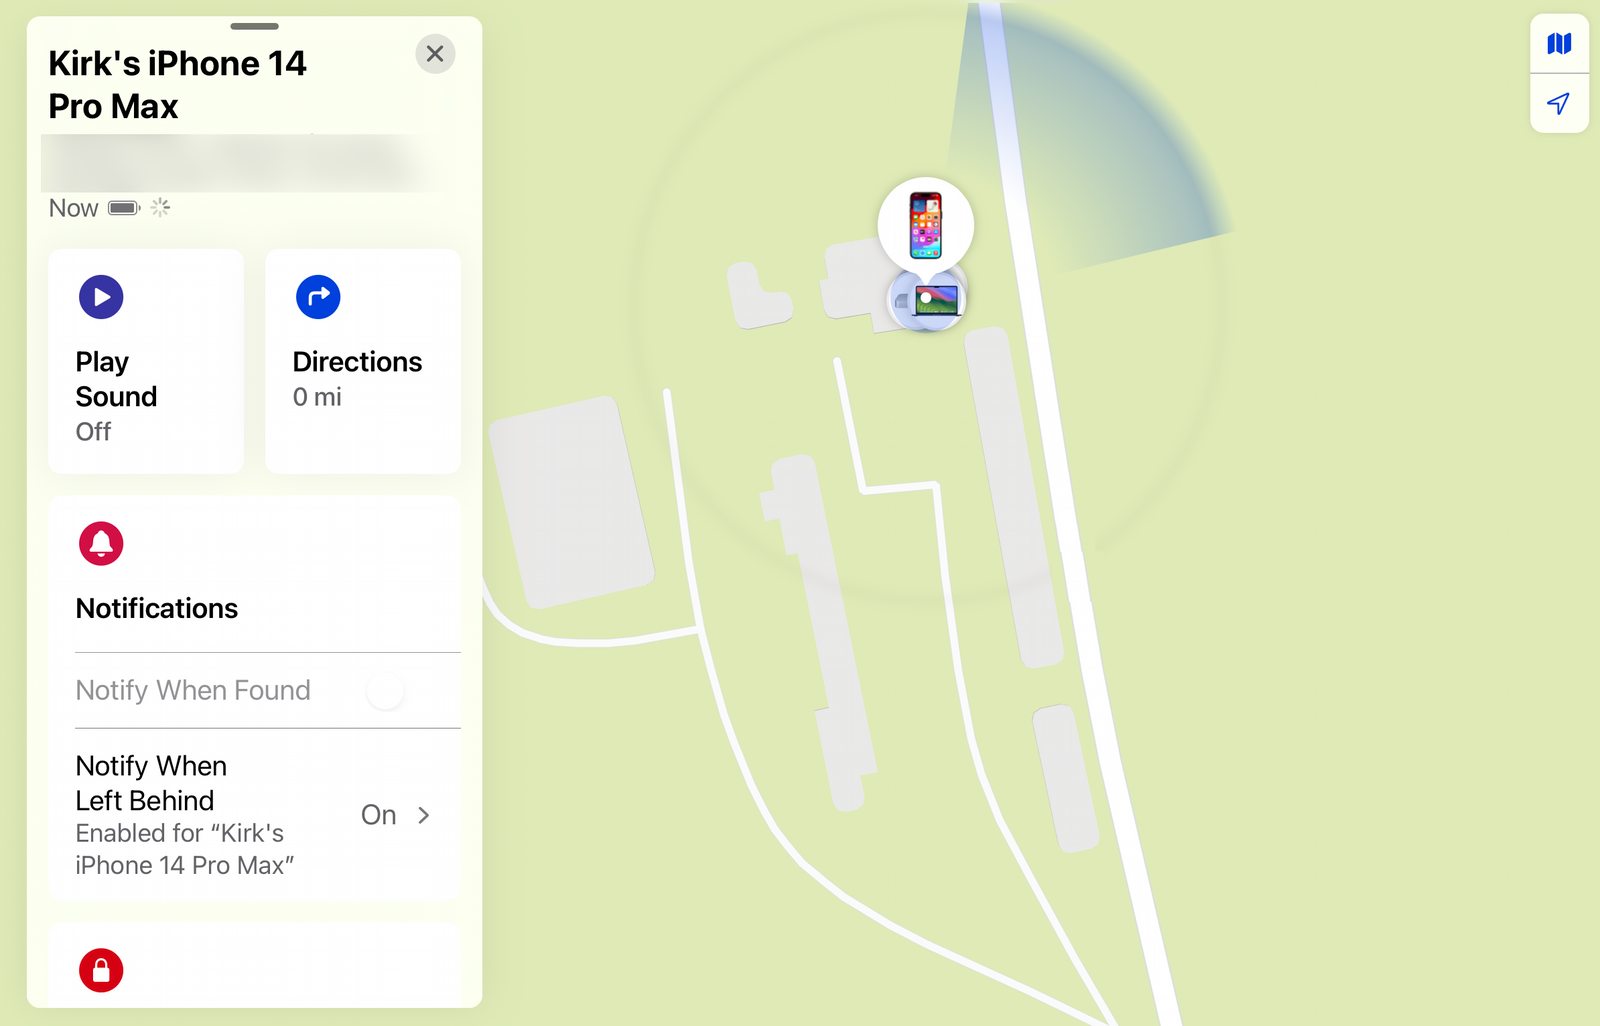
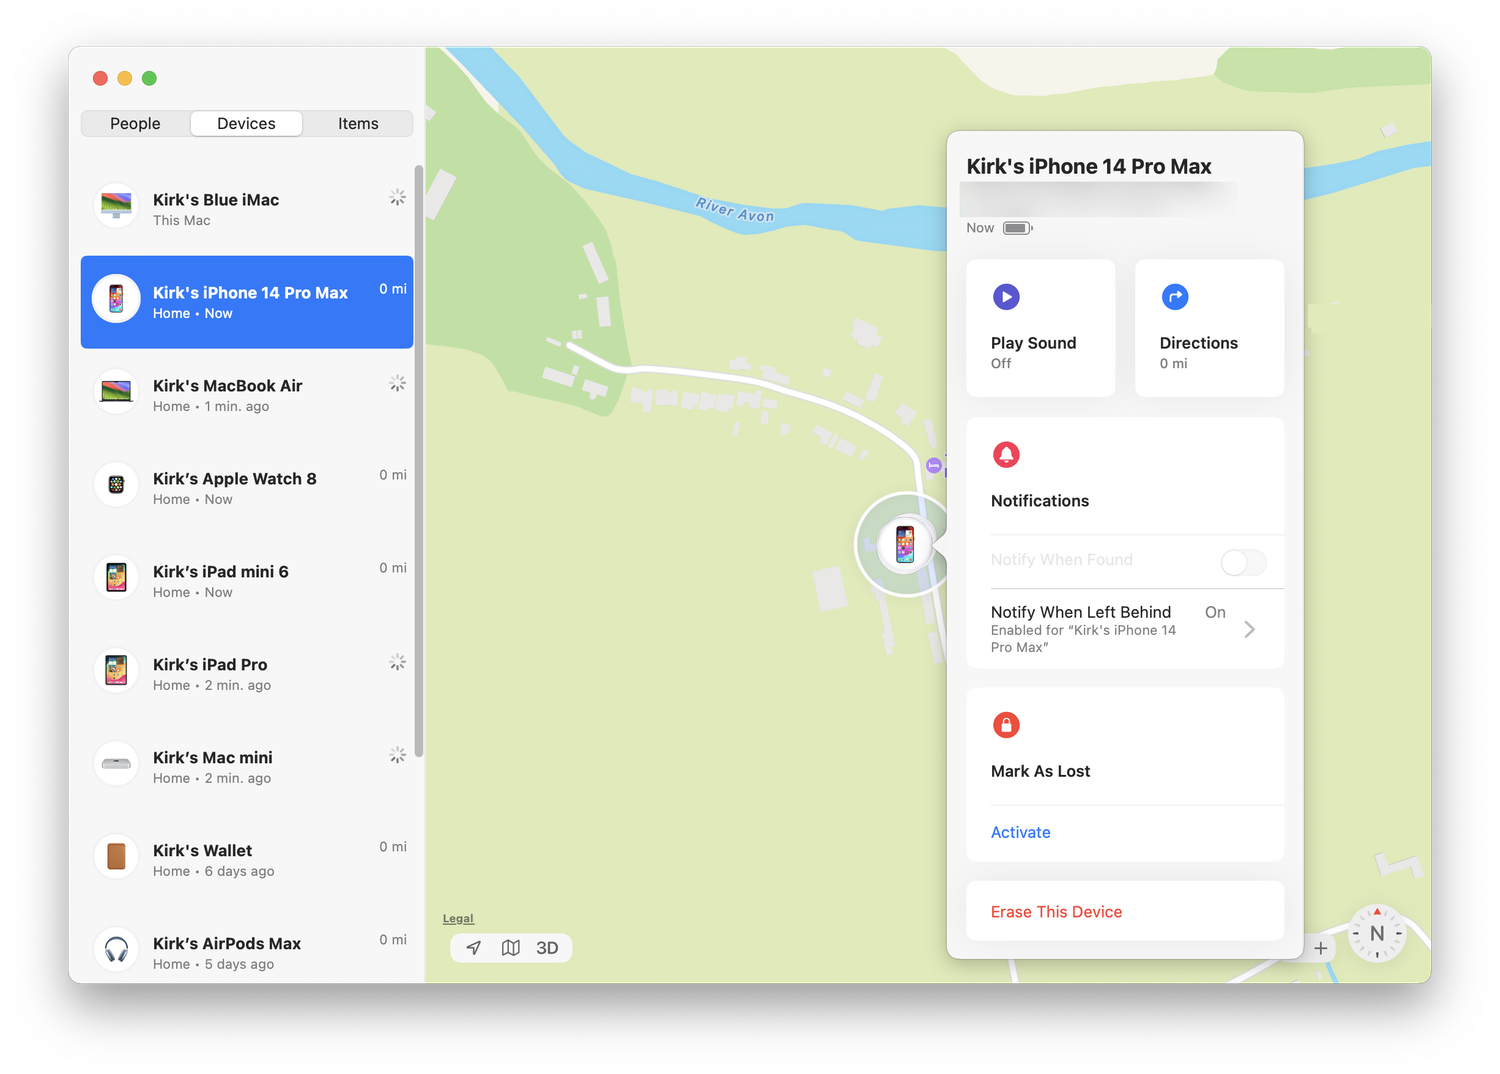
We all sometimes need to find our devices: our iPhones, iPads, Macs, Apple Watches, and even our AirPods. Your iPhone may have slipped between the cushions of your sofa, or you may have left it at work. You may have forgotten where you put your iPad last night. And one of your AirPods may have gone missing.
With the Find My app, you can find the location of a missing device, have it play a sound — great if it’s at home and you can’t locate it — or in a worst-case scenario, you can mark the device as lost and erase it. You must turn on the Find My setting on each of your devices (other than AirPods), in their iCloud settings to ensure that if you do lose a device, you can remotely wipe it to protect your data.
With the Find My app, you can even locate devices that aren’t connected to Wi-Fi or a cellular network. As long as these devices have power, they will emit a secure, low-energy Bluetooth signal, and other Apple devices with iOS 13, iPadOS 13, or macOS Catalina or later will be able to help crowdsource their locations.
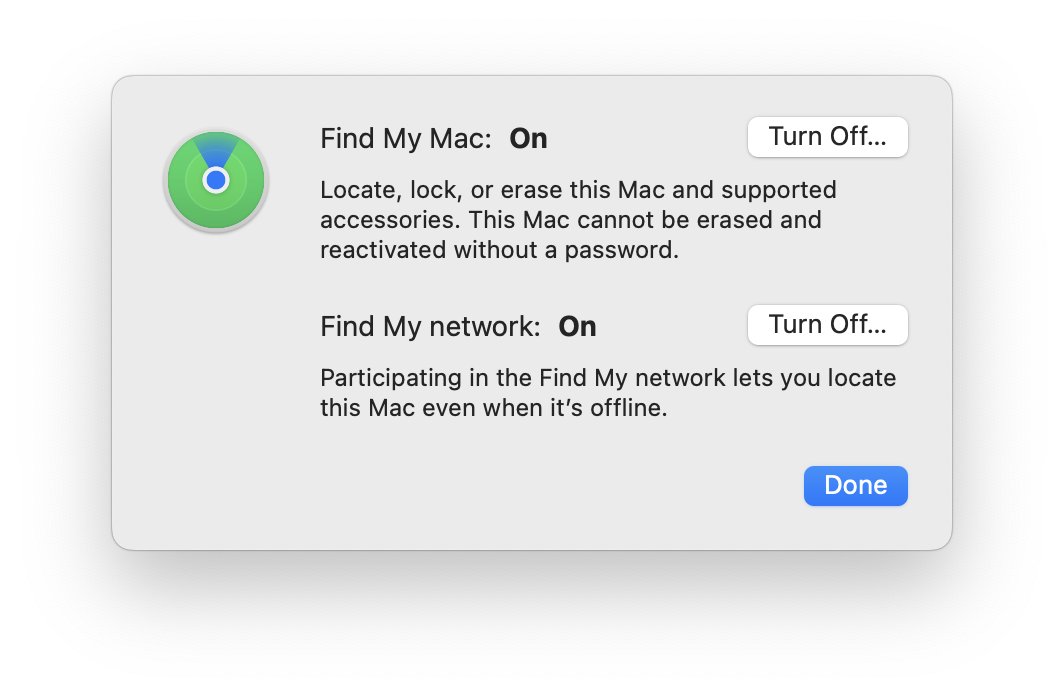
How to enable Find My Mac
To ensure that this feature is active on your Mac, go to System Settings, click your Apple ID, then click iCloud. Click “See All” (or “Show More Apps”), look for Find My, and ensure that it’s set to On. If it says Off, click on it, and then click Turn On…; note that both “Find My Mac” and “Find My network” should be set to On.
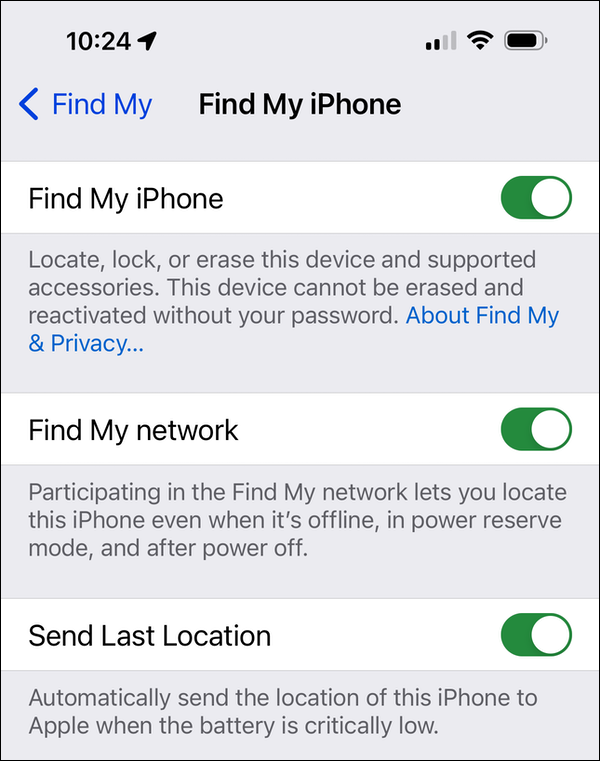
How to enable Find My iPhone or Find My iPad
On an iPhone, iPad, or iPod touch, go to Settings, tap your name at the top of the screen, then tap Find My > Find My device (e.g. Find My iPhone or Find My iPad) and toggle Find My Network. You should also ensure that Send Last Location is on, so your device will continue to send its location until it runs out of power.
How to locate a family member’s lost devices
Find My works with more than just Apple brand devices like Macs, iPhones, iPads, Apple Watches, AirPods, and AirTags. It also works with some Beats headphones (an Apple-owned brand). Even some third-party devices are compatible, such as the Chipolo Card Spot, a card you can put in a wallet that is thinner than an AirTag; VanMoof bicycles; the Ember Travel Mug 2; and more.
Different devices offer different options. For a Mac, iPhone, iPad, or Apple Watch, you can view the device’s location, play a sound, put it in lost mode, erase it, or trigger activation lock. When you put a device into lost mode, you can also add contact information, so if someone finds it they get in touch with you. It’s worth noting that the sound that these devices play is a fairly high frequency, and may not be easy to hear for people with hearing limitations.
How to locate lost AirPods
For AirPods or AirPods Pro, you can view a location and play a sound. For AirPods Max, they must not be in their case for Find My to work (putting AirPods Max in their case puts them into deep sleep mode). Even if you can’t locate devices right now, you’ll see their last location and the time they were last seen in the Find My app. Depending on the AirPods model, you may be able to get precise directions to locate them. (See below.)
How to locate a family member’s lost devices
Note that if you are using Family Sharing, all your family’s devices will show up in your Find My app, so you can help track devices used by your children, partner, or spouse.
Finding your friends and family
The People tab of the app lets you locate friends or relatives who have shared their location with you (either permanently or temporarily). This can be useful if you want to keep tabs on your kids, or if you’re planning to meet a friend somewhere and want to make it easier to find them. All your friends who are sharing their location show up in the app. You can set notifications to get alerted when they arrive at or leave a specific spot.
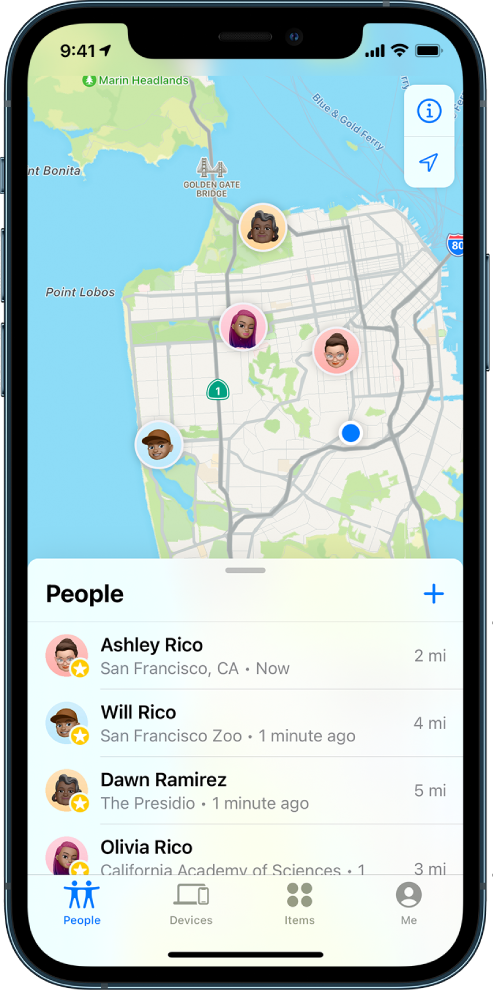
You can get directions to where your friends are, view their contact cards, and edit the name of the location where they are. And, if you have lots of friends, you can add your besties to a favorites list.
How to share your own location
In order to find your friends, one of you has to share their location, and the other has to accept. You can do this in two ways. The first is from the Friends tab; tap Share My Location and type in the name of the person with whom you want to share your location.
You can also do this from the Me tab of the Find My app on iOS or iPadOS. Here you’ll have more options.
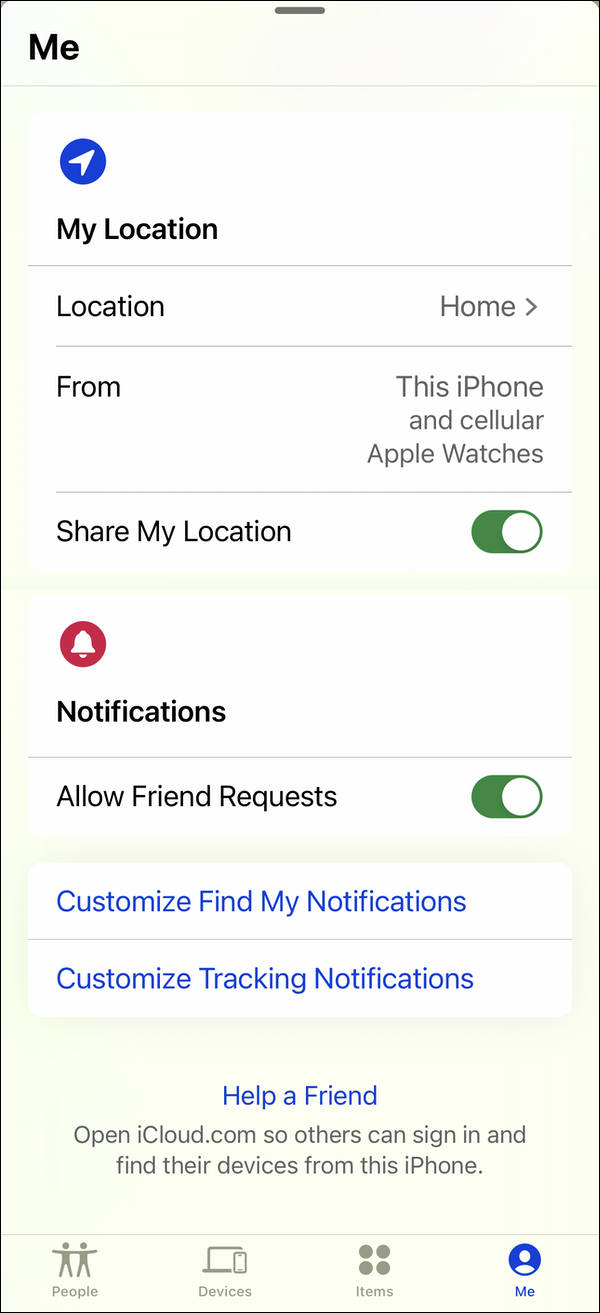
Here you can toggle your location sharing on or off, decide if you want to allow friends to ask to share your location, receive location updates, and edit your location name. For example, you might want to edit the names of your home and work locations, so friends will know precisely where you are, but also other locations such as the gym, the supermarket, your kids’ school, etc. Otherwise, you’ll just see the closest addresses to that location.
The Apple Watch also offers three Find My apps: Find Devices, Find Items, and Find People. Settings for these are in each of the apps on the Apple Watch. They inherit devices, items, and friends that you’ve set up on other devices.
How to find items
Apple has integrated AirTags into the Find My app. You can keep track of your keys, wallet, baggage, and much more with AirTags. You can access a total of 32 items using the Find My app, but some items count as more than one. Apple notes that “AirPods Max count as one item, AirPods and AirPods Pro 1 count as two items, and AirPods Pro 2 count as three items.” For more on AirTags, see our article, Apple AirTags: The Complete Guide – How they work, what to track with them, and more.
In addition to AirTags, there are a number of third-party tracking devices that are compatible with the Find My network. These include wallet cards, tags, and other devices, and some products, such as earbuds and even chargers, have built-in Find My support. These devices generally don’t support precision finding (see below), but will help you zero in on a lost item.
AirTags benefit from Apple’s network of nearly one billion devices. When a device with Find My comes near an AirTag, it records its location, and sends it to Apple, anonymously, so you won’t know that this occurs, and no one will know that you’ve been near an AirTag. Since there are so many iPhones and iPads in the world, I was able to track an AirTag I sent to a friend by mail.
How to track AirTags
You track AirTags as you would any Apple device. Click on tap one in the Find My app, and you’ll see its approximate location.
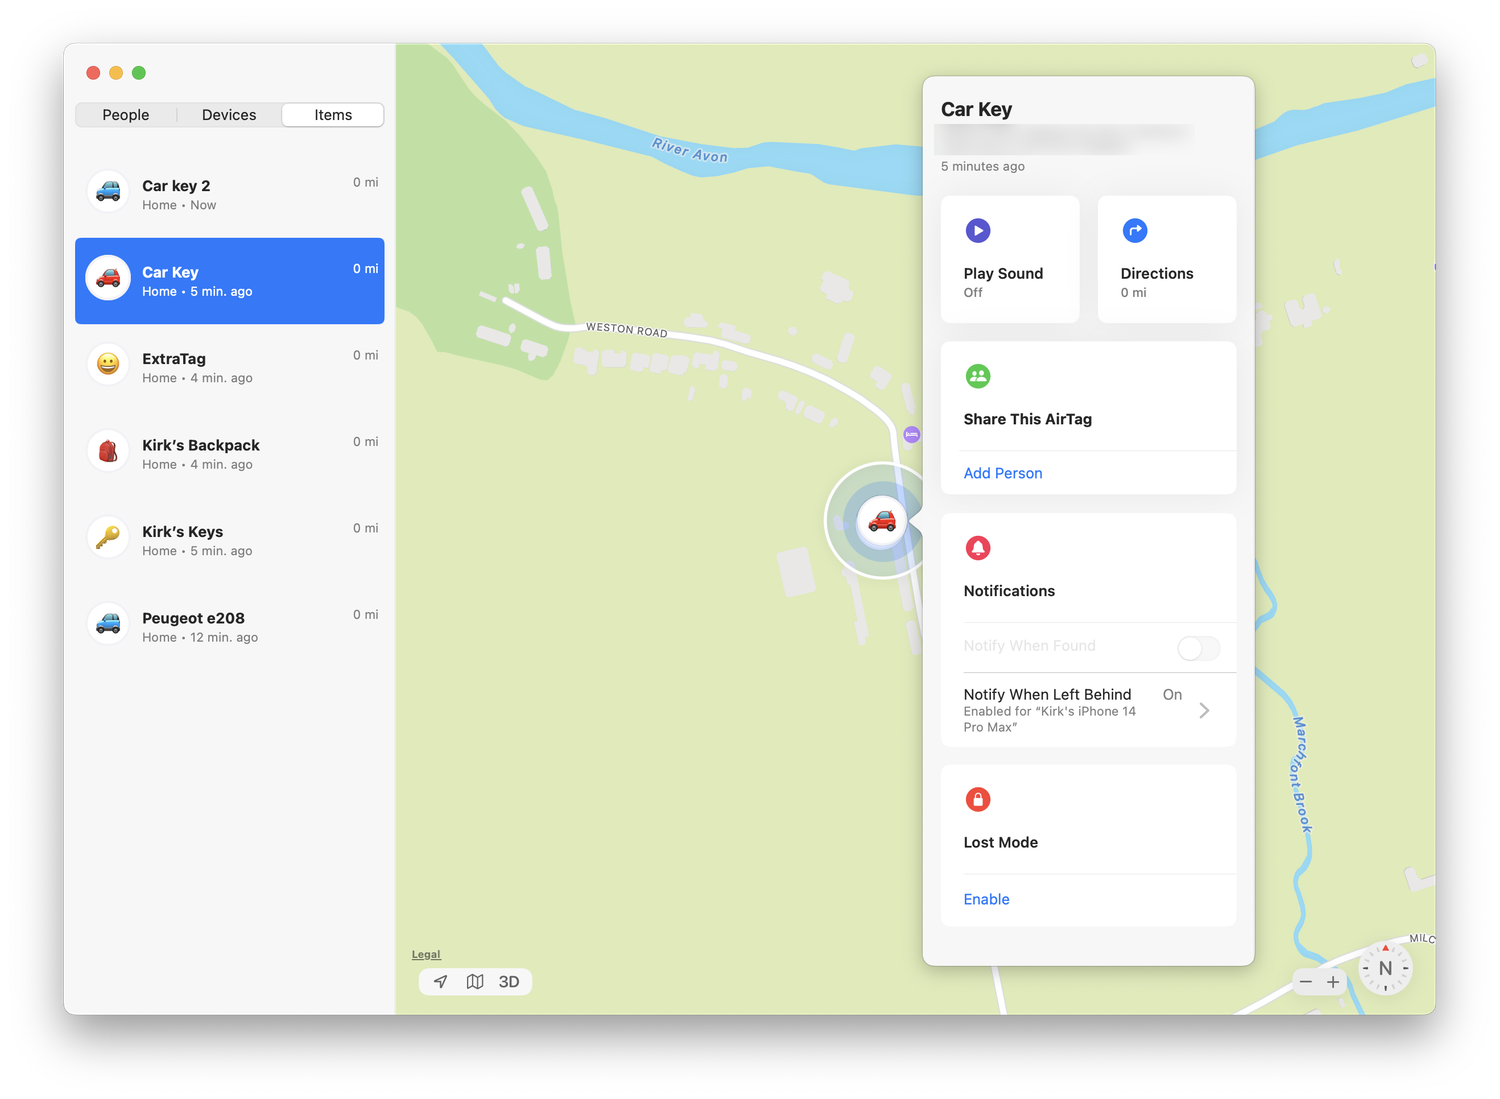
You can have the AirTag play a sound, or get directions to its location. If its current location is unknown, you can get a notification when it’s found, and put it in lost mode. If you do the latter, you can add a message that will display if someone finds the AirTag and holds it near their phone. You can include your phone number and a message, so the person who finds the AirTag can contact you.

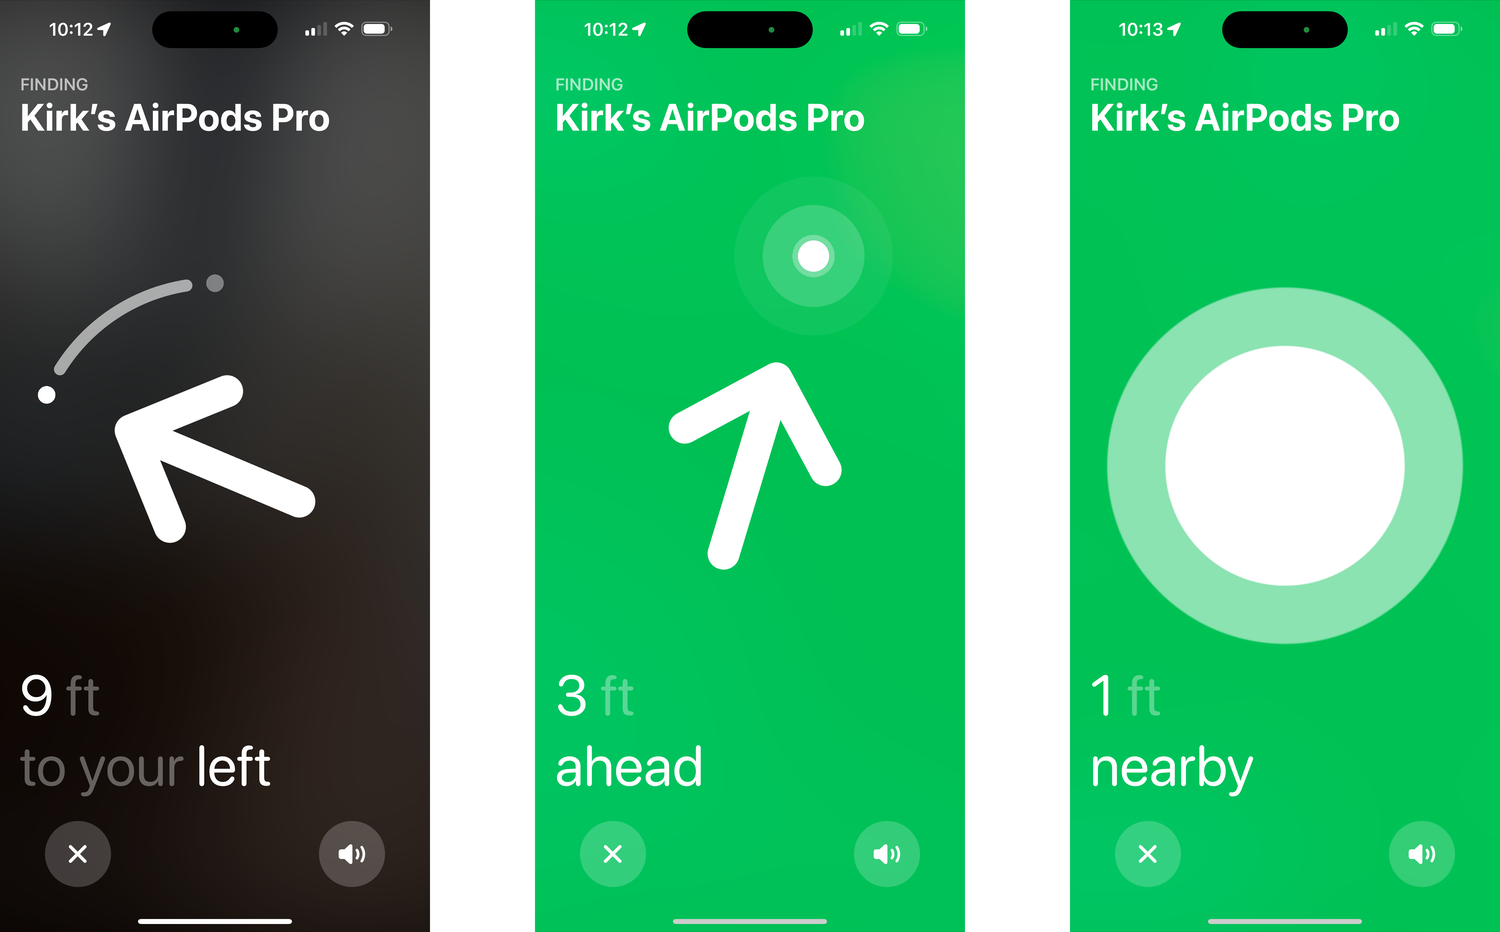
If you’re near an AirTag or a device, with an iPhone 11 or later, you can get precise directions to locate the device or AirTag. Your iPhone will show you, with arrows, which way to go, how far you are from the AirTag, and will tell you when you’ve gotten right next to it. Your iPhone will vibrate as you get closer to the item.
Another useful feature with AirTags is the ability to be notified if you’ve left an item behind. Click the icon for an AirTag in the Find My app, then click the i icon. You see this:
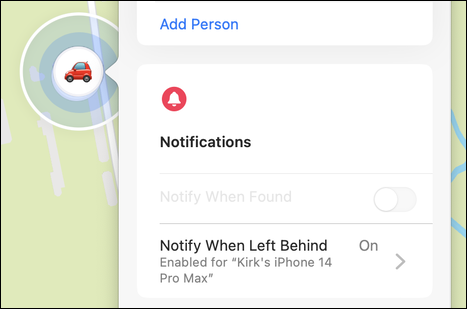
Click Notify when Left Behind, and you see this screen:
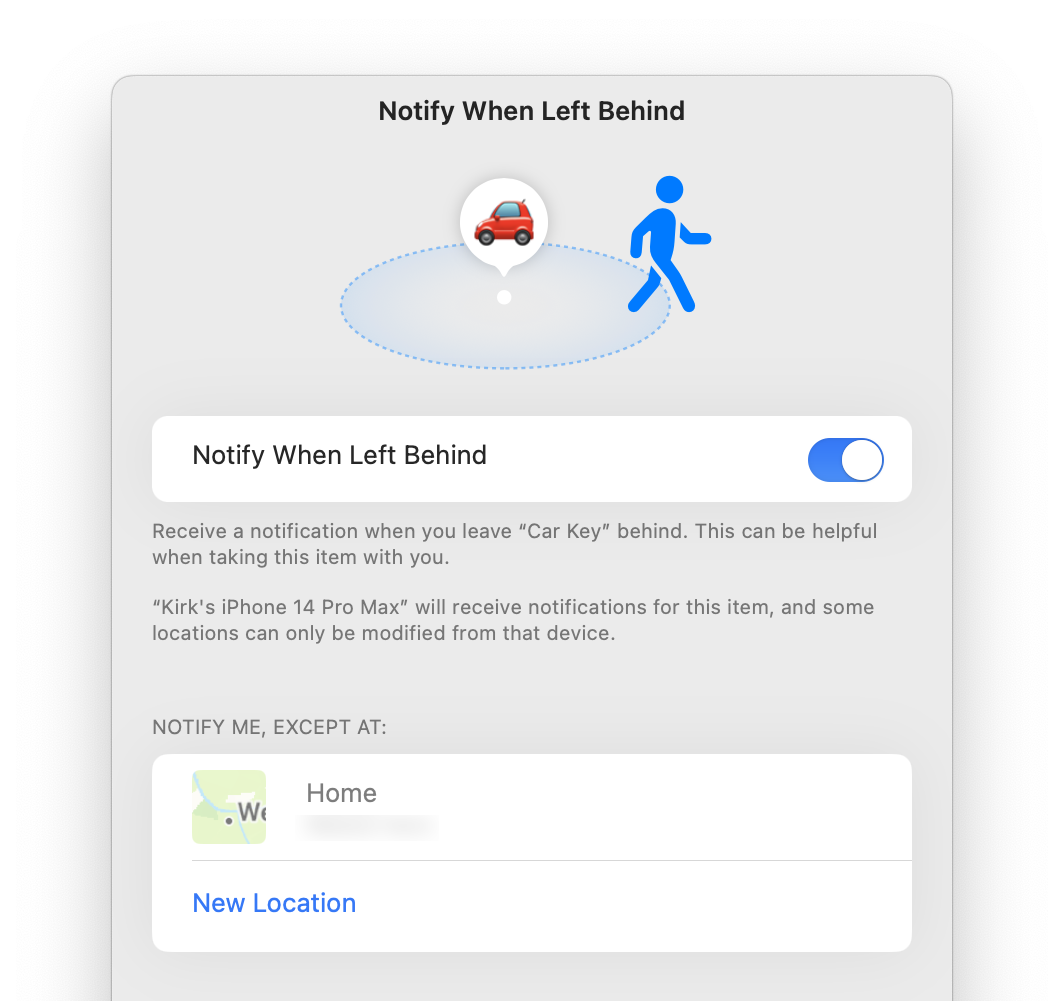
Toggle Notify When Left Behind, and you’ll get alerted on your iPhone if you leave a location without the AirTag. If you don’t want notifications when you leave certain locations, click the suggested location; this is your current location. Or click New Location and choose where you want to not be notified.
How to use Find My on iCloud.com
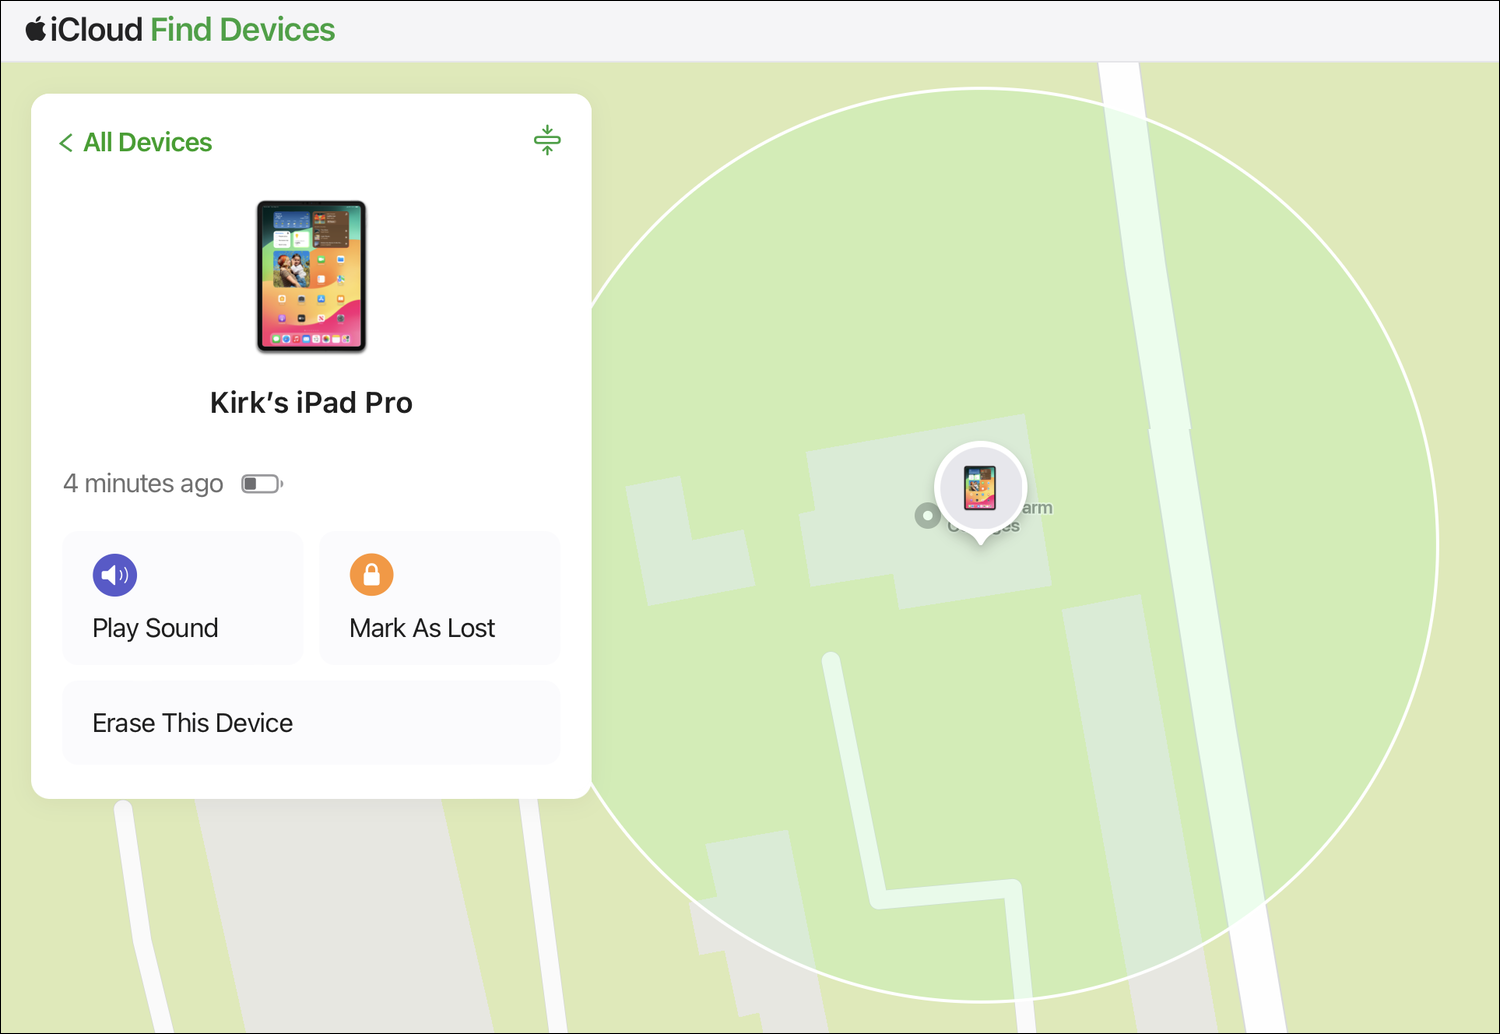
You can also use Find My on the web, at Apple’s Find Devices page on iCloud.com. From the menu at the top, you can choose a specific device; then you can play a sound, put the device in lost mode, or erase it.
How to help a friend find a device
You can also use the Find My app to help a friend locate a device. Let’s say a friend has lost or misplaced their iPhone. Open the Find My app on any of your Apple devices, and tap the Me tab. Then scroll down and tap Help a Friend. This opens a page on iCloud.com, where your friend can sign into their account. From there, they can use your device to access the Find My network. Then you can locate their device, put it in lost mode, or erase it.
When a friend signs into their iCloud account via this link, they can only access the Find My page of their iCloud account. They also do not need to approve the sign-in via two-factor authentication, since access is limited to finding devices. This wouldn’t be possible if they have lost their only device, or have no device handy to receive the two-factor codes.
Putting an iPhone in repair state
When Apple released iOS 17.5 in May 2024, they added a new feature to the Find My app: Repair State. In Apple’s tech support document about preparing your iPhone for service, they tell you to turn off Find My. “To prevent anyone else from getting service for your device without your knowledge, Apple might not be able to service your device if Find My isn’t turned off.”
That last bit is a confusing double negative; so, to rephrase: “Apple might not be able to service your device if Find My is on.”
Repair state only works for iPhones, though this may be expanded to other devices in the future. You can enable the repair state via this app, though it’s not obvious. Open the Find My app, tap Devices, then tap your iPhone. Scroll down and tap Remove Device. Since Find My is active, a dialog displays asking if you want to prepare this device for repair.

Tap Continue to put the device into a repair state. For now, there is no way to manually disable repair state; this can only be done by Apple or by authorized repair partners.
The Find My app is a great way to protect your Apple devices. You can even use it to let friends locate you and vice versa, and track down lost items with AirTags.
How can I learn more?
 Each week on the Intego Mac Podcast, Intego’s Mac security experts discuss the latest Apple news, including security and privacy stories, and offer practical advice on getting the most out of your Apple devices. Be sure to follow the podcast to make sure you don’t miss any episodes.
We discussed mailing AirTags and more in episode 187 of the Intego Mac Podcast.
You can also subscribe to our e-mail newsletter and keep an eye here on The Mac Security Blog for the latest Apple security and privacy news. And don’t forget to follow Intego on your favorite social media channels: ![]()
![]()
![]()
![]()
![]()
![]()
![]()

