How To + Recommended + Security & Privacy
This Home VPN Router Setup Protects Your Traffic Wherever You Are
Posted on
by
Kirk McElhearn
Computer, smartphone, and tablet users face all kinds of security threats. When at home or at the office, you’re protected, in part, by your firewall and other security software. Yet when you’re away from your usual networks, risks abound. So you may be wondering a few things, such as what is the security concern when connecting to Wi-Fi networks? How the heck can you protect your traffic on public networks? And is a VPN router setup the right solution? These are all good questions that I’ll clear up, giving you the tools you need to protect your computers and smartphones when on the go.
What’s the Security Concern with Wi-Fi Networks?
It is possible — and increasingly common — for malicious people to “sniff” traffic on public Wi-Fi networks, looking for information. They try to catch your user names, passwords, and any other data that may identify you, and then try and access your accounts or even steal your identity. This happened to my partner recently. She had used a public Wi-Fi network on a roadside rest stop, and suddenly found that she needed to change a number of her passwords. No one had hacked into any of her accounts, but attempts had been made to reset some of her passwords.
Furthermore, a recently discovered malware, called AceDeceiver, attacks iOS apps — even those downloaded from the iTunes Store — thus, enabling “man in the middle attacks,” whereas an attacker intercepts your data over a public network. For now, AceDeceiver has only been spotted in the wild in China, but it could spread.
For this reason, you need to take extra precautions when you’re on public or unfamiliar networks. If you use a MacBook on the go, you can protect it with software such as Intego Mac Internet Security X8, which contains a powerful two-way firewall and a Mac anti-virus app. But with iOS devices, this is not possible; Apple has banned anti-virus apps from the iOS App Store, and also doesn’t allow apps to access the operating system in the same way, so your iPhone or iPad is at a much greater risk when you connect to unknown networks.
How to Protect Your Mobile Devices on the Go
There’s a way to protect your devices from man in the middle attacks wherever you are: You can use a virtual private network (VPN). This ensures that the data you send and receive is encrypted between your device and a server, ensuring that no one can sniff your traffic in a coffee shop, airport, or hotel. Most VPNs are subscription services, and cost from a few dollars to a few hundred dollars, depending on the speed and amount of data you use.
But there’s a better way to set up a VPN: You can buy a router that includes built-in VPN software, and then set it up at your home or office. When you’re on the road, you connect to that router, and the traffic between your laptop computer, iPhone, iPad or Android device is encrypted up to that point. After that, it goes out onto the Internet, but from a location that you know is secure. (And most routers also have firewalls you can activate to enhance their security.)
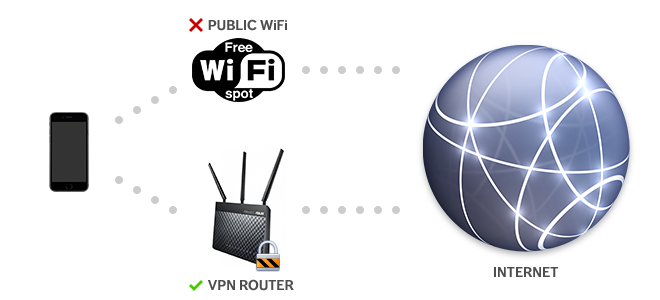
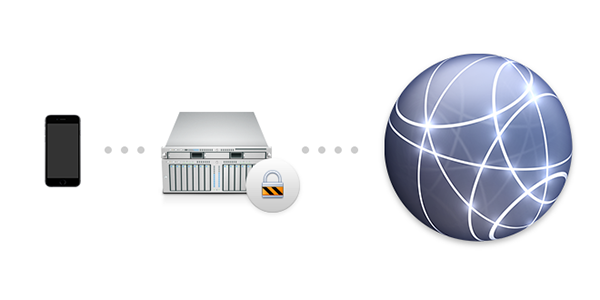
When connected to the router, all VPN traffic is encrypted.
As you can see, with the end-to-end encryption of a VPN, you can rest assured that you won’t fall pray to a man-in-the-middle attack. So far, so good? Good! Keep reading, and I’ll explain how you can set up a VPN-enabled router at home or at work, and tell you how you can use it to ensure your mobile device’s traffic on public networks is secure.
Step 1: Choose a Router with Built-In VPN Software
The first thing you need is a router with built-in VPN software. You certainly already have a router at home, and your employer does as well. In this article, we’ll look at a simple home router; we won’t cover more complex situations, such as large companies, where a server is used as a router, offering not only a VPN, but also advanced routing and network traffic management services.
Depending on how you access your Internet connection, you’ll either need a router, or a combination modem/router. In the United States, most ISPs provide modems that are simple pass-through devices, which don’t offer routing services. In this case, such as with a cable modem, you connect a router to the modem to then provide network access to your devices and Wi-Fi to your home.
In some countries — as in the UK, for instance — you’ll need a combination modem/router. Here, the router serves two purposes. It allows you to connect to the internet — either via ADSL, cable, or fiber — and it provides a Wi-Fi network for your home. Most people have a router provided by their ISP; these routers are often simple, yet some may have more advanced features. If your ISP’s router doesn’t include built-in VPN software, then you’ll want to get one that does.
If you have this type of modem/router, you may not be able to use it with a second router that offers a VPN. The main reason for this is that a router performs NAT, or network address translation. If your ISP’s router cannot just pass through data without performing NAT on it, you won’t be able to set up a VPN, as explained below. Don’t try to work around this limitation; while you may be able to get it to work, it’s very complex.
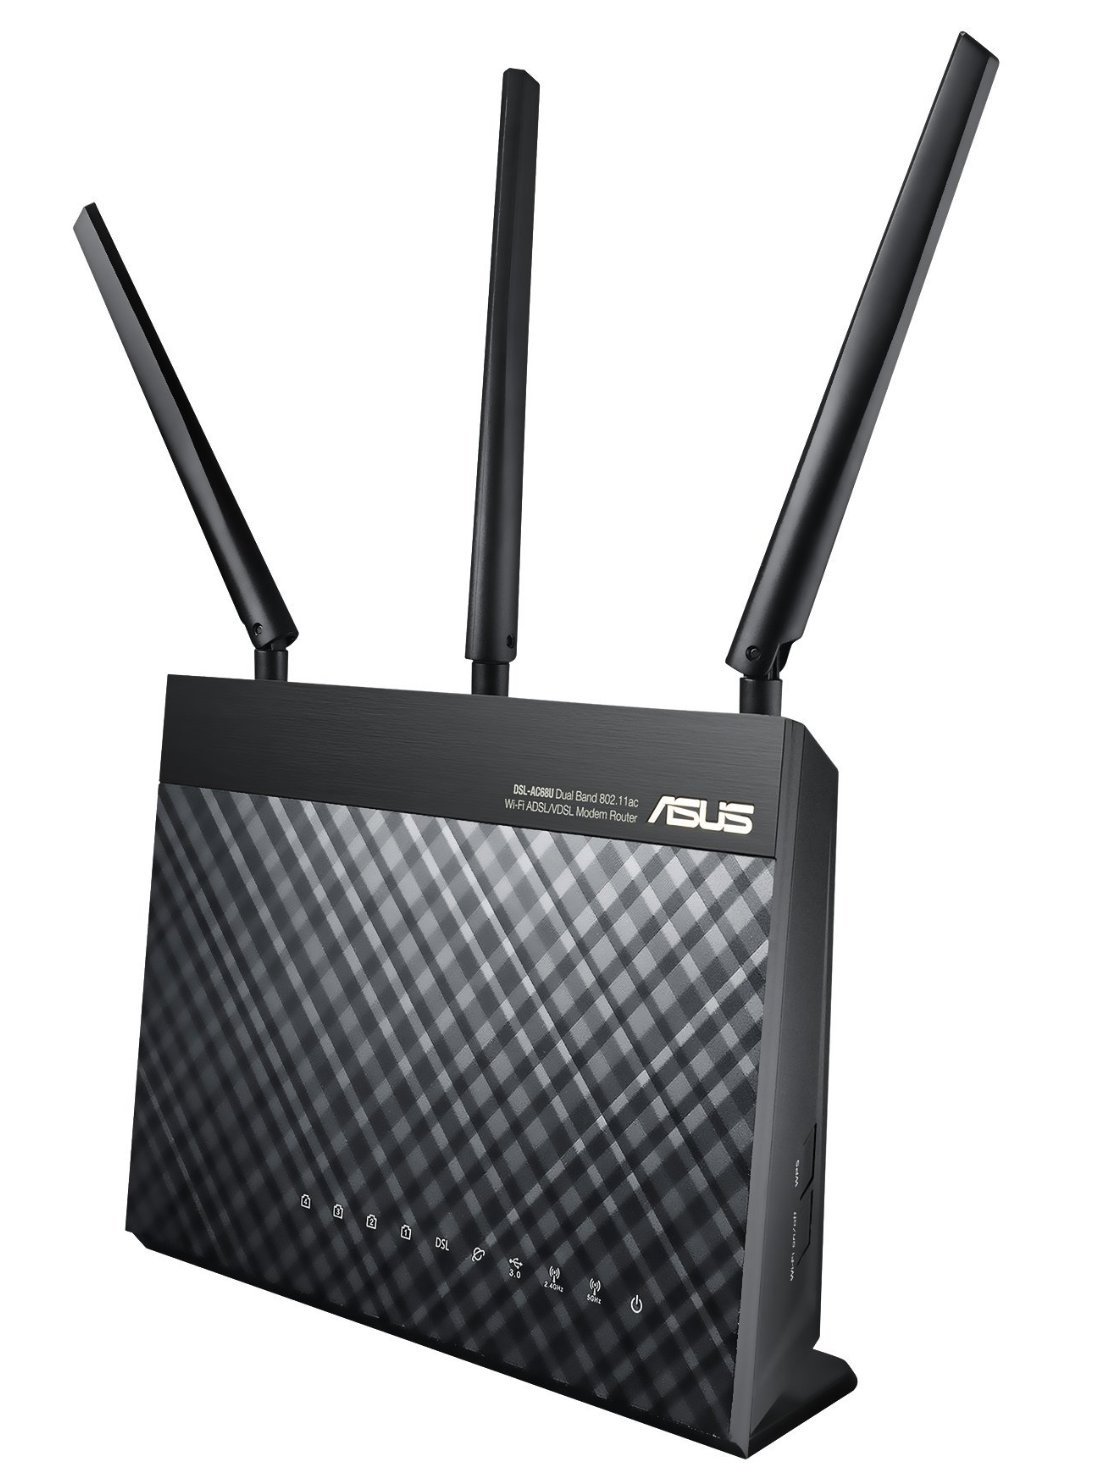
ASUS offers many routers that include built-in VPN software.
The router I’ve used for this article is the ASUS DSL-AC68U. It’s not the cheapest router that comes with a VPN — ASUS, in particular, has a number of VPN-enabled models — but it’s one of the fastest I could find. It offers 802.11 a, b, g, n, and ac, and has two channels, one at 2.4 GHz and another at 5 GHz. If you’re in the US, you’ll want the ASUS RT-AC68U, which is the same device without the built-in modem.
There are other routers that offer VPN support, but I found that the ASUS router’s built-in OpenVPN support is particularly easy to set up.
Step 2: Set up the Router
Setting up one of these routers is quite simple; its software walks you through the setup. If you are connecting to a cable modem, you just link the router with an ethernet cable. If you’re using the device as an access point, you’ll need to enter the credentials your ISP sent you to establish a connection. The router I’ve used for this article has a quick setup wizard, and you can be up an running in minutes.
After that, to use the VPN, there are two things to set up. The first is DDNS, and the second is the VPN itself.
Step 3: Use a DDNS, or Dynamic DNS
You’ll be setting up a VPN that’s hosted on your router. For your iOS device to connect to the router’s VPN server, it needs to be able to find it. Usually, an IP address — such as, say, 8.8.8.8 — is sufficient to locate a server, but many ISPs give out dynamic addresses, which change every time you restart your router, or every week or so. As such, you need to use a DDNS, or dynamic DNS service, to “resolve” a domain name to your router.
The ASUS configuration lets you do this in its WAN section. Click the DDNS tab, check Yes to “Enable the DDNS Client,” and then choose a DDNS service. While one of the menu choices is ASUS’s own service, asus.dns.com, I found this to be unreliable, and used www.no-ip.com, but you can also use the well-known DynDNS service if you wish.
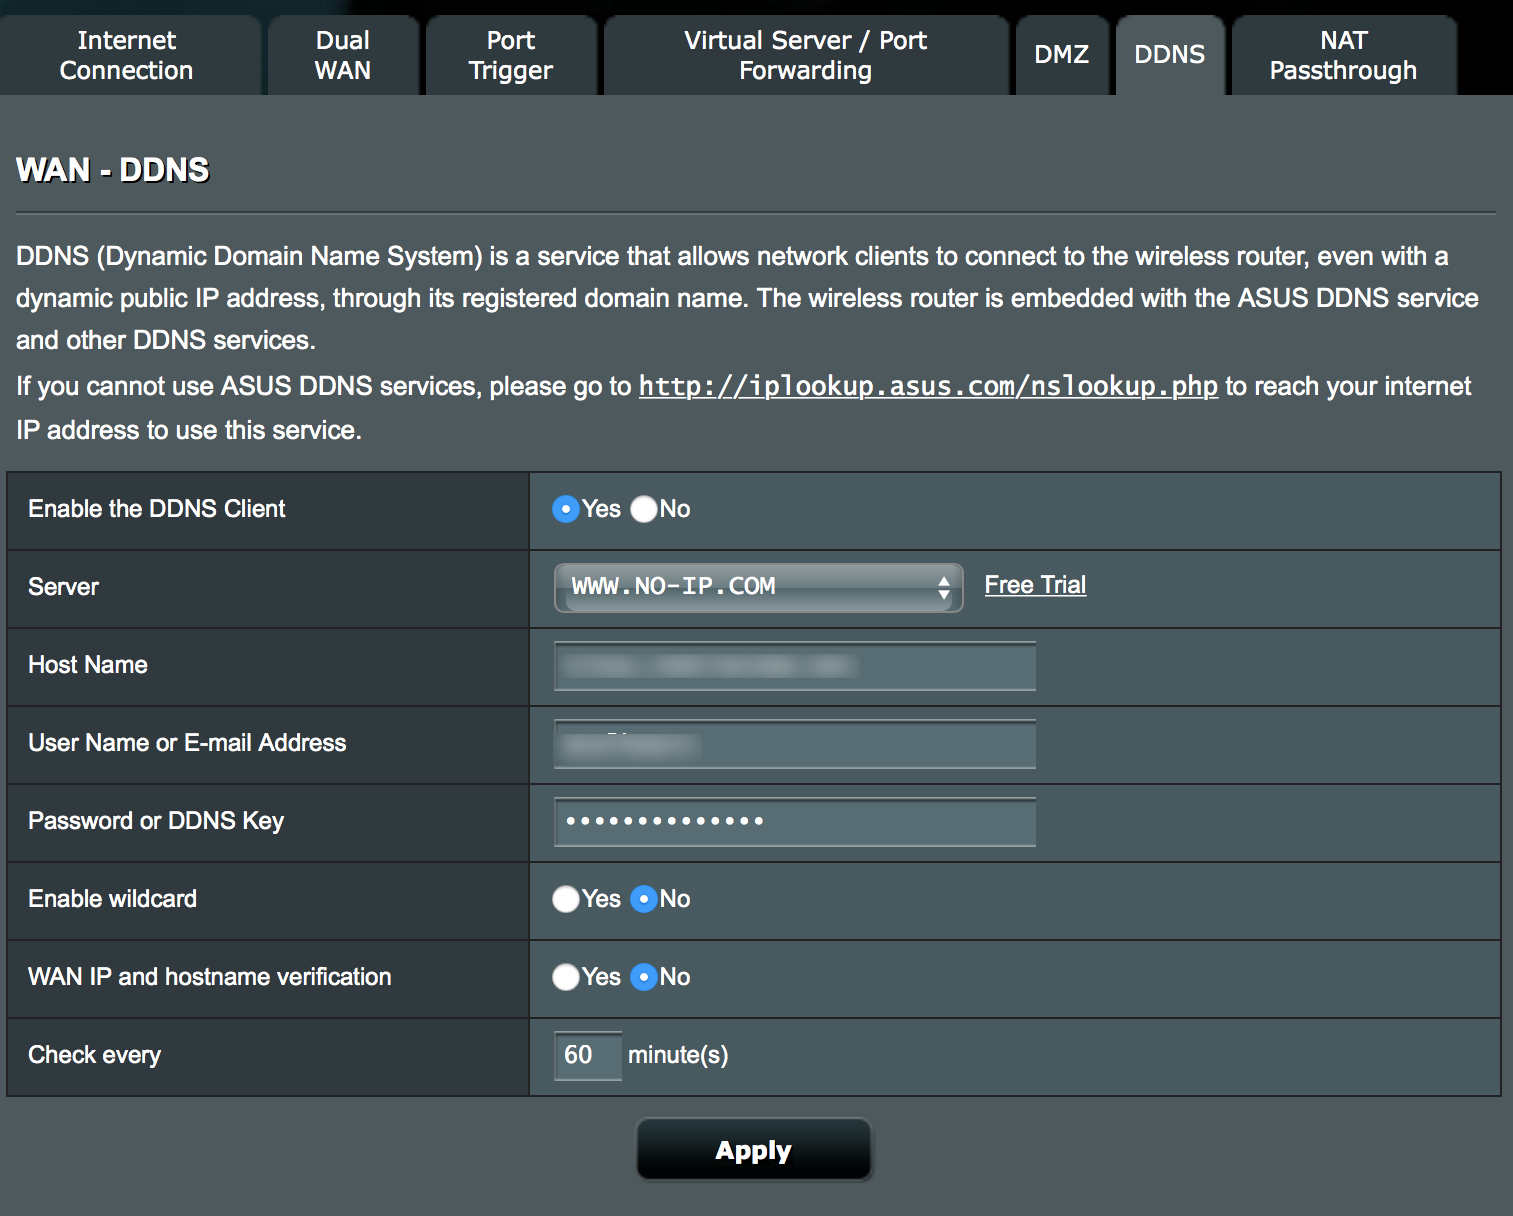
Configure ASUS router settings to use a DDNS, or dynamic DNS service.
Go to the no-ip.com website, and sign up for a free Dynamic DNS account. Follow the instructions to choose a hostname; you can set up three different hostnames for free, but you only need one for the VPN. Note that you’ll need to log into the no-ip website once every 30 days to keep your domain alive; you’ll get an email once a month, and you just click a link to confirm it.
In the ASUS configuration screen, enter the hostname, your no-ip user name, and your password. Leave the rest of the settings as they are, and then click Apply. If you check the Network Map screen in the ASUS configuration software, you’ll see the name of your DDNS server, once the router has connected to it and resolved its name.
Step 4: Set up the VPN
Now it’s time to set up the VPN, or the virtual private network. On the ASUS configuration, it’s really simple. Click VPN in the sidebar, click the OpenVPN tab (this is easier to use than PPTP), and then toggle the “Enable VPN Server” button. At the bottom of the window, enter a username and password for a user. You can register up to 16 different users.
Next to VPN Details, click on the menu and choose Advanced Settings. Make sure to check Push LAN to Clients, Direct Clients to Redirect Internet Traffic. If not, clients will connect to the VPN, but their Internet traffic will still go out over the network they’re on, unprotected.
When you’ve done this, click Apply.
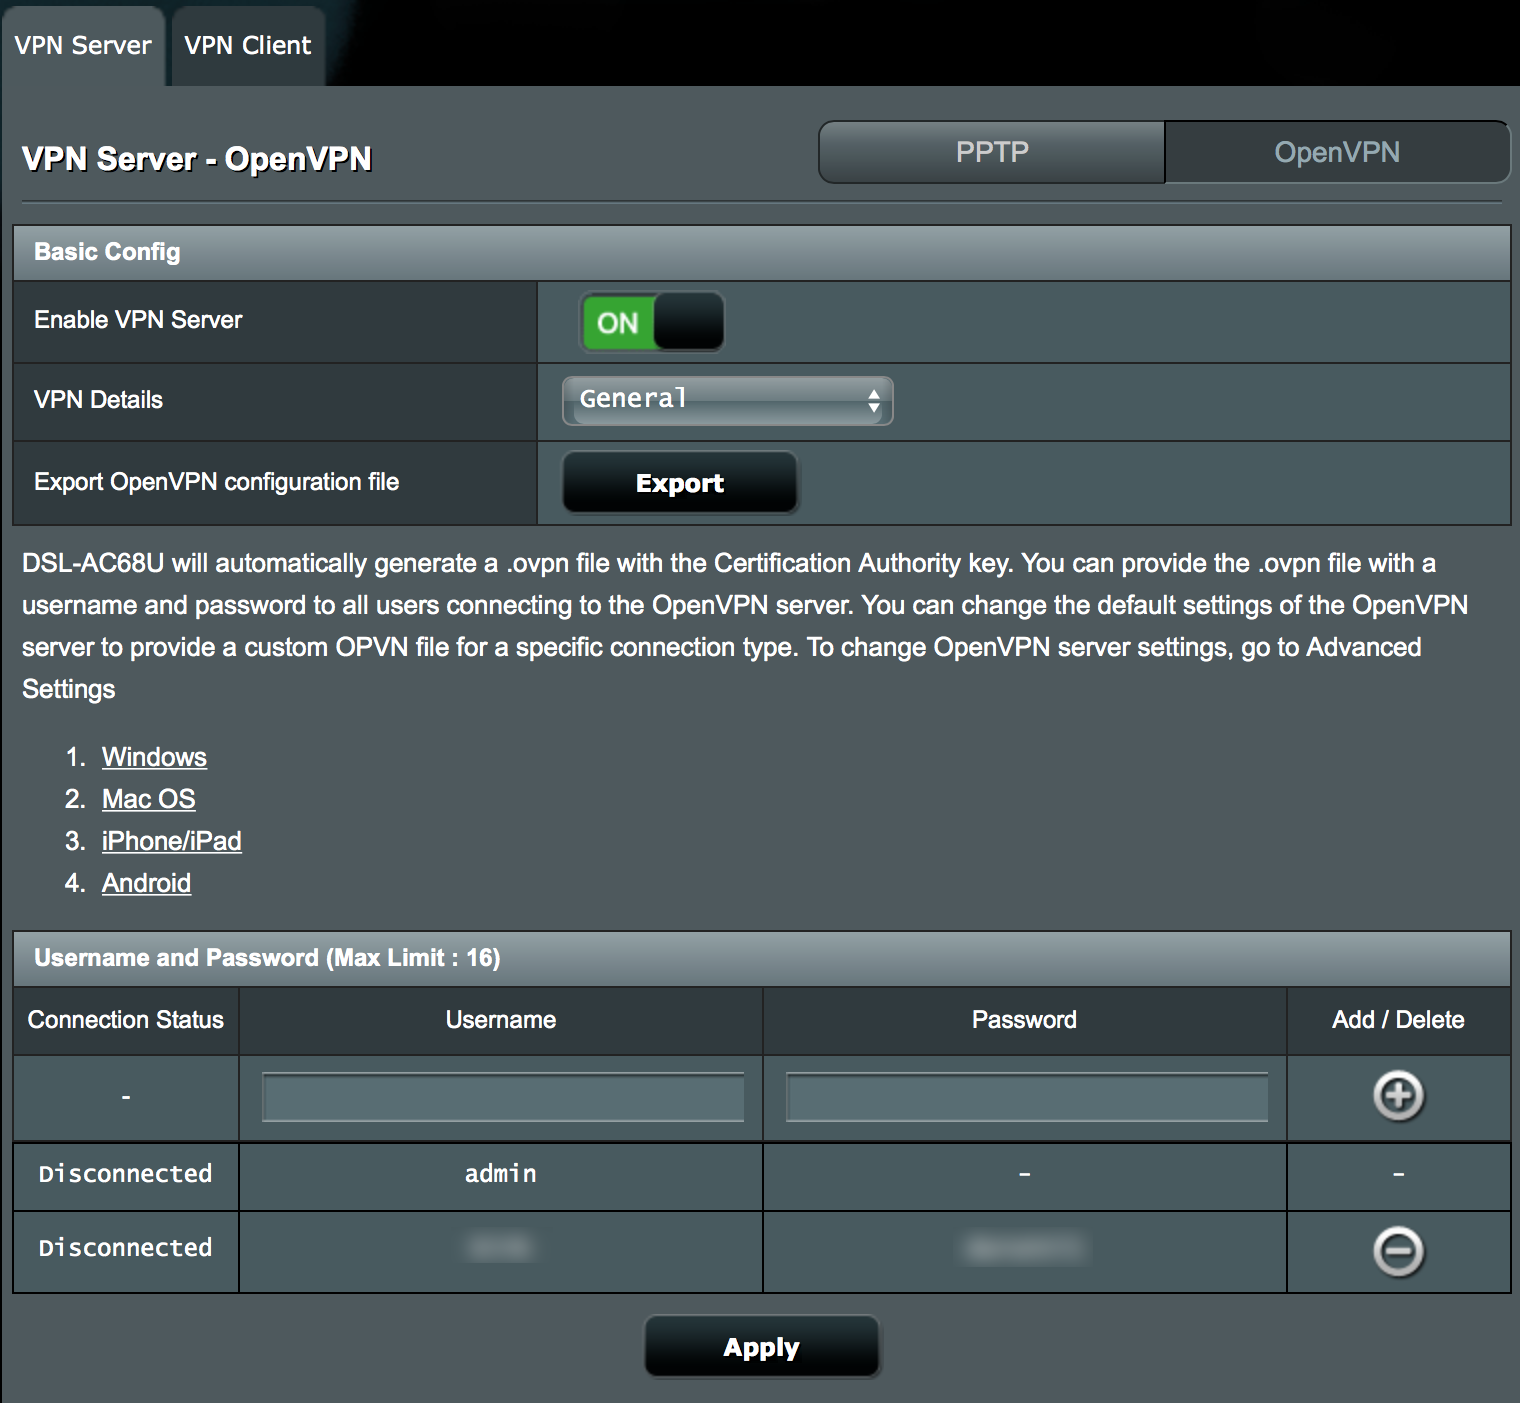
The ASUS configuration makes setting up the VPN a breeze!
To allow users to connect to the VPN, they need a certificate. Near the top of the window, click the Export button to save an .opvn file, which contains the keys users need to connect to the router’s VPN.
Email this to each of the devices that you’re going to use with the VPN (do this at home, not on a public network); you’ll need to access the file on those devices. Note that you can set up a single user account for the VPN, or you can create different accounts for different devices. For example, if you have an iPhone and iPad, you can create separate accounts for each one, with the usernames, for example, alice-phone or alice-pad. But you can only have one device connected to a user account at a time, so if you plan to use multiple devices simultaneously, you’ll need to set up multiple accounts.
Step 5: Connect iPhone, iPad or Android Devices to the VPN
Download the free OpenVPN Connect app to the iOS devices you want to connect to your VPN. If you use an Android phone, you can go here to download the free OpenVPN Connect for your device.
Open the email you received with the .opvn file, download it, then tap it to open it; a sheet will ask you which app you want to open it with — select OpenVPN.
Enter the user name and password you set up on the router’s configuration page, toggle the Save switch, and then toggle the button just below Disconnected. You can easily test this by turning off your Wi-Fi, if you’re connected to your home network. In about 10 or 20 seconds, you’ll be connected to the VPN. On the router’s configuration page, you’ll see the name of the user that is connected.
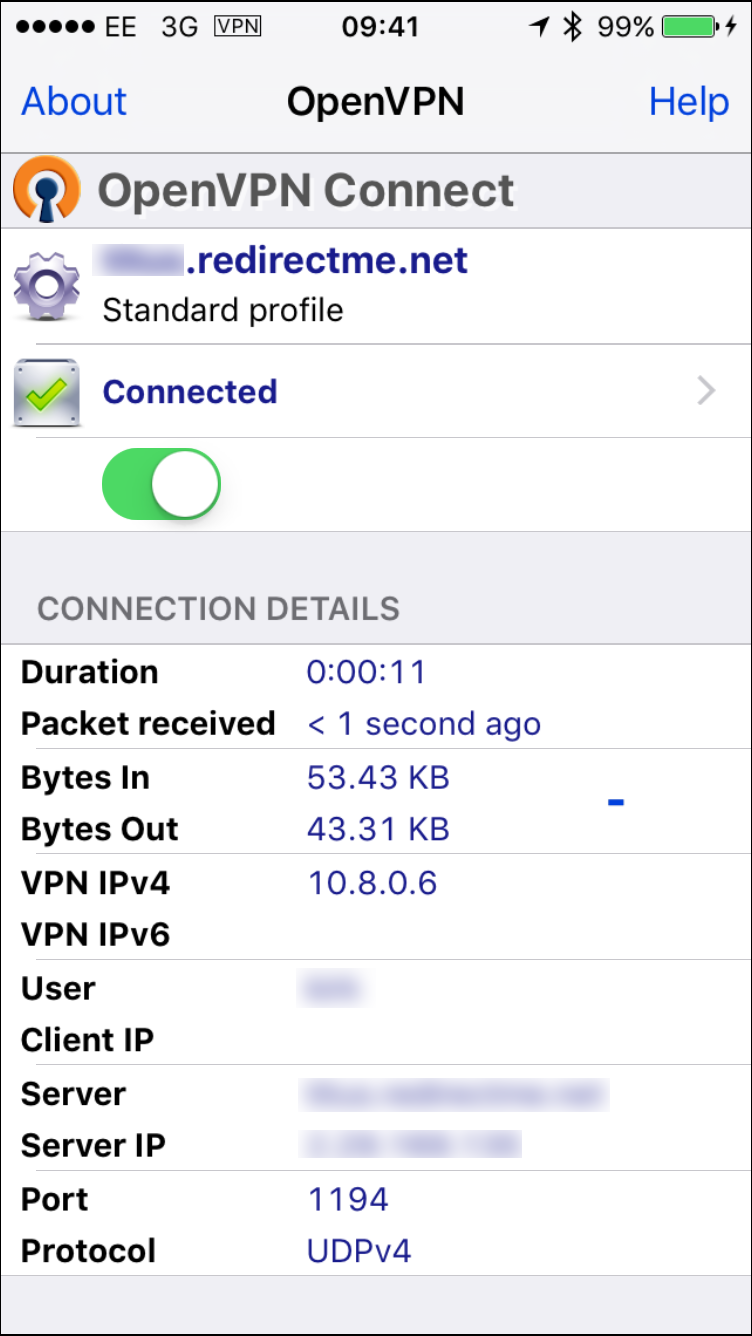
Use OpenVPN Connect to connect your iOS devices to the VPN.
When finished using your mobile device in public, toggle the connection switch off.
Step 6: Connect Your Mac Laptop to the VPN
You may also want to set up OpenVPN on a Mac laptop. To do this, download and install the latest stable version of Tunnelblick. After you’ve installed the software, launch it (it’ll be in your Applications folder), and click “I Have Configuration Files,” and then OpenVPN Configuration(s). Click Create Tunnelblick OpenVPN Configuration, then double-click the .opvn file you saved earlier from the router’s configuration page, or that you emailed to your laptop.
Tunnelblick installs a menu extra near the right of your menu bar. Click it and choose Connect Client. Enter the user name and password you set up on the router; you can check the box to have them saved in your keychain so it’s quicker the next time you try. Remember, you won’t be able to connect to the VPN if you’re on the same network; you’ll have to either test this from another network, or, if your iPhone can make a personal hotspot, connect your Mac to that, and then set up the connection.
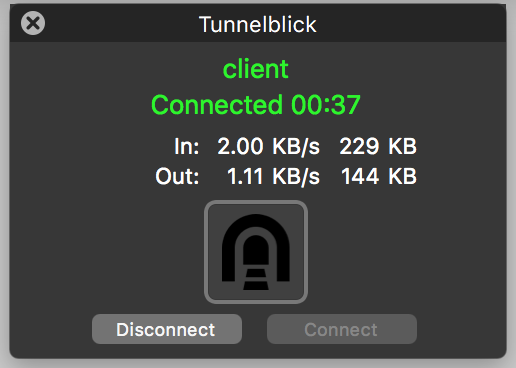
Use Tunnelblick to connect your Mac to the VPN.
You can learn more about Tunnelblick in this quick start document.
You’re All Set!
This may seem like a complex process, and I hope I’ve explained it in enough detail. Once everything is up and running, connecting to the VPN is pretty simple, both on iOS devices and on a Mac, and also on Android. The only problem you may have is if your Internet connection goes down, the router isn’t working, or you have a power cut. In such cases, you will obviously not be able to connect to the router.
And, of course, if you use a different router, the configuration process will be different, but the principles will be similar. You’ll still need to set up a Dynamic DNS hostname, and use either the iOS or Android app or the Mac app to connect your devices.
Nevertheless, on your iPhone, iPad, or Mac, it’s just a couple of taps or clicks to ensure that you’re on a secure network. You’ll be protected from man-in-the-middle attacks, which are increasingly common on public Wi-Fi networks. Sure, it takes a small investment to get a router with a VPN, and a few minutes to set it up, but once that’s done this additional layer of security will have you surfing a lot more safely.
For enhanced protection, use a VPN on a router in combination with a two-way firewall and a trusted Mac anti-virus, and you’ll be much harder to hack — even when on the go.

