How to avoid Mastodon security and privacy risks
Posted on
by
Joshua Long
Following billionaire Elon Musk’s acquisition of Twitter (later renamed X), some dissatisfied users began looking for a new social network to call their home. One alternative social network, called Mastodon, rapidly gained a high volume of new user sign-ups in late 2022.
Mastodon is technically open-source software that enables federated social networks, meaning that one corporation does not have control over the Mastodon network or service. Instead, anyone can operate their own server, called an “instance.”
This is vastly different from virtually all popular social networks today. As such, it presents unique challenges—including some privacy, security, and identity validation issues. Let’s examine some potential concerns and how you can protect yourself.
In this article:
- 1. Instance admins can see everything, so choose your instance carefully
- 2. Mentioning someone in a DM adds them to the conversation
- 3. There’s no official Verified status on Mastodon (but you can verify yourself)
- 4. Use a unique password and two-factor authentication
- 5. Don’t deactivate or delete your Twitter account
- How can I learn more?
1. Instance admins can see everything, so choose your instance carefully
One of the first things potential Mastodon users need to decide is which instance (server) they want to join. There are lots of them, and it’s outside the scope of this article to help you choose a specific instance. Some will tell you that the instance you choose “doesn’t matter.” However, there are some vitally important considerations to keep in mind when making your choice.
Instance owners and admins know everything about you
Instance operators, and anyone else they entrust as admins, have great power over your use of the network—and your data. They can delete your account at any time. They know your e-mail address. They know your recent IP addresses—which could give away where you live, work, or visit in the real world. And they can see your direct messages; they aren’t encrypted.
Of course, many of the same things could be said about a major social network like Twitter. But at least in the case of a larger network, there are clearly defined rules and standards. There’s an expectation that those rules are supposed to be applied fairly to everyone. With Mastodon instances, it may be one individual making the decisions about whether to enforce the rules and how to treat user data.
Government requests may be handled with less resistance, less transparency
Mastodon instance operators are usually volunteers who spend much of their free time maintaining their instance. Naturally, they may not want to spend a lot of time handling challenges with users.
 If they receive requests from their own (or a foreign) government to turn over information about a user, some instance operators will likely comply with little resistance. After all, they’re already giving up a lot of their own personal time already. They’re probably not lawyers. And they probably don’t want to get in trouble for potentially hindering an investigation.
Major social networks, on the other hand, have departments that handle government requests. They’re familiar with the law and know when pushing back may be appropriate. Companies often publish regular reports (e.g. Twitter, Meta, TikTok, LinkedIn) detailing the types of government requests they’ve received, and how often they’ve complied with such requests. It isn’t reasonable to expect that a volunteer Mastodon instance operator will do the same.
It’s also possible that an instance operator could get fooled by a fake government request, and unknowingly send someone’s private information to a malicious party. Again, this is less likely to happen with a major social network that employs teams of expert handlers.
How to protect your privacy from instance admins
Following are some mitigation strategies for the potential concerns listed above.
When you create a Mastodon account, choose an instance operated by someone you know and trust, if possible. At least try to find an instance whose operator seems to have positive qualities that you value.
If you’ve already joined an instance and later decide you don’t trust your instance admin, you can move your account to a different instance. (Check your Settings for details. Go to your instance’s homepage in a browser, and if you can’t find the Settings button, click on “Edit profile” to get there.) Just remember that if you switch instances, you’re now trusting an entirely different person with all of the same personal information.
If you want to try to avoid leaking your IP address to instance admins, use a trusted VPN (for example, Intego Privacy Protection, available for Mac and Windows) and leave it on all the time. You might want to leave your VPN turned on when using other social networks, too.
Since direct messages on Mastodon are not end-to-end encrypted, don’t send private information via DM. Again, this is good advice for any social network; assume that your conversations can been seen by server administrators.
To prevent instance admins from knowing your e-mail address, create a custom forwarding address using Apple’s Hide My Email or DuckDuckGo Privacy Protection.
Which Is Better: Apple’s Hide My Email or DuckDuckGo Email Protection?
2. Mentioning someone in a DM adds them to the conversation
Direct messages on Mastodon are awkwardly designed. Technically, a “direct message” is more like a regular message, but with its privacy set to only the mentioned individuals.
This can be a problem for a variety of reasons. For example, if you’re trying to report abuse to the instance operator, you could unintentionally “out” yourself to the abuser as the person who reported them.
How to avoid adding someone to a Mastodon direct message
Of course, the easiest way to avoid unintentionally mentioning someone is to not type @ followed by their username when composing any message. Make sure that your friends are aware of this “feature, not a bug,” so they don’t drag you into an uncomfortable situation.
And, as mentioned previously, don’t send private information in DMs. In fact, you should really treat “direct messages” on Mastodon as public posts. If you need to have a private conversation with someone, use an encrypted messaging service such as Signal, Threema, or WhatsApp.
3. There’s no official “Verified” status on Mastodon (but you can verify yourself)
Next to someone’s name on Mastodon, you might see an icon that looks like the Twitter “blue check,” or Verified status symbol. Remember, Mastodon is really a network of federated instances operated independently from one another. There’s no central verification authority.
If you see a “blue check” after someone’s name, what’s really happened is that their instance has the Twitter Verified symbol as an emoji that anyone can use. On those instances, anyone can add :verified: (or the relevant Markdown name for the emoji) to their own username.
Although it’s fine if someone wants to do this for their own account, people who are new to Mastodon may mistake it for having the same meaning as it once had on Twitter.
How to identify if an account really belongs to someone you know
Don’t trust symbols after someone’s name; there is no official company-verified status (à la classic Twitter) for Mastodon accounts.
However, there are certain things that users can do to demonstrate that they really are who they claim to be. And, therefore, there are ways that you can confirm their identity.
In most cases, you probably “know” the person from another social media platform, such as Twitter. You can check their profile on that platform to see if they’ve put their Mastodon username, or a link to their account, in a prominent place or in a recent tweet. This has become popular enough recently that there are actually services that will check the accounts of everyone you’re following on Twitter to see if they’ve posted a Mastodon profile in their bio or a pinned tweet. Not everyone does, of course, but it’s one way to find people on Mastodon that you’re following on Twitter. (There’s an automated way to check everyone you follow on Twitter at the same time; see the “Third-party services” section below.)
Verified links can confirm a user’s identity
Another way to confirm if a Mastodon user is really the person you know is to check whether they have verified links in their bio. (This was just recently implemented in the official Mastodon mobile app, so make sure your app is up to date. You can also check for verified links when logged into Mastodon in your browser.) Do you see at least one link preceded with a green check mark next to it, and a green background? And is that linked site actually affiliated with the user? If so, this is reasonably strong* confirmation that the Mastodon user had access to edit that site and embed a verification link into it.
(*I say “reasonably strong” because someone could trick you with a lookalike domain name; for example, apple.com is not the same as appIe.com — one of those has a capital i instead of a lowercase L. Also, due to Mastodon’s federated nature, it’s theoretically possible that someone could host their own Mastodon instance and modify it to falsely verify their own links, at least as far as how it would appear if you viewed their instance in a browser. But, in theory, it should not be possible to spoof site verification on the existing major Mastodon instances.)
Here’s an example of a verified link on my profile, as it would appear if you went to my profile page https://infosec.exchange/@theJoshMeister in a browser.
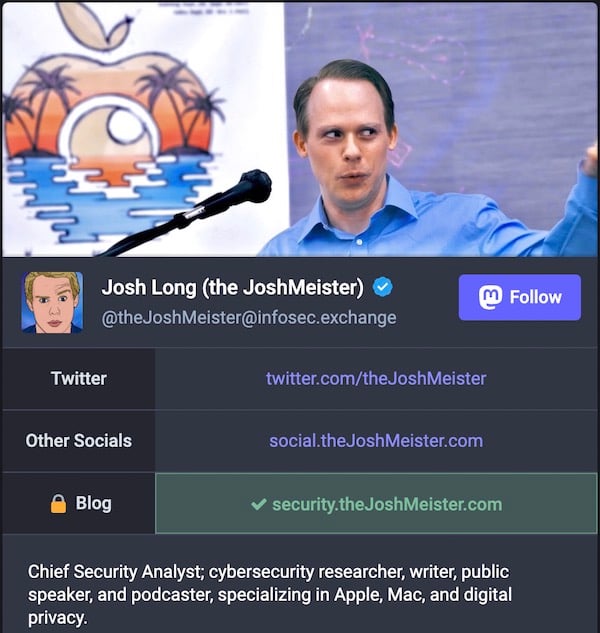
The blue “Verification check” badge by my name is actually a meaningless icon, but the “green check” by the link in my bio validates my affiliation with that site.
If you own a site or blog and want to verify yourself (if your instance supports this), you can add a link to your Mastodon profile with rel="me" included in the a tag. For example:
<a rel="me" href="https://your.instance/@username">Mastodon</a>
This would add the word “Mastodon” as a link to your profile. Pro tip: A secret alternative is to add a link tag in between the <head> and </head> tags in your site’s HTML code. This option does not include a clickable link to your profile. You might want to do this if you’re just experimenting with Mastodon and don’t want to advertise or link to your account yet. Example code:
<link rel="me" href="https://your.instance/@username">
After you’ve added verification code to your site, here are the steps to get a verified link on your profile:
- Log into your Mastodon instance in a browser and then click “Edit profile.”
- Under “Profile metadata,” type a short Label (e.g. “My Blog”).
- In the Content field, paste the URL of your page that has the embedded verification code.
- Click on the “Save Changes” button.
Watch out for lookalike accounts
One more note on account validation: the same username can be registered on multiple Mastodon instances. It’s certainly possible for someone to register their own username on multiple instances. (In fact, some people actually do this intentionally, for example if they’re trying to decide which Mastodon community they prefer.)
However, it’s also possible that one or more accounts may be an impersonation. So if your friend is, for example, @[email protected], someone who wanted to impersonate them could register @[email protected]. Technically, your username plus the instance domain, with two @ signs, is your complete username on Mastodon. Be cautious about lookalike accounts.
4. Use a unique password and two-factor authentication
When registering an account on any site or service, it’s always wise to use a unique password that you’ve never used before. This means you’ll have a lot of passwords, which is why you should use a trusted password manager protected by one really secure password that you won’t forget.
Another given when you sign up for any site or service should be to enable two-factor authentication (2FA), if that option is available. This adds an additional layer of protection to make it a bit more difficult for an attacker to get into your account. For Mastodon, here’s how to do it:
- Log into your Mastodon instance in a browser (ideally on a desktop or laptop computer or a tablet, rather than an iPhone or Android phone), and then go to Settings. (If you can’t find the Settings button, click on “Edit profile” to get there.)
- Click on Account, then click on Two-factor Auth.
- From there, you have a couple options. You can choose either “Authenticator app” or “Security keys.” The latter can work with a physical dongle or biometrics (e.g. Touch ID on a Mac keyboard). Authenticator app is easier for anyone to set up, so I’ll explain how to do that. (Note: You can always go back and add a security key as an additional 2FA method layer.)
- If you selected “Authenticator app,” you’ll see a QR code and an alphanumerical token. Assuming you’re doing this in a Mac or iPad browser, open your authenticator app on your iPhone (e.g. Google Authenticator, or some password managers). Scan the QR code, or manually type (or copy and paste) the token into your authenticator app. You can set up multiple apps with the same code, if you wish.
- Next, your Mastodon instance will ask you to type a six-digit code from your authenticator app to confirm that everything is working, and you’ll be able to start using 2FA.
- You’ll also get some one-time use backup codes; you can store these in a safe place in case you ever lose access to your 2FA method, so you won’t be locked out of your account.
Never share your password, your six-digit temporary codes, or your backup codes with anyone. If anyone ever asks you for any of these things, they’re trying to hack your account
Two-factor authentication (2FA) apps for iOS: Which are the best?
5. Don’t deactivate or delete your Twitter account
Some prominent people have proclaimed that they’re done using Twitter and have no plans to return. If you decide to completely quit using Twitter, don’t deactivate or delete your Twitter account. Twitter’s policy is that once you deactivate your account, after a 30-day grace period, the account is deleted permanently—and your username is up for grabs. Anyone else can register your former username. They could impersonate you or create a parody account mocking you. Even if the new account owner doesn’t intend to hijack your identity, other people visiting an old link (or who memorized your old username) might mistakenly think that the new account owner is you.
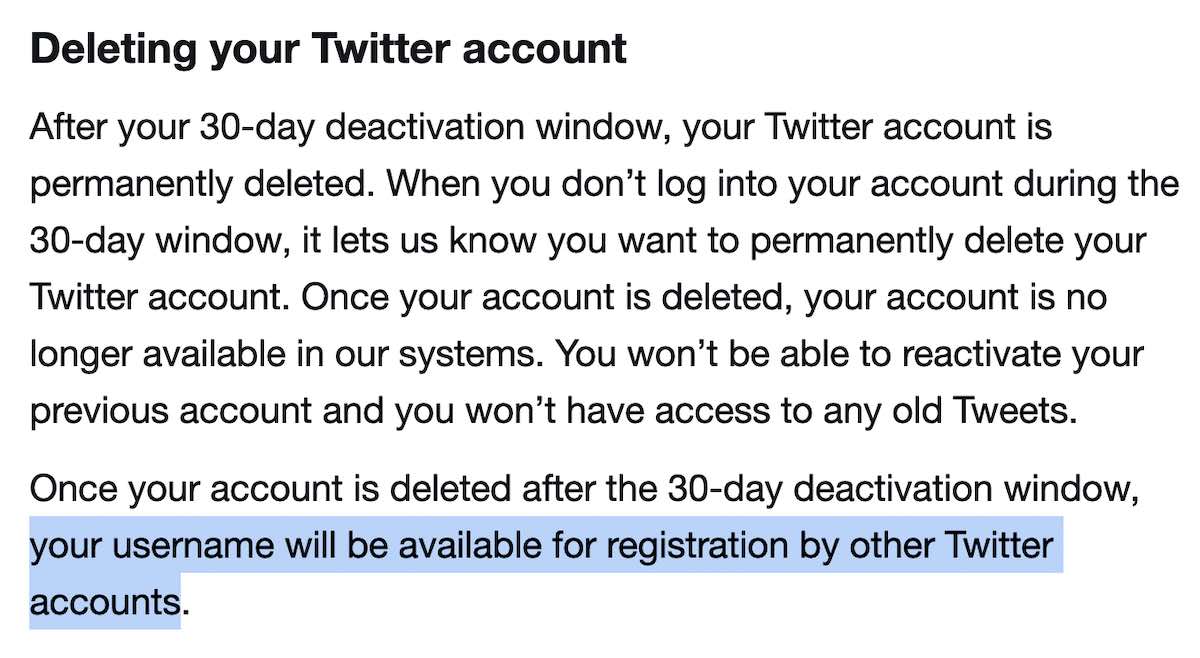
Twitter’s policies allow anyone to reuse a deleted account’s username.
These are some of the things you should know if you’re thinking about using (or already use) Mastodon. Please share a link to this article with your friends on Twitter and Mastodon to help ensure they’re aware of these important security tips. And feel free to follow @[email protected] and @[email protected], if you’d like.
Got any additional tips related to Mastodon security, privacy, and identity verification? Share them in the comments below.
How can I learn more?
 Each week on the Intego Mac Podcast, Intego’s Mac security experts discuss the latest Apple news, security and privacy stories, and offer practical advice on getting the most out of your Apple devices. Be sure to follow the podcast to make sure you don’t miss any episodes.
You can also subscribe to our e-mail newsletter and keep an eye here on The Mac Security Blog for the latest Apple security and privacy news. And don’t forget to follow Intego on your favorite social media channels: ![]()
![]()
![]()
![]()
![]()
![]()
![]()

