How to Encrypt and Password Protect Files on Your Mac
Posted on
by
Jay Vrijenhoek and Kirk McElhearn
To protect your sensitive data, you should use encryption and password protection whenever possible; macOS provides you with a number of ways to implement this security, using built-in software and features.
This article discusses five areas where you can encrypt or password protect files:
- Encrypt System Data and Your Startup Drive
- Encrypt External Drives
- Encrypt Documents and Files
- Encrypt Backups
- Encrypt Files You Send to Others
Encrypt System Data and Your Startup Drive
The best way to prevent unauthorized access to your data is to encrypt your startup drive. This ensures that no one can steal your Mac can read the data on its drive.
But you should also set a password to protect your Mac when the screensaver is active, because, if not, anyone walking by could access your Mac. 
And you can set a firmware password to prevent someone from starting up your Mac from an external drive (for Macs with Intel processors).
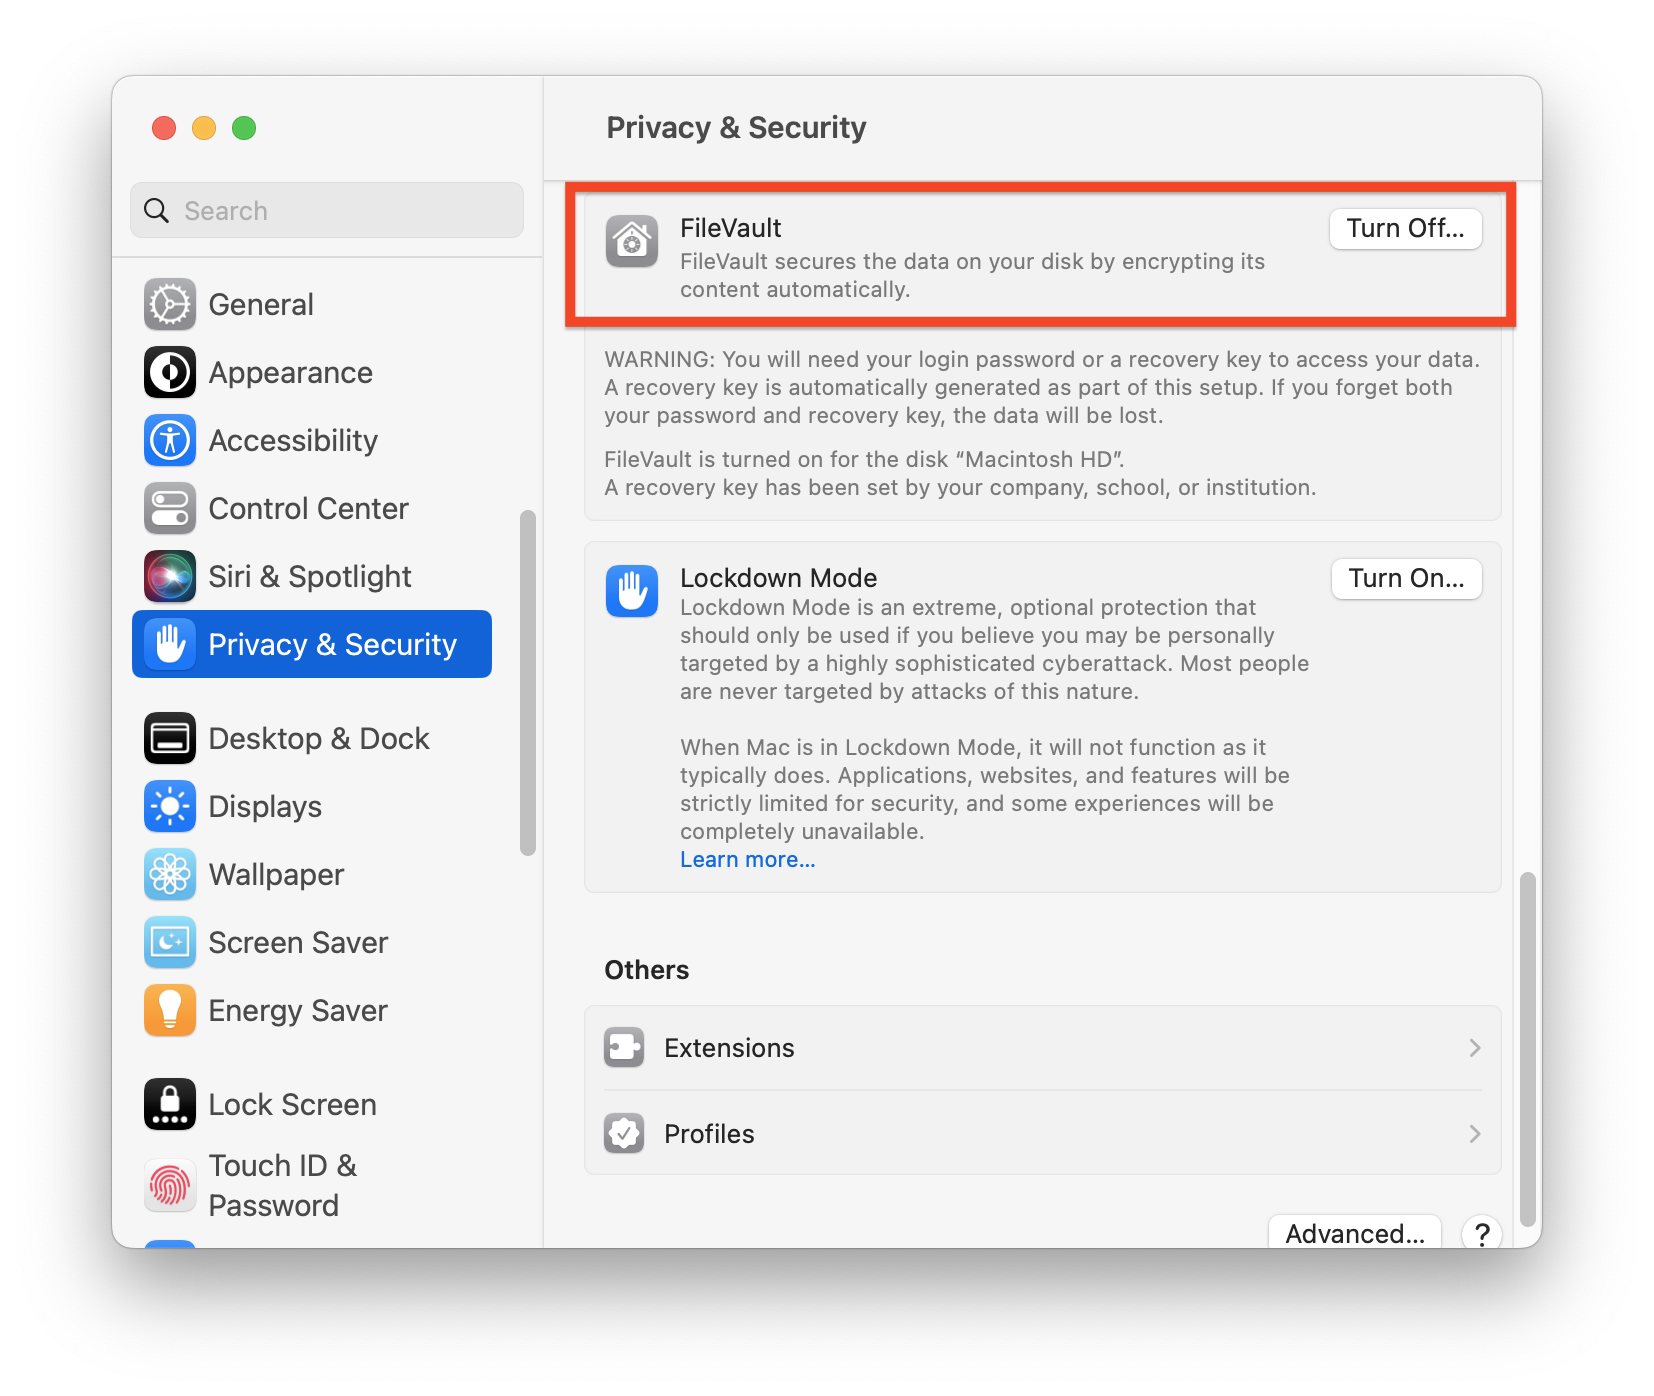
Use FileVault to Encrypt Your Startup Drive
FileVault, the built-in full-disk encryption feature in macOS, is a robust way to encrypt the contents of your entire startup drive. When you turn it on, it encrypts all the data on your drive; as you work, writing and editing new files, they are encrypted on the fly. 
It is important to use a strong password to secure your user account, because that password not only gives you access to your account, but it also unlocks your drive. A simple password (“1234,” or “password1,” etc.) is easy to guess and could allow anyone to log in, thus bypassing FileVault protection.
To enable FileVault, follow these steps:
- From the Apple menu, choose System Settings.
- Go to the Privacy & Security pane.
- Scroll down to the FileVault section.
- Click Turn On.
You will be asked to choose a method to unlock your disk if you ever lose your account password.
If you choose to use your iCloud account, Apple will store the recovery key for your disk on its servers, and you’ll have to provide questions and answers for three security questions that will unlock the disk.
Saving a recovery key locally is more secure, since, if someone gets access to your user data, they may have your Apple ID and its password. You have to make sure that you can store the recovery key safely. If you use a password manager, you can store it there, and you’ll be able to access it from your iPhone or iPad if necessary.
If you select recovery key, a window will display showing that key. Copy it to a secure location, such as a password manager, or take a screenshot of the window.
The encryption process begins, and you can use your Mac normally. You probably won’t notice any performance hit as FileVault encrypts your disk, and, depending on the size of your Mac’s drive, this will take from a few hours to overnight. Your Mac has to be plugged in for the encryption process to advance, so if you have a laptop make sure to connect it to power. And encryption only occurs when the Mac is awake.
If you enable FileVault, you cannot use automatic login on your Mac. This is something you should never use anyway, because anyone who has possession of your Mac can start it up and log into your user account. 
Activating a Screensaver Password
FileVault protects your data at rest, meaning that if the Mac is off, sleeping, or you are logged out, a password is required to get access. Once you are logged in the data is accessible to you or anyone else that can sit at your Mac while you’re not looking. To prevent this, you should set a password so, when your Mac is asleep, or when a screensaver is active, this password is required to access the Mac. And if you set a password like this, it’s easy to lock your Mac, without even clicking your mouse.
To enable the sleep and screensaver password, click here and follow these steps:
- From the Apple menu, choose System Settings.
- Go to the Lock Screen pane.
- Click the General tab.
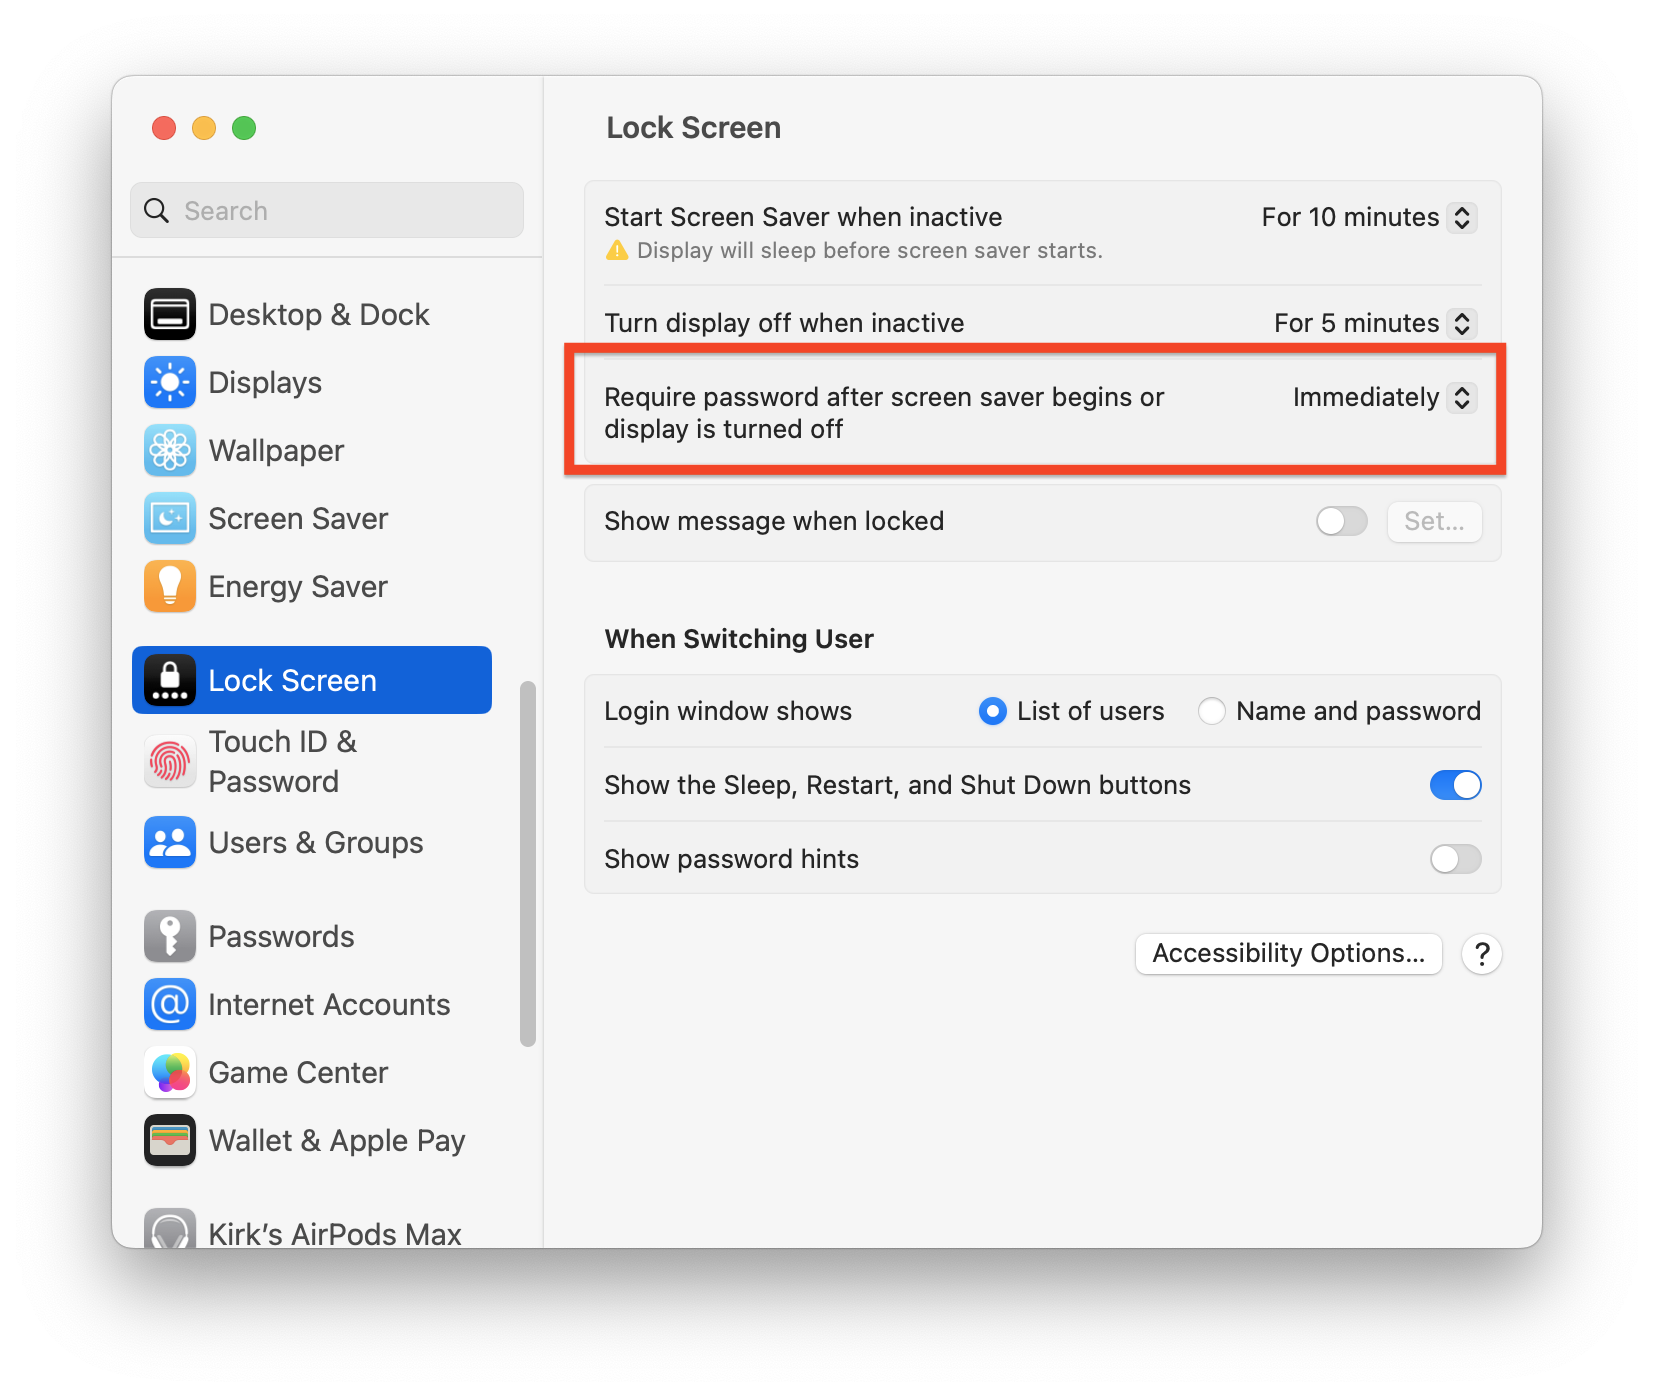
Click the popup menu in the Lock Screen section to make changes, choosing the amount of time before the password requirement kicks in. It’s best to choose immediately here; that way, you don’t have to worry about how long it takes before your Mac is protected. After you make your choice, a dialog asks you to enter your password to confirm it.
If you choose this setting, you can set a hot corner that will activate your screen saver when your mouse pointer reaches a specified corner of your display.
To do this, go back the Desktop & Dock pane of System Settings. Scroll down to the bottom of the window, click the Hot Corners… button.
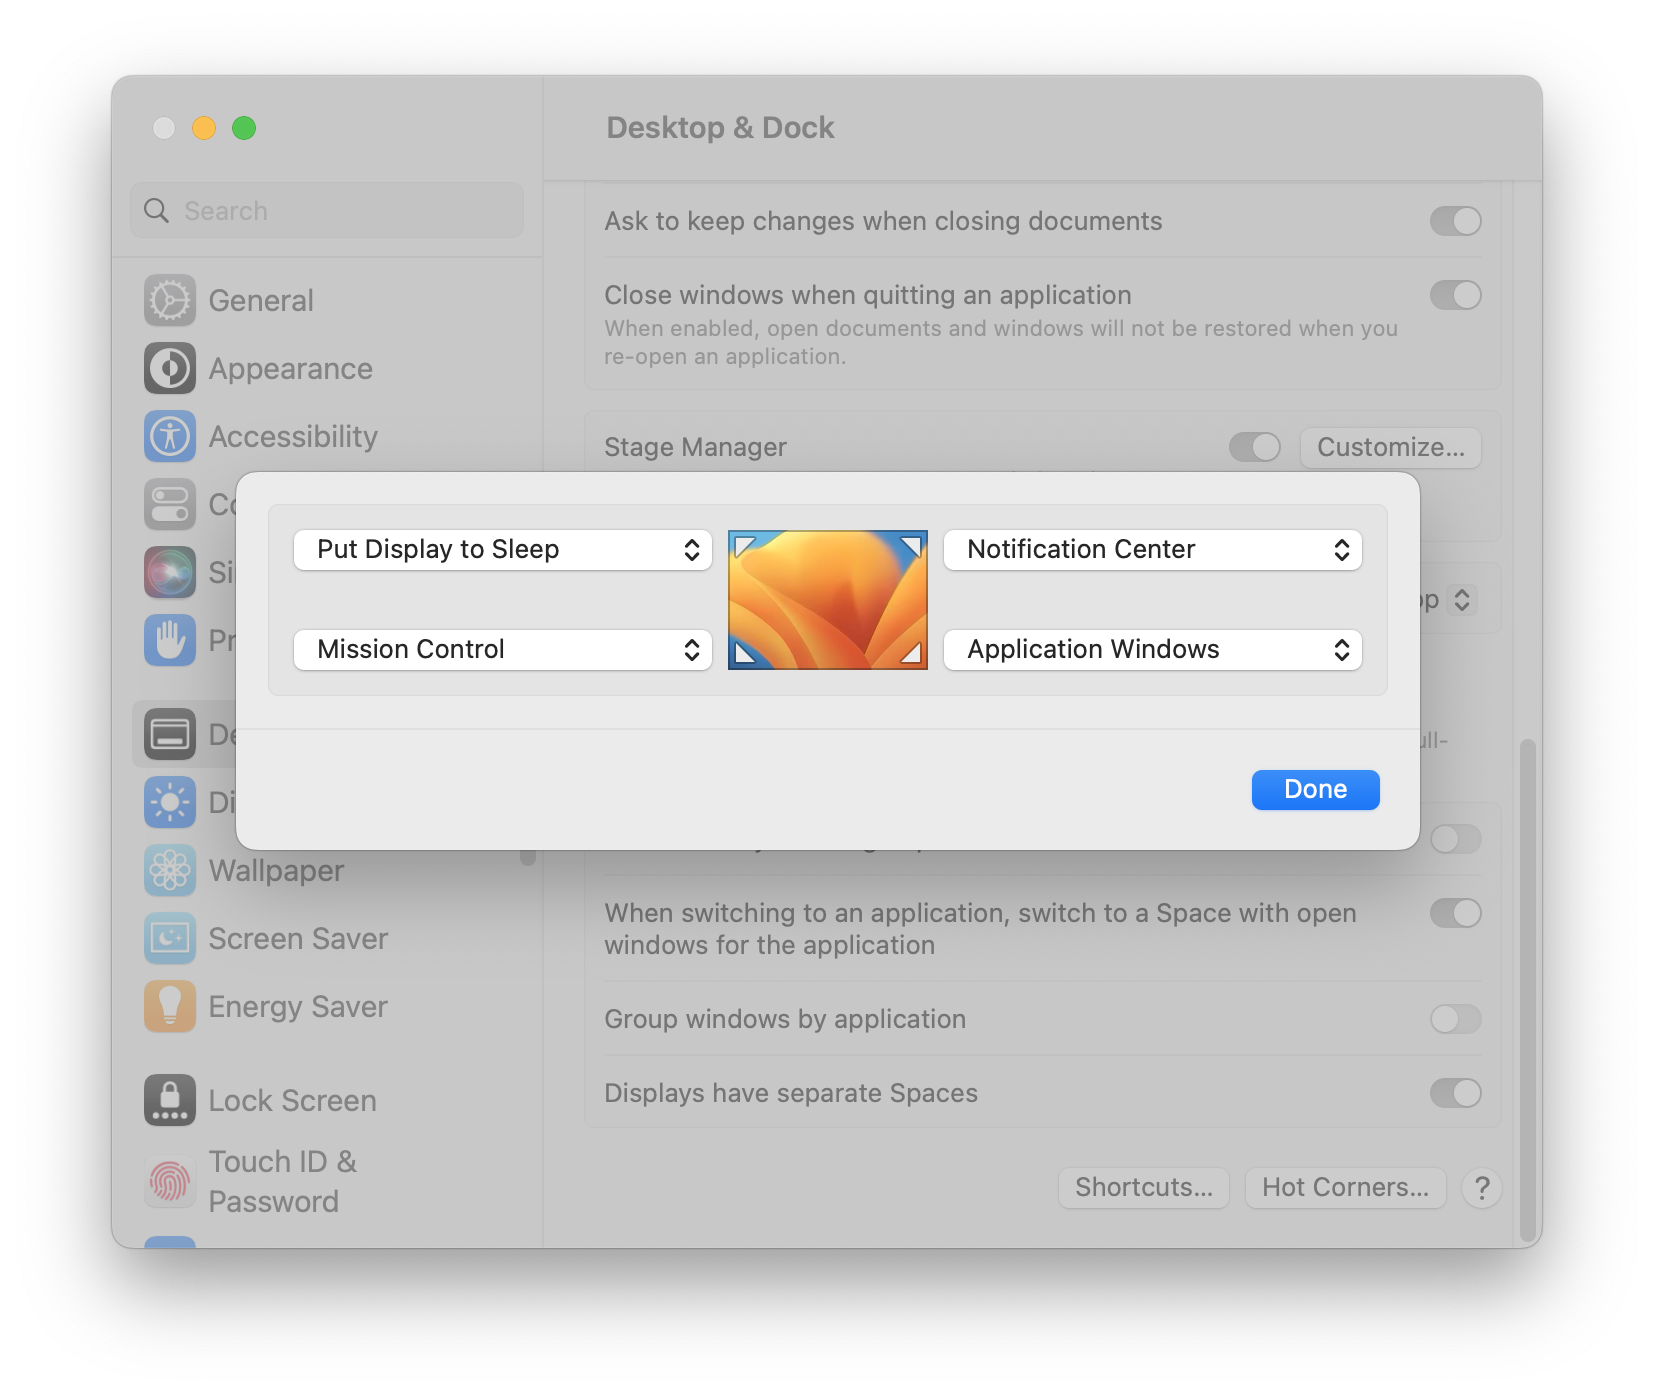
Hot corner actions occur when you move your cursor into one of the corners of your screen. As you can see above, I have four actions set for the four corners of my display. At the top left is Put Display to Sleep. Since my security settings require a password immediately after the display is asleep, this provides instant protection from prying eyes.
You can also put your Mac to sleep from the keyboard. You can press any of a number of key combinations, depending on your Mac and its keyboard.
– Press the Power button for about a second and a half; this is practical with a laptop or a keyboard that has a power button.
– Press Control-Shift-Power button or Control-Shift-Media Eject, if you have this latter key.
– If you press Control-Power button or Control-Media Eject, a dialogue asks whether you want to restart, sleep or shut down your Mac.
– If you press Control-Command-Q, this locks your screen, but doesn’t put it to sleep. Your Mac displays the login screen. this is the quickest method if your keyboard does not have a power button. 
If you leave your Mac running with the screen saver, or tell it to display the Lock Screen, then operations, such as downloads, can continue while you’re away from your computer.
Setting a Firmware Password
*Note: this only works on a Mac with an Intel Processor, not with Apple’s M1 or M2 processors.*
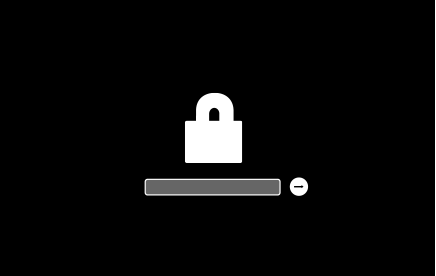
To prevent unauthorized users from starting up your Mac from another drive, or from the recovery partition, you can set a firmware password. Once set, when you start your Mac from your normal startup disk, you see the normal login window where you enter your user account password. If you try to start up from another drive, or from macOS Recovery, your Mac pauses startup and displays a lock icon with a password field instead.
To set a firmware password on an Intel Mac, follow these steps:
-
-
- Restart your Mac and hold down Command+R as soon as the screen turns black. Your Mac will now boot from the recovery partition. This may take longer than usual but just keep holding down the keys until you see a progress bar.
- When the Mac finishes starting up, you should see the Utilities window.
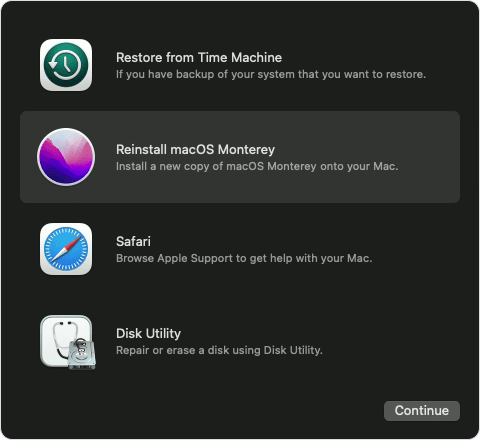
- Select Utilities from the menu bar and then choose Firmware Password Utility.
- Click Turn On Firmware Password, enter a password, then click Set Password. Make sure to keep a record of the password, in a password manager on another device, for example.
- Quit the Utility, then choose Apple Menu > Restart, to restart your Mac.You’ll only be asked for the firmware password if someone is attempting to start your Mac from a drive other than the one selected in the Startup Disk pane of System Settings. If you want to start up from another drive, without having to enter the firmware password, you can change the startup drive, then click Restart in that preference pane.
-
You can only set a firmware password on an Intel Mac; the new Macs with Apple’s own processors do not support this. Apple recommends the use of FileVault to protect your data on these Macs, and, to be honest, if you are using FileVault even on an Intel Mac, you probably don’t need a firmware password.
In addition, macOS Ventura requires that you “trust“ an external drive in order to use it with your Mac, either as a startup disk, or as a data or backup disk. This means that a random person cannot just connect a disk to your Mac and boot the computer. When you first plug a drive into your Mac, you will see a dialogue asking for your password and ensuring that you trust that device. 
Encrypt External Drives
FileVault protects your startup drive, but what if you have other drives? You may have one or more external drives that you use to store data or for backups; portable drives that you use to take files to and from work; and USB thumb drives you use to take files to a friend’s house. You may also have drives that are formatted with two or more partitions, and you can choose to encrypt certain partitions on these drives, if you want. You can encrypt these drives manually to protect their data.
Encrypting Drives and Partitions (Option 1)
To encrypt a drive or partition using the Finder, follow these steps:
-
-
- Anything can happen from a sudden drive failure to a power outage so always make sure you have a current backup.
- Right-click on the drive icon on your Desktop, in a Finder window, or in the Finder sidebar.
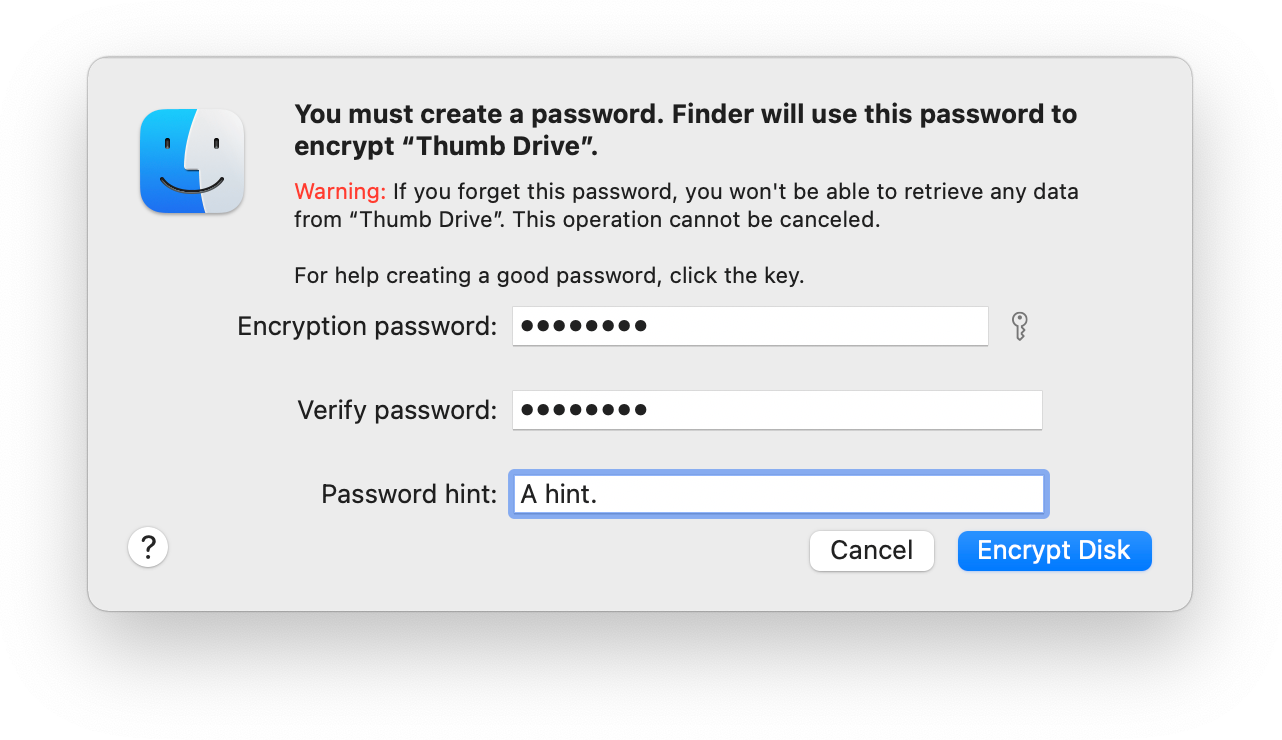
- Choose Encrypt. A dialog displays inviting you to set a password, type it a second time, and enter a password hint. The password hint is required, so you cannot leave it blank. Since you will need to enter the password after every restart or every time you connect the drive, the chances of forgetting that password are slim, so you may not need a hint. If you don’t think you’ll forget the password, set a hint that makes no sense at all and will only confuse an unauthorized person.
- Click Encrypt Disk and let macOS work for you in the background. When the encryption has completed, you’ll see Decrypt in the contextual menu when you right-click on the drive. If you ever want to turn off the encryption, choose Decrypt and enter the password, and macOS will decrypt the drive.
-
Note that when you encrypt drives on macOS Big Sur or later, they are converted to the APFS format, which is not readable by Macs running versions of macOS older than 10.13 High Sierra.
Encrypting Drives and Partitions (Option 2)
You can also encrypt drives or partitions through Disk Utility, but this requires that you erase them in the process. For new or empty hard drives, or drives that still ned to be partitioned, Disk Utility is a good option, since you’re likely already using it anyway to handle the partitioning.
To encrypt a drive or partition using Disk Utility, follow these steps:
-
-
- Open Disk Utility; it’s in the Utilities folder in your Applications folder.
- Select the drive or partition you want to encrypt. In this example, I’m using a USB thumb drive, but you can do this on any drive, other than your startup drive. Make sure that you’ve backed up the data on the drive, because the next step erases it completely.
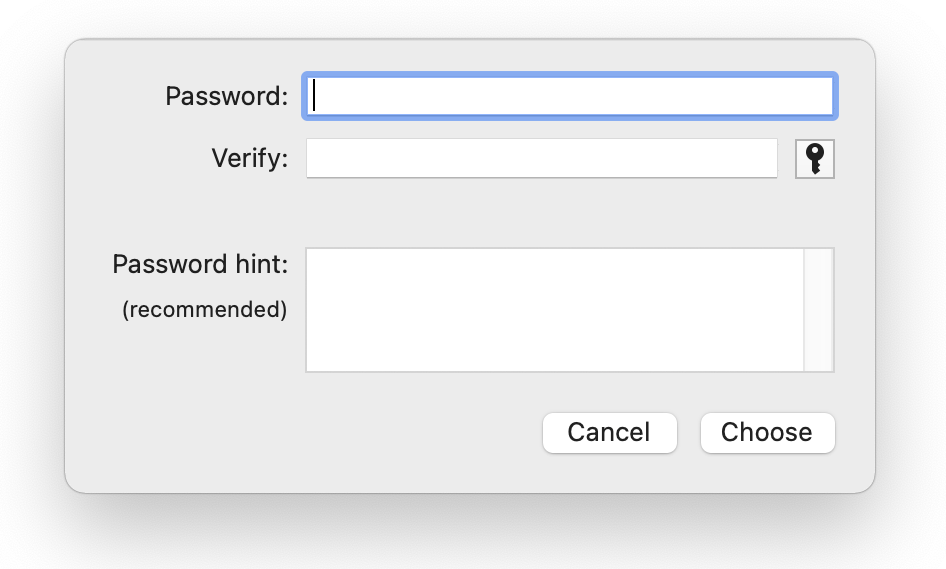
- Click Erase. In the dialog that displays, name the drive, then click the Format menu. In macOS Big Sur or later, you have to use the APFS format to encrypt drives: choose APFS (Encrypted). Enter a password, type the password again in the Verify field, then enter a password hint; it’s not required here, but it is recommended.
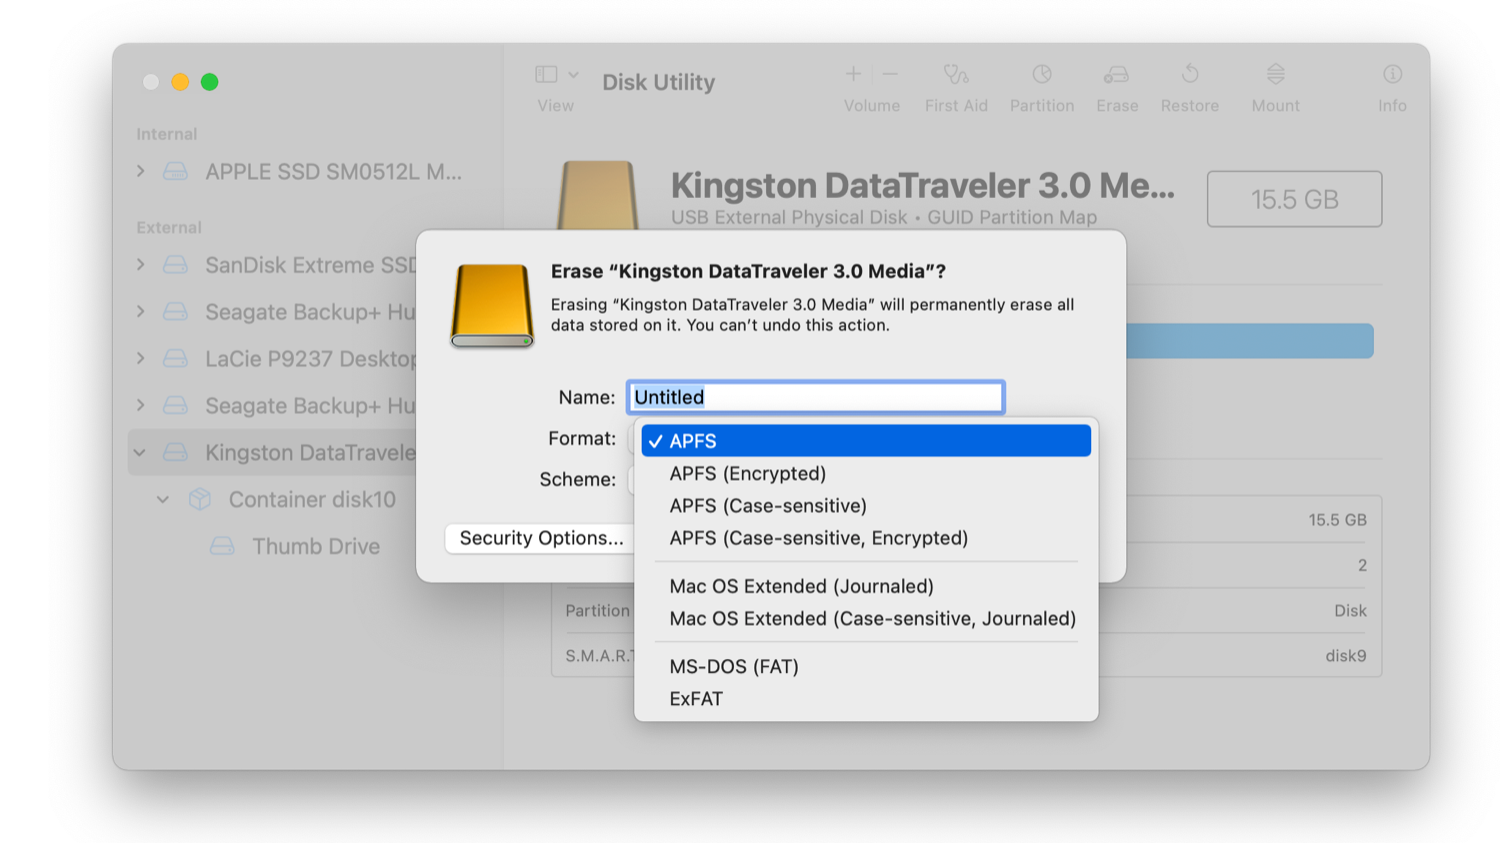
- Click Choose when done, and the drive or partition will be erased and encrypted.
-
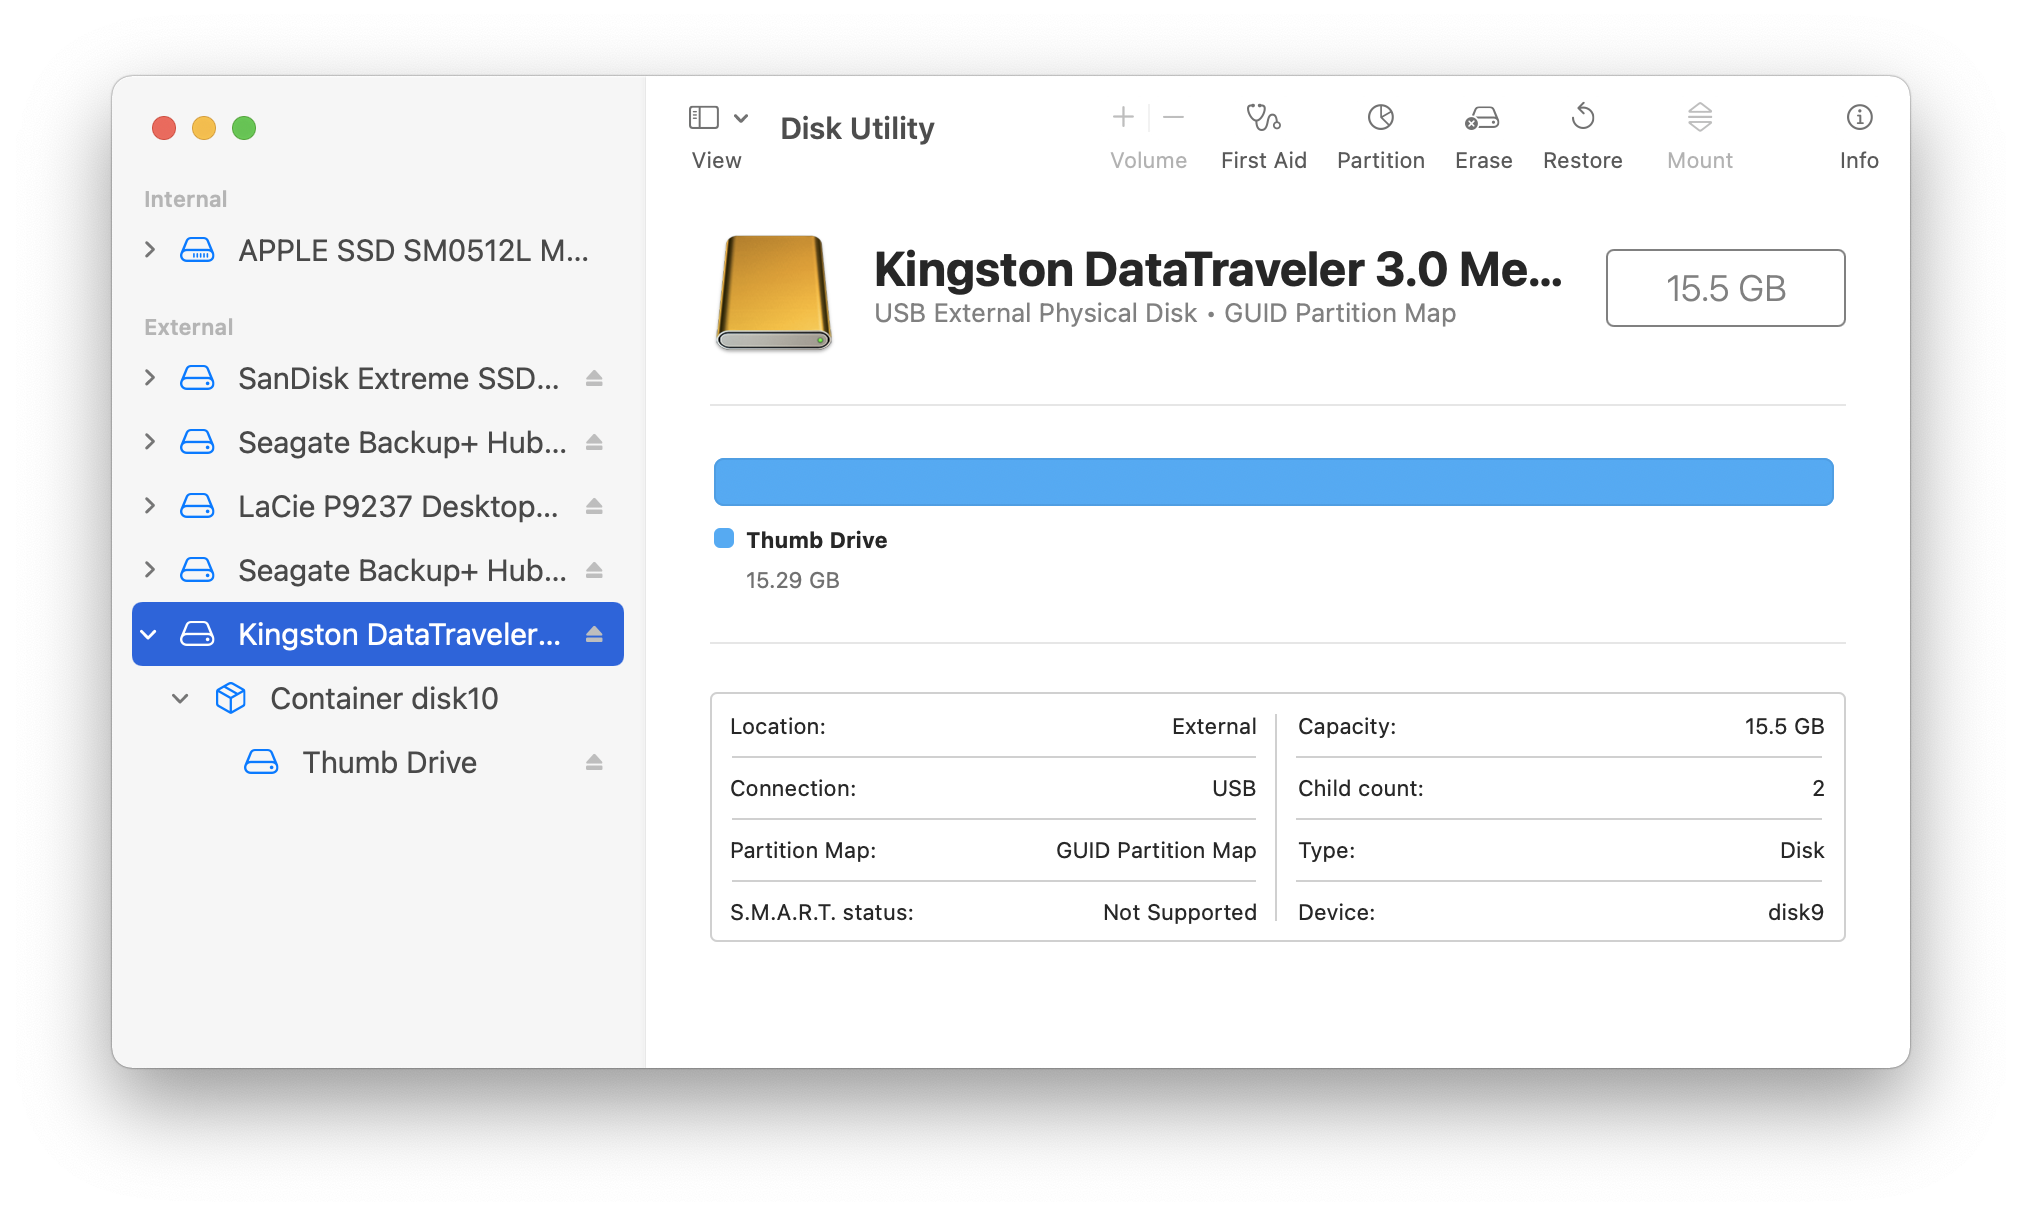
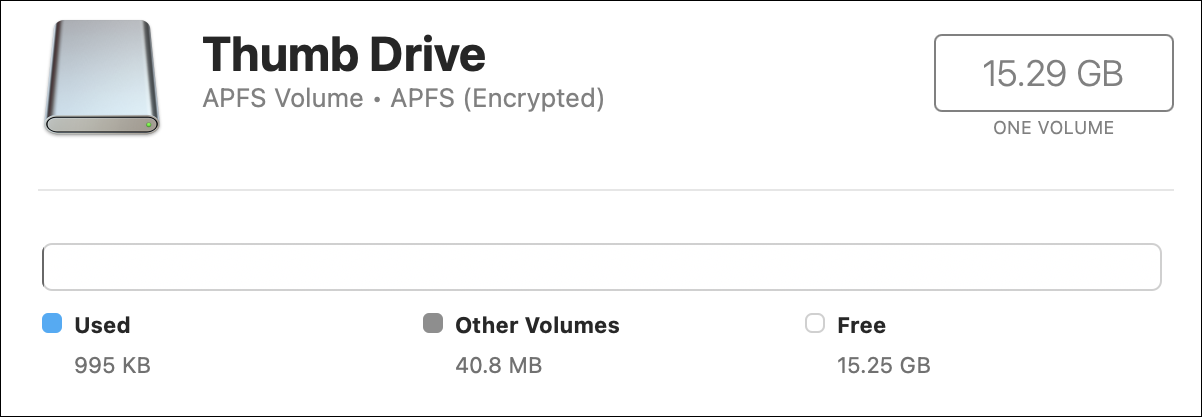
You can verify the encryption is in place by clicking that same drive again in Disk Utility. It will now show that the drive is formatted in an encrypted format as shown in the screenshot below.
Going forward, every time you restart your Mac or mount the drive, a window like this displays:
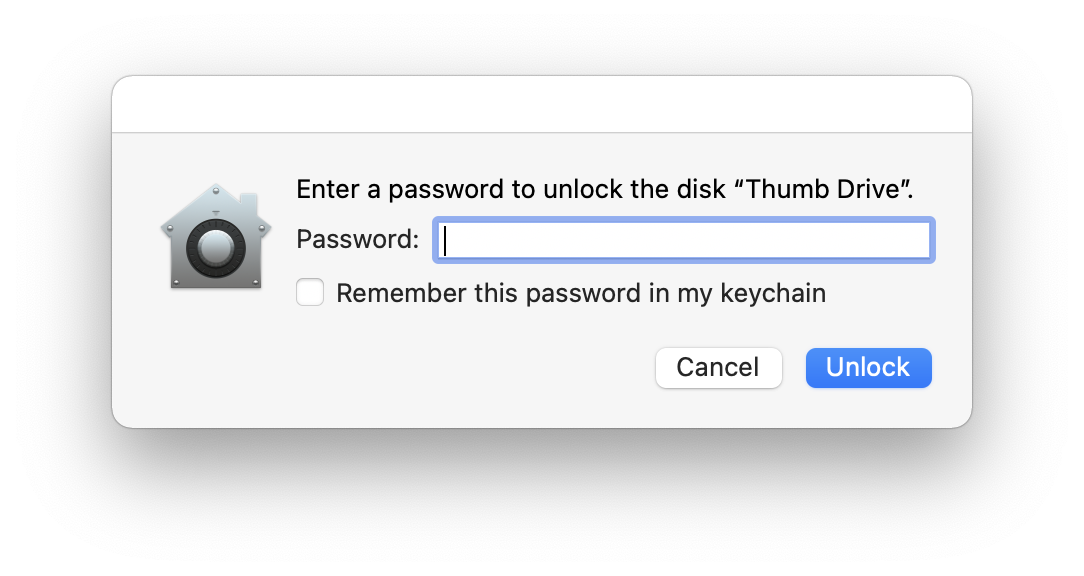
If you save the password in your keychain, then you won’t need to enter it again, once you’ve logged into you Mac. However, if someone manages to get into your account, the drive will mount automatically. So it’s better protection to not save the password, but you’ll need to remember it, and it’s more likely that people choose weaker passwords when they have to remember them.
If you forget the password, there is no way to access the files on the drive; you’ll have to erase it to be able to use it.
Encrypting Disk Images
You can also create encrypted disk images to store files. Think of these as folders with their own encryption. Even if the hard drive the data is on is already encrypted, some want an additional layer of security for certain files or folders, and an encrypted disk image has its own password. And encrypted disk images are portable: if you copy one to an unencrypted disk, files will still be protected. 
You can create two types of disk images: standard disk images with a fixed size, or you can create “sparse images,” for which you define a maximum size, but which only use the amount of space of the files you’ve added. Sports images are great because they can grow as you add more files to them. The encryption applies to any files or folders you add to the disk image.
To create an encrypted disk image using Disk Utility, follow these steps:
-
-
- Open Disk Utility; it’s in the Utilities folder of your Application folder.
- Choose File > New Image > Blank Image. If you want to create a disk image from an existing folder, choose File > New Image > Image From Folder.
- The following dialog displays:
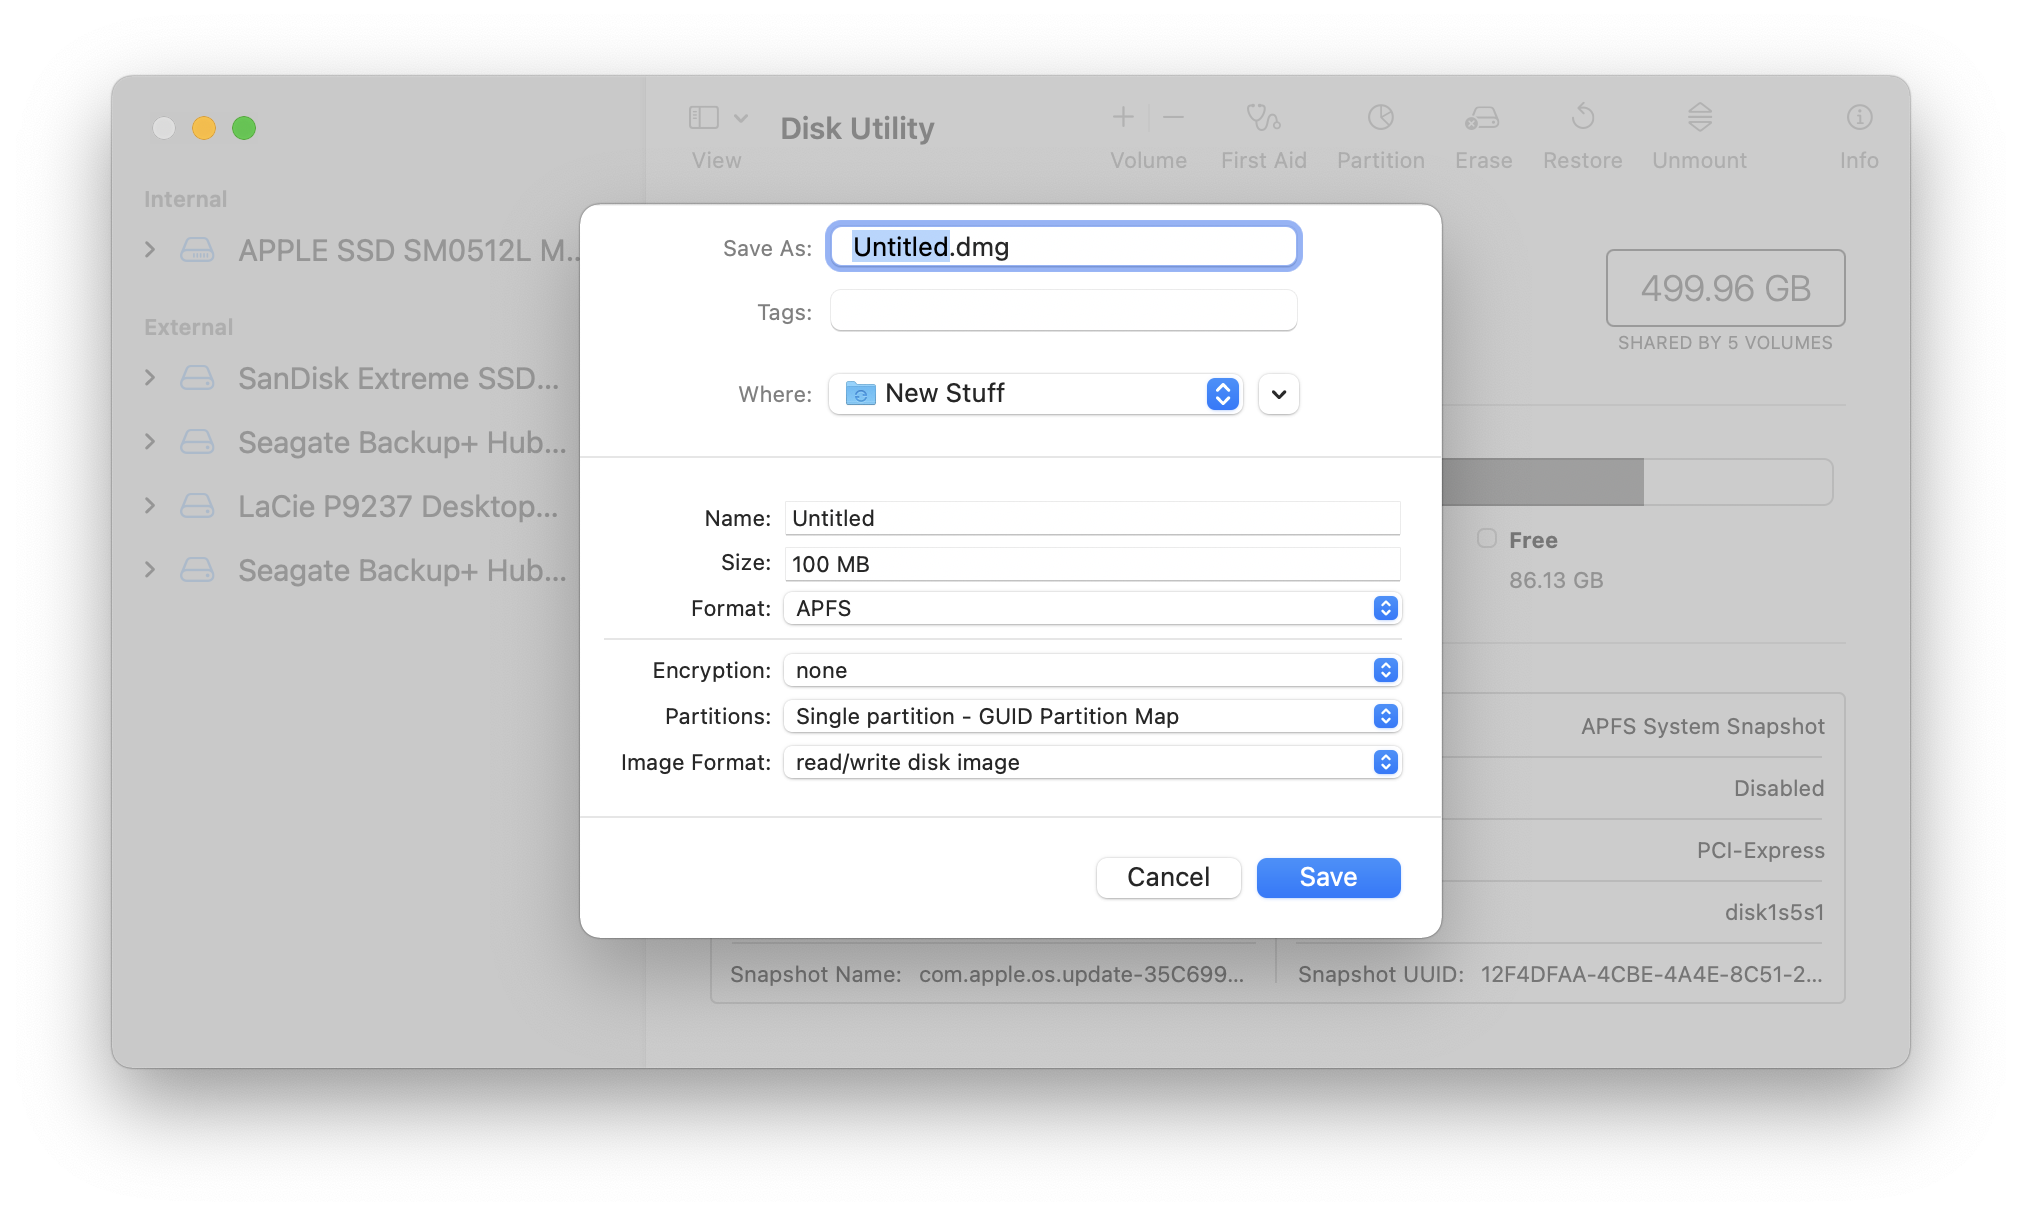
Depending on your needs, this can be set up in different ways. I’ll stick with the scenario that fits the most common uses.
- There are a number of configuration options and settings:
- The Save As file name is what you’ll see in the Finder, such as FileName.dmg.
- In Where, choose a location to save the disk image.
- The Name is what displays on your Desktop after you double click the disk image.
- For Format, close APFS for a Mac that has an SSD and is running macOS 10.13 or later. Choose Mac OS Extended (Journaled) if you want to use the disk image on a Mac running macOS 10.12 or earlier. If you want to access the disk image on Windows, and it’s 32 GB or smaller, choose MS-DOS (FAT); for Windows above 32 GB, choose ExFAT.
- For Partitions, let Disk Utility set the appropriate option according to the format you choose.
- For Image Format, you can choose read/write disk image for standard disk images, or you can choose sparse image or sparse image bundle if you want a disk image that will expand as you add files.
- Select the Size of the disk image. In general, you either know how many files you want to put in your disk image, or you want to leave space to add more files. If you choose a read/write disk image, set the size for what you need, leaving room to add more files if necessary. The disk image will take up that amount of space on your drive. However, if you choose sparse image, set the maximum size you want for the disk image. The disk image won’t take up much size right away, but will grow as you add or remove files. An empty sparse image is less than 10 MB, but as you add more files it will grow. So don’t hesitate; set it to 1 GB or more.
- Next choose the Encryption level. There are two encryption options; choose 256-bit. Click Save when everything is set up and Disk Utility creates the disk image, then the Finder opens and mounts the disk image; you’ll find it on your Desktop or in the Finder sidebar.
- Select the disk image you just created and press Command+i or right click on it and select “Get Info.”
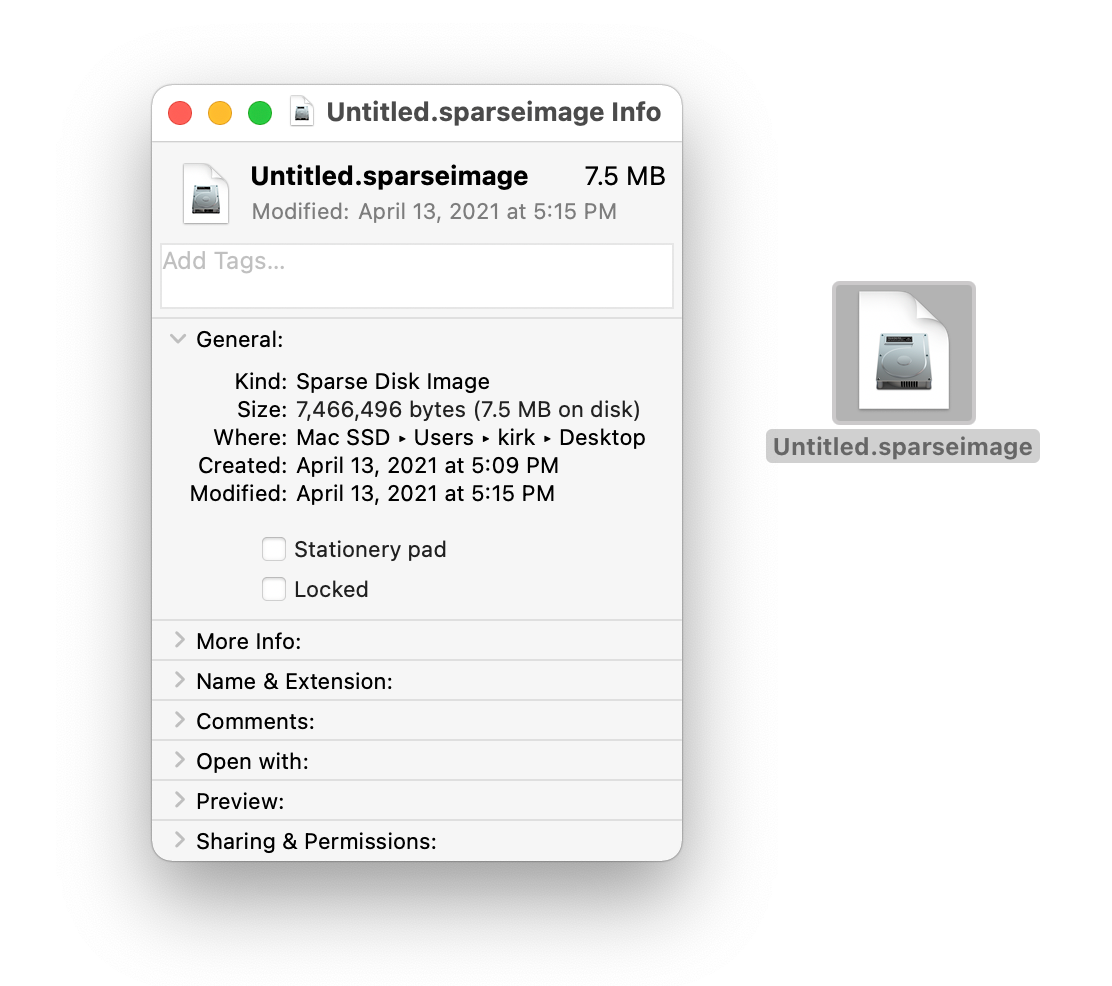
The reason I recommend using the sparse disk image now becomes clear. I set the disk image to be 1 GB, but it only takes up 7.5 MB on my drive. This is because the sparse disk image format grows in size when needed, until it reaches the size you set in Disk Utility; in my case, this is 1 GB. If you find you need a bigger disk image later, just create a new one and copy the data over.
- If you want to encrypt an existing folder, select the folder you want to encrypt, set a name, encryption strength, and format (read/write if you want to make changes to the contents later on).
-
Keep in mind that this disk image, created from a folder, will not be able to store more files than what’s already there. This makes the Image From Folder method a good one for long term storage of files you’re done with. If you need to frequently access the contents or add to it, a sparse disk image, or a read/write disk image, of a size larger than the files you currently want to store in it, is a better way to go.
Encrypt Documents and Files
You often need to share data and files. While the above techniques help you ensures it, the data on your Mac is protected, what do you do if you need to email or message a document or file to someone? You can password protect certain types of documents and files.
Password Protecting through the Preview App
The Preview app is versatile and often underestimated. One of the things it can do for you is encrypt files, allowing you to protect them with a password.
To password protect a file using Preview, follow these steps:
-
-
- Open any PDF file or image in Preview. On macOS, you can save any file as a PDF from the Print menu. Choose File > Print, then click the PDF menu and choose Save as PDF.
- In the save dialog, rename your file if you want, then click Security options.
- You’ll see an option to enable encryption and set a password.
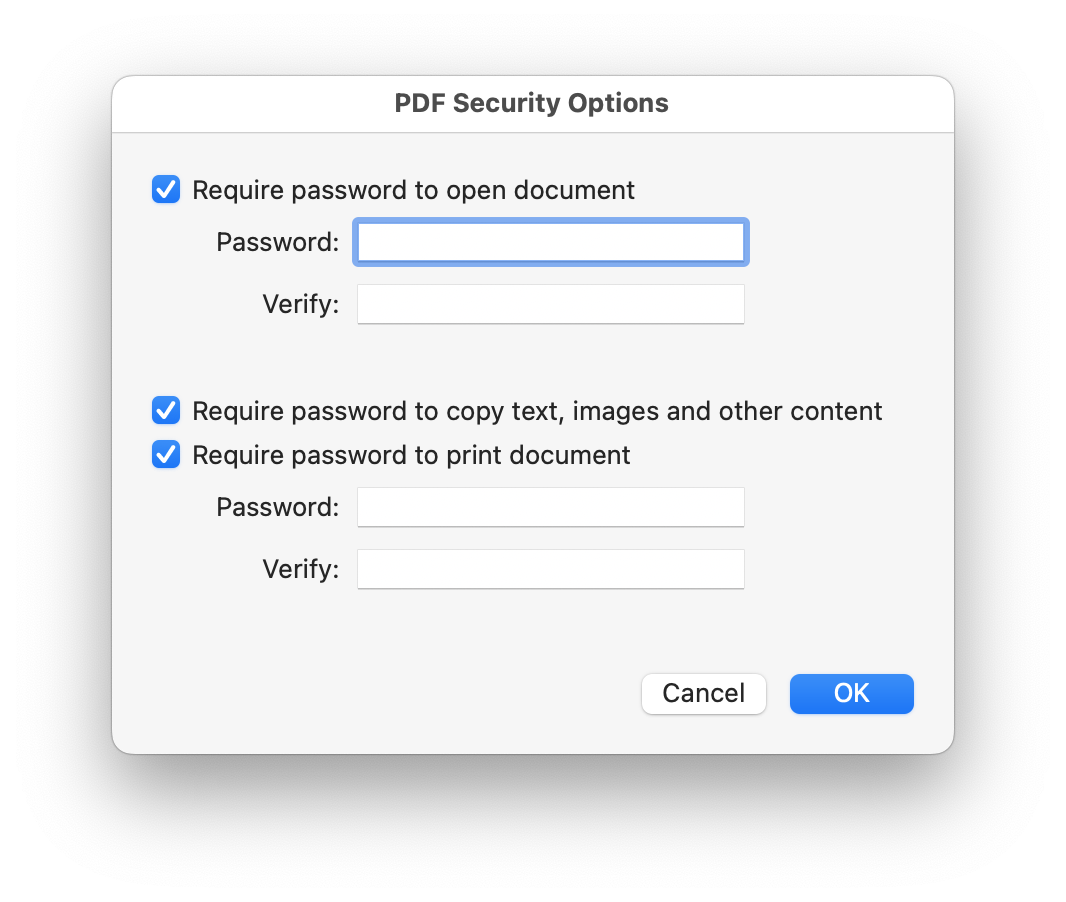
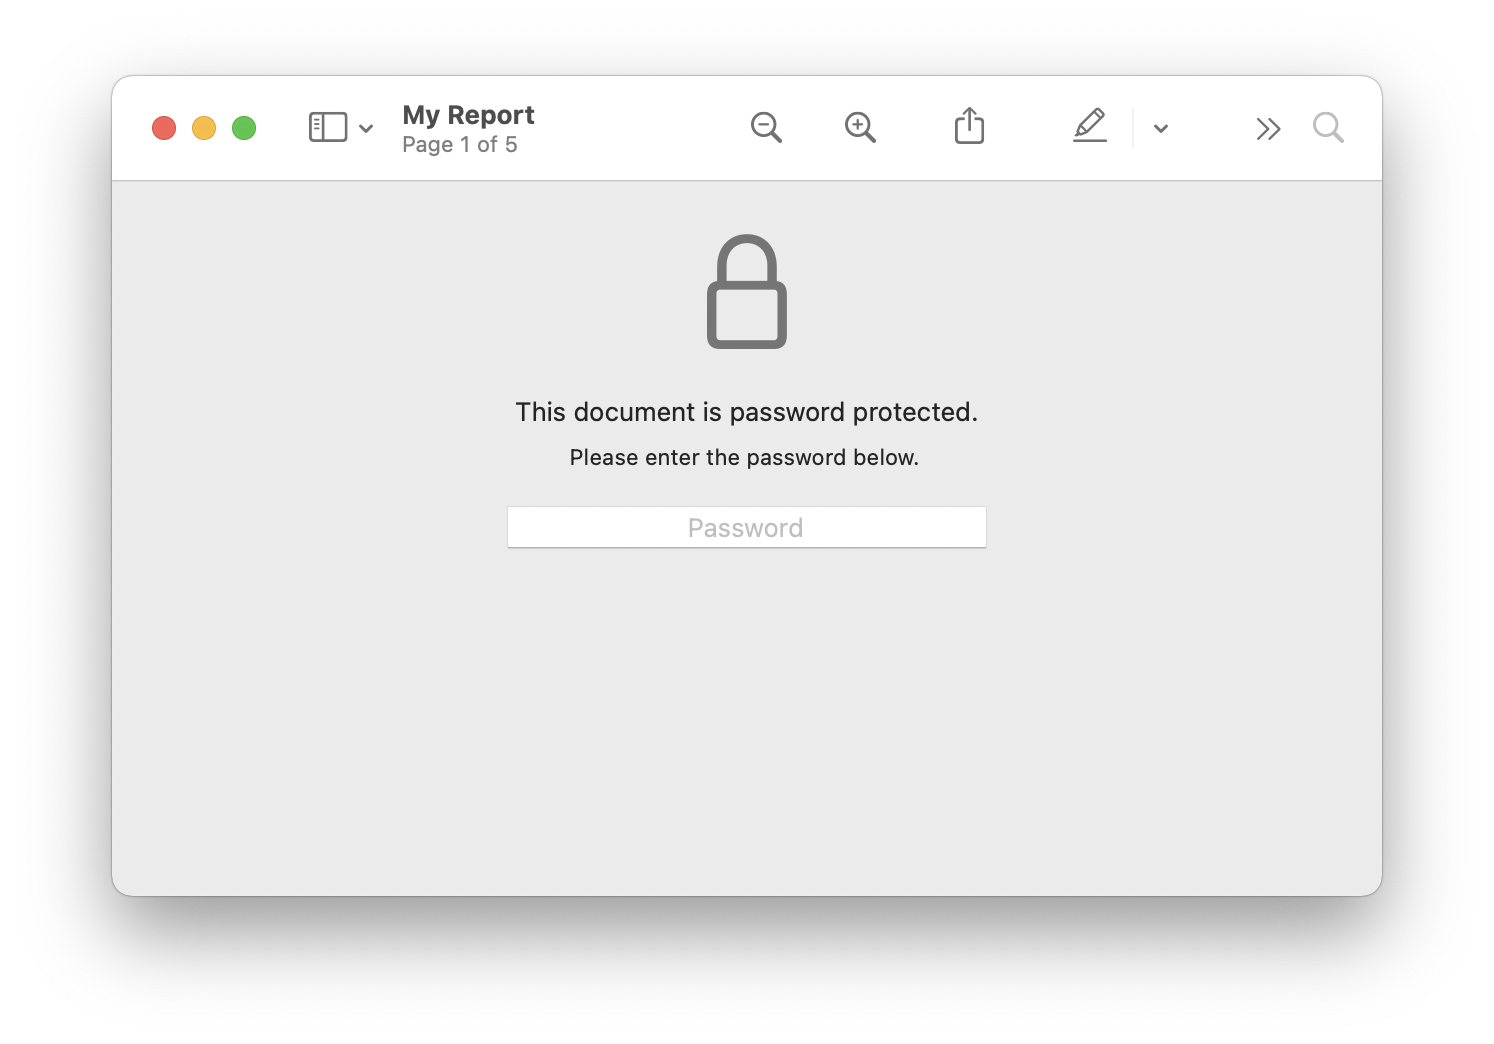
- Once a password is set and the file is saved, when you open the PDF file it will prompt for a password.
-
You can also choose File > Export as PDF. Click Show Details in the Save dialog, then click Permissions. You have more options here:
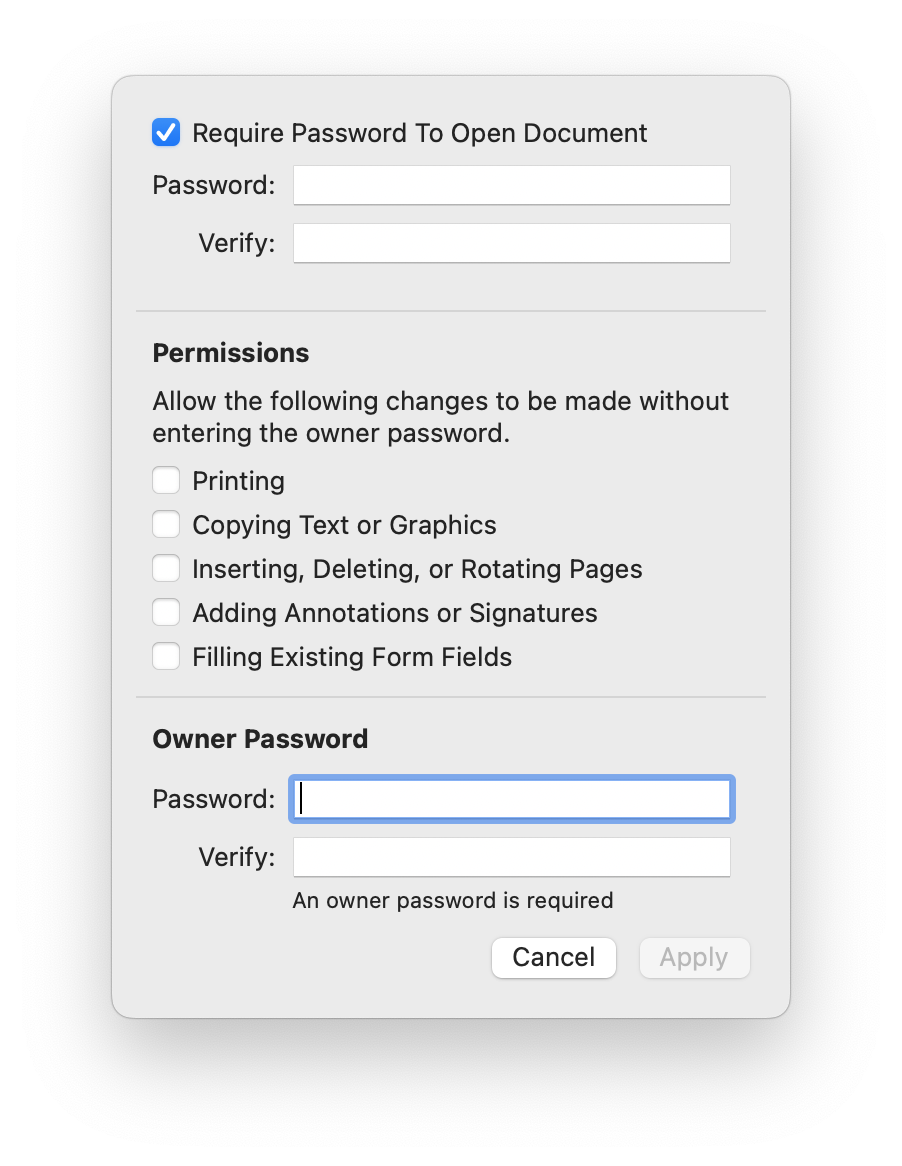
You can set an owner password, at the bottom of the dialog, which allows you to make changes to the document, and set permissions, such as whether the document can be printed, its content copied, and more. And the password you set at the top of the dialog is for a user who you want to be able to access the document, with the permissions defined. You can change these permissions later after entering the owner password. 
The above steps will work for any image or document that Preview can open.
Password Protecting an Existing PDF through the Print Dialog
You may already have a PDF that you would like to protect with a password. This can also be done using the Preview app, using either of the methods above. With the second method, choose File > Export, and you’ll see the same dialog with the Permissions button to set your password.
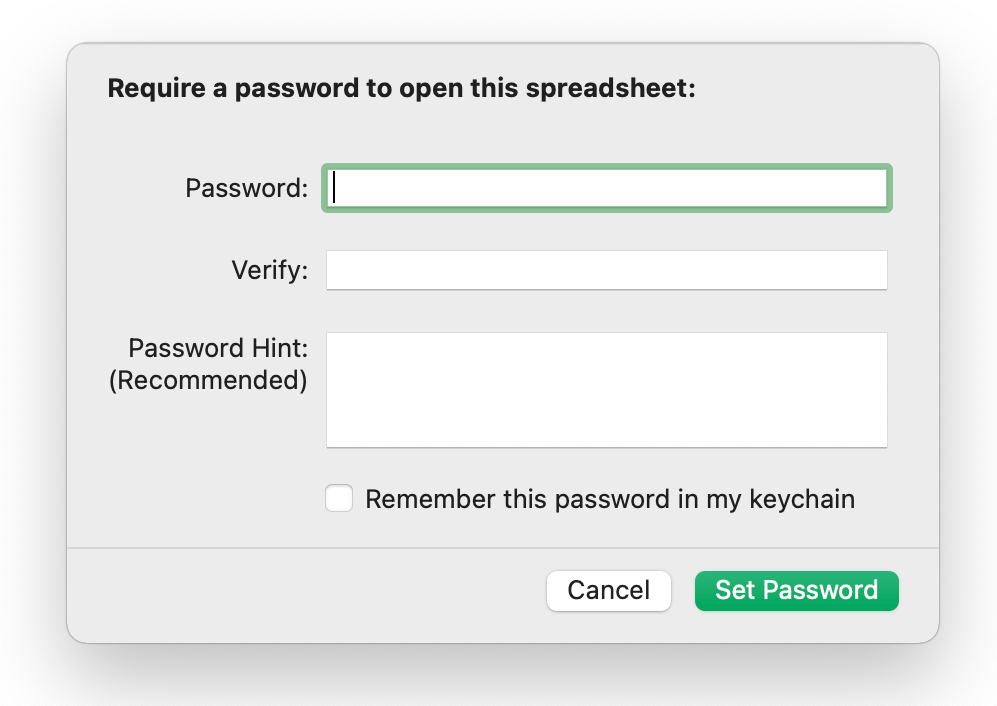
Password Protecting Pages, Numbers, and Keynote Documents
If you create a new document in Pages, Numbers, or Keynote there is no need to save your document as a PDF. You can password protect the actual document and keep it as an editable file. To password protect your Pages, Numbers or Keynote document, follow these steps:
-
-
- With your document open, choose File > Set Password.
- Enter a password, enter it a second time in the Verify field, then click Set Password.
-
-
- Open the Terminal app which, is in the Utilities folder inside your Applications folder. When Terminal opens you will see a default string of text like this:
Dark-Star:~ kirk$This is your Mac’s name, current directory location (~ is a shortcut for your home folder), and your username. This is called a “prompt,” and it displays when Terminal is waiting for you to enter a command.
- In this example, I have a file on my desktop “report.pdf” that I want to put in a password protected .zip archive. In Terminal, I type the following:
zip -ej - “zip -ej ” (including the space at the end) tells Terminal you want to create a zip archive (zip) with encryption (e) and no file paths included (j). Next, you have to tell it where to save the zip file and what name it must get. The easiest thing is to just use your desktop which can be entered as “~/Desktop.” When done, it should look like this (add a space after the file extension):
zip -ej ~/Desktop/report.zip - Now Terminal needs to know which file is to be archived. The simplest way to do this is to drag the file you want to encrypt into the Terminal window. This adds the file path to Terminal. The result should look something like this; make sure there’s a space between the two file paths, and this example assumes that you’ve dragged a file (report.pdf) from your Desktop.
zip -ej ~/Desktop/report.zip ~/Desktop/report.pdf - Press Enter and Terminal prompts you for a password that will be required to open the .zip file. Terminal will not show any cursor movements while you type the password. Press Enter, and you are asked to verify the password by typing it again. Press Enter a third time and Terminal creates the zip archive. For my example, when Terminal was done, I saw this:
- Open the Terminal app which, is in the Utilities folder inside your Applications folder. When Terminal opens you will see a default string of text like this:
-
-
-
- This created “report.zip” on my desktop. When you double-click the file to open it, you see a password request in Archive Utility, the application that expands archives on macOS.
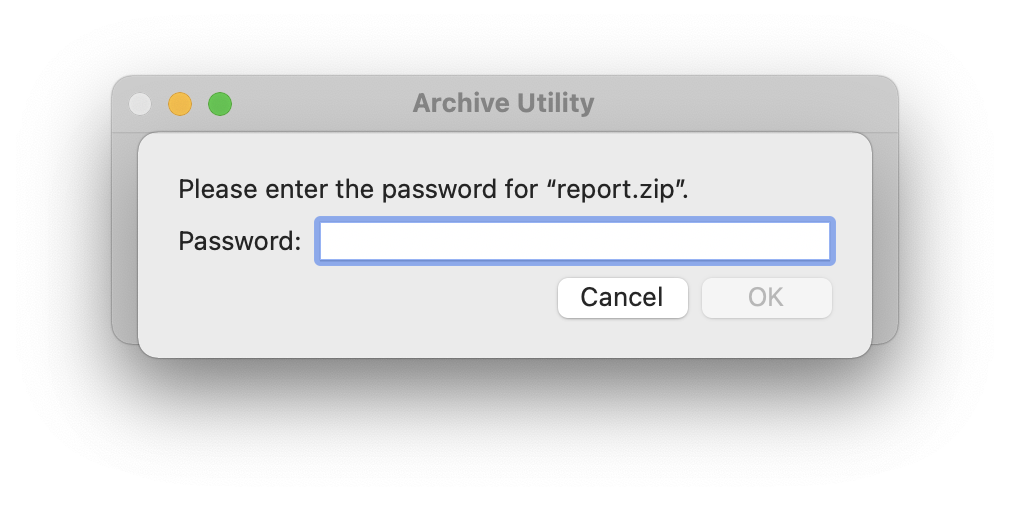
- This created “report.zip” on my desktop. When you double-click the file to open it, you see a password request in Archive Utility, the application that expands archives on macOS.
-
-
-
- Open Terminal.
- For this example, I have a folder on my Desktop named Photos that I want to put in a password protected .zip file. The command to archive a folder is slightly different:
zip -erAs with archiving a single file, zip tells Terminal what kind of archive to create and the (e) in -er tells it to encrypt the file. In this case the (r) means recursive, which tells Terminal to archive all the folder contents, even if they are in sub-folders.
- Since we’re already pointed at the desktop, specifying the saved file name does not require any path information, In my case I am saving it as “files.zip” so I end up with (make sure to leave a space at the end):
zip -er ~/Desktop/Photos.zip - Add the folder by dragging it onto the Terminal window, and I see this:
zip -er ~/Desktop/photos.zip ~/Desktop/Photos/ - After entering and verifying the password I end up with this:
Dark-Star:~ kirk$ zip -er ~/Desktop/photos.zip ~/Desktop/Photos/ Enter password: Verify password: adding: Users/kirk/Desktop/Photos/ (stored 0%) adding: Users/kirk/Desktop/Photos/IMG_1309.JPG (deflated 0%) adding: Users/kirk/Desktop/Photos/IMG_1308.JPG (deflated 0%) adding: Users/kirk/Desktop/Photos/.DS_Store (deflated 97%) adding: Users/kirk/Desktop/Photos/IMG_1310.JPG (deflated 0%) adding: Users/kirk/Desktop/Photos/IMG_1307.JPG (deflated 0%) Dark-Star:~ kirk$
-
-
-
- Open System Settings, then click General, then Time Machine. cClick Select Backup Disk.
- Select an external drive or partition to use as a backup destination. Make sure to check Encrypt backups.
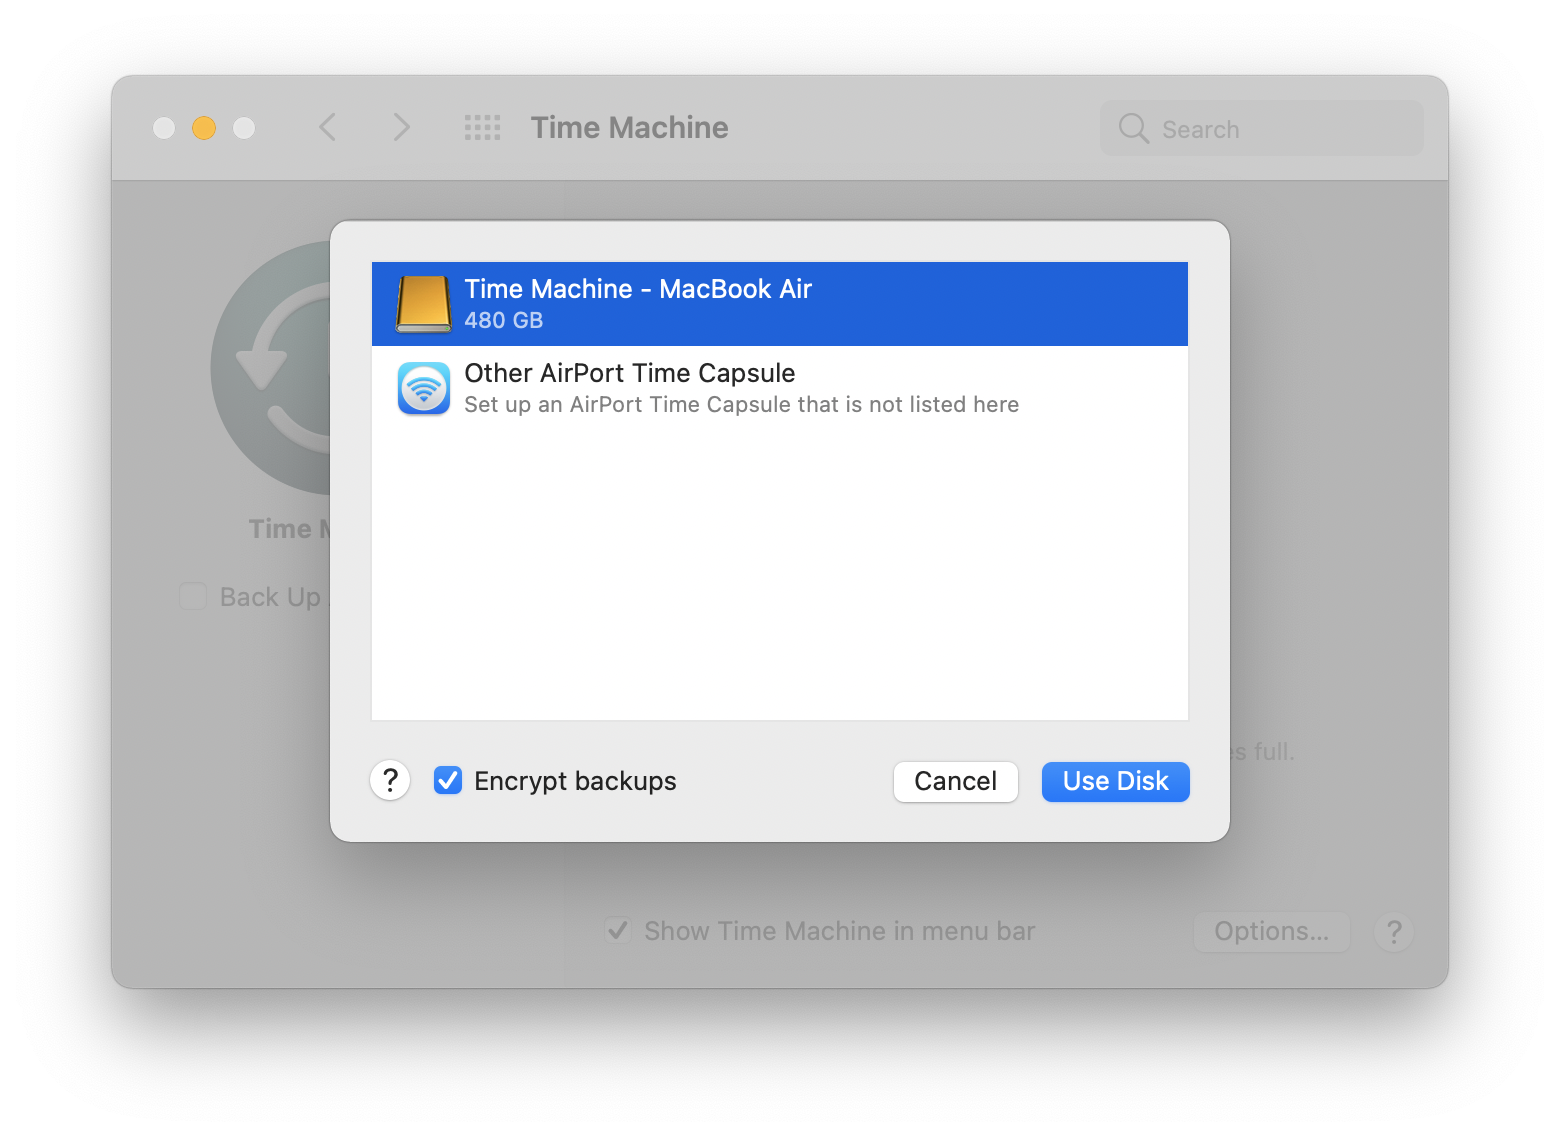
- Set a strong password and a hint. (Choosing a password hint is mandatory.) When you click Use Disk, Time Machine begins the encryption process. A progress bar displays as the drive or partition is prepared, then the backup starts while the encryption runs in the background.
- The backup data is stored in a “backup.backupdb” folder that you can open and browse, just as on an unencrypted drive. It correctly assumes that since the drive or partition itself is encrypted there is no need to wrap the backups in an encrypted disk image. This encryption is similar to FileVault, where the entire drive is encrypted, and, as new files are added, they are also encrypted. 
-
-
-
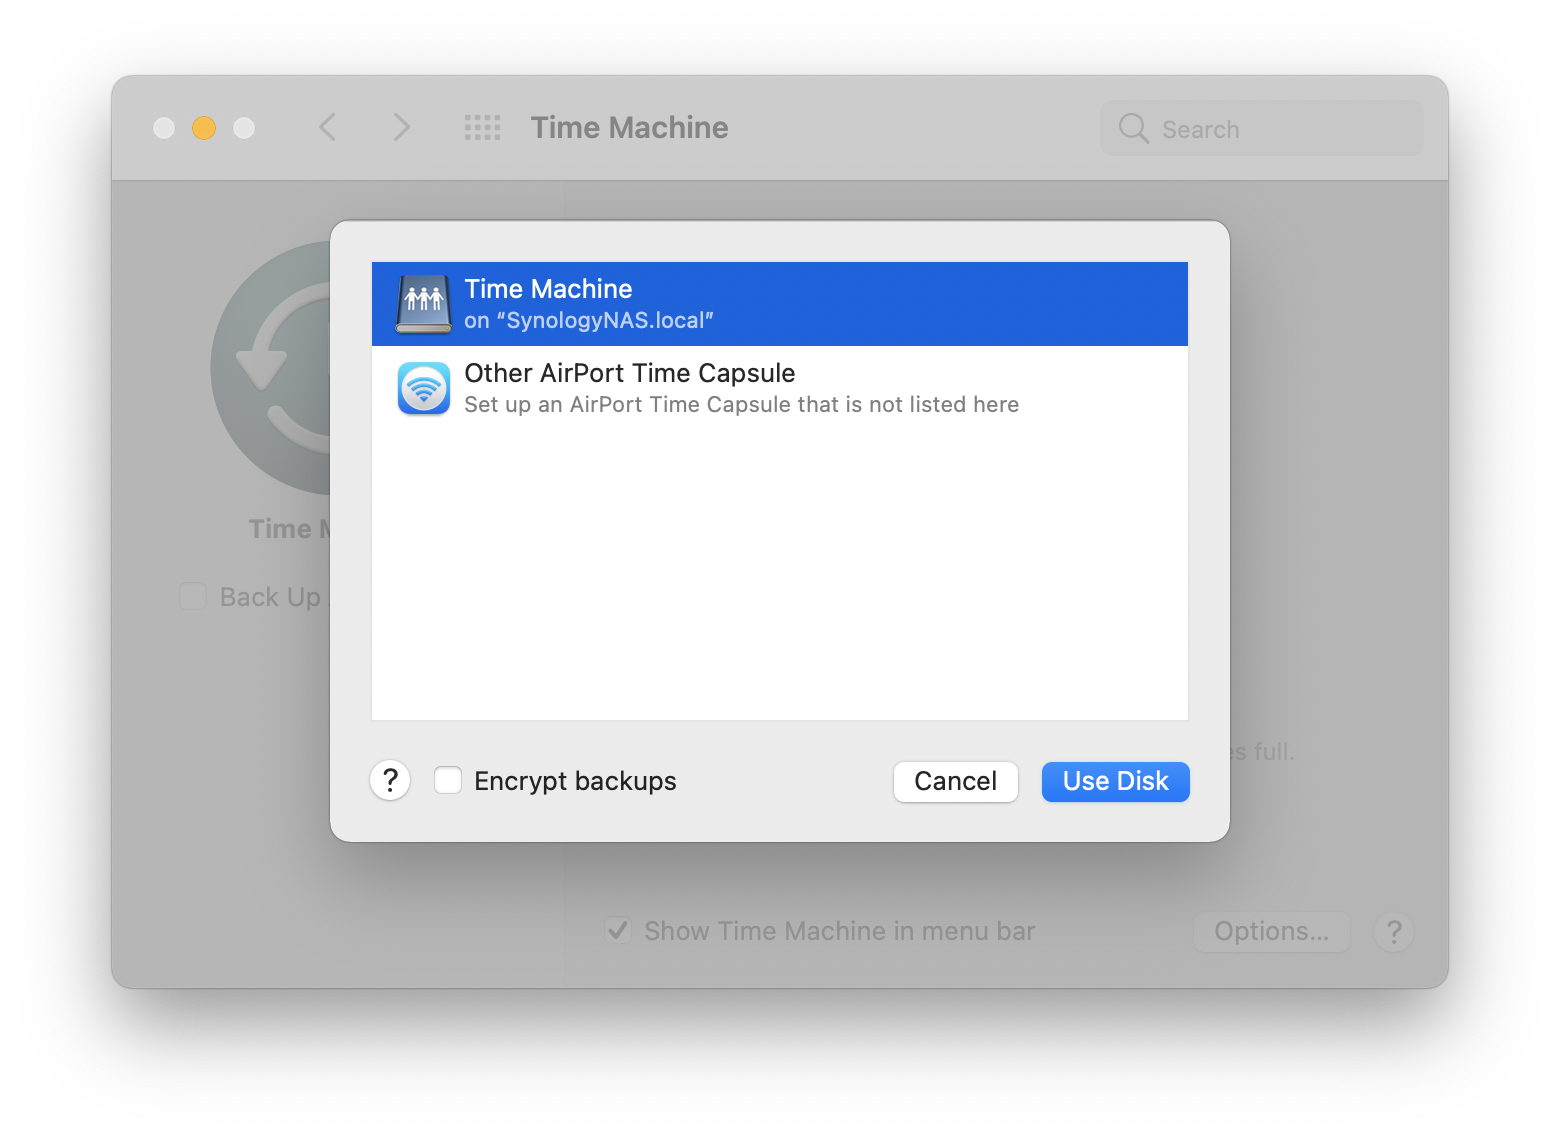
- In the Time Machine preferences, and select your server or NAS destination, then click “Use Disk.”
-
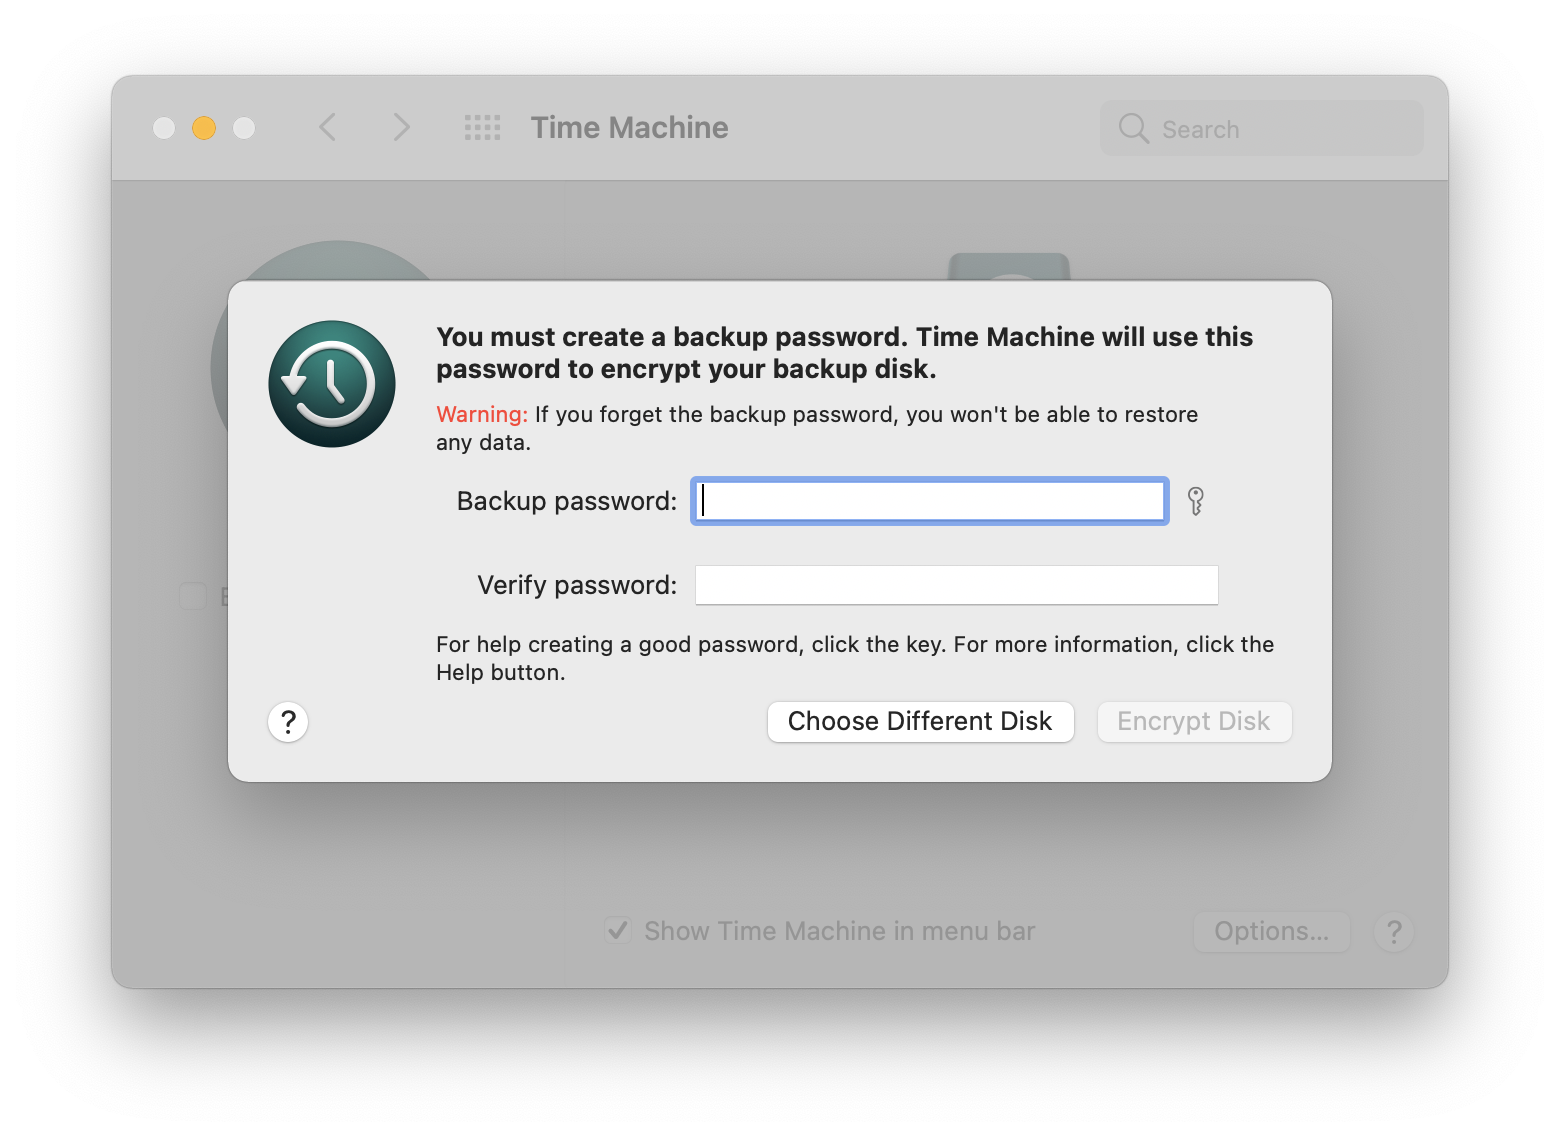
- A password request displays: this is the password for your server or NAS.
- After you authenticate, you are prompted to set a password to encrypt the backup. In this case no hint is required.
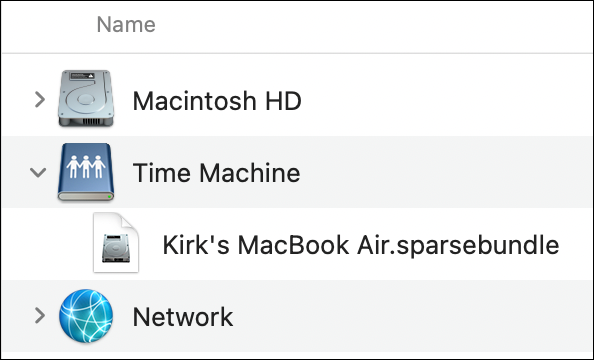
- The backup begins momentarily. Because the backup is stored on a network volume it is not stored as a “backup.backupdb” folder but an encrypted sparse bundle image instead. As explained above, this is a type of disk image that expands when more space is needed for additional files.
Password Protecting Word, Excel, and PowerPoint Documents
The Office 365 apps – Word, Excel, and PowerPoint, allow you to password protect documents. Each of the three apps does this a bit differently.
Microsoft Word
In Microsoft Word, click the Review tab, then click Protect in the ribbon and choose Protect Document. A dialog displays giving you options to password protect a document for opening and modifying the document, as well as other options.

Microsoft Excel
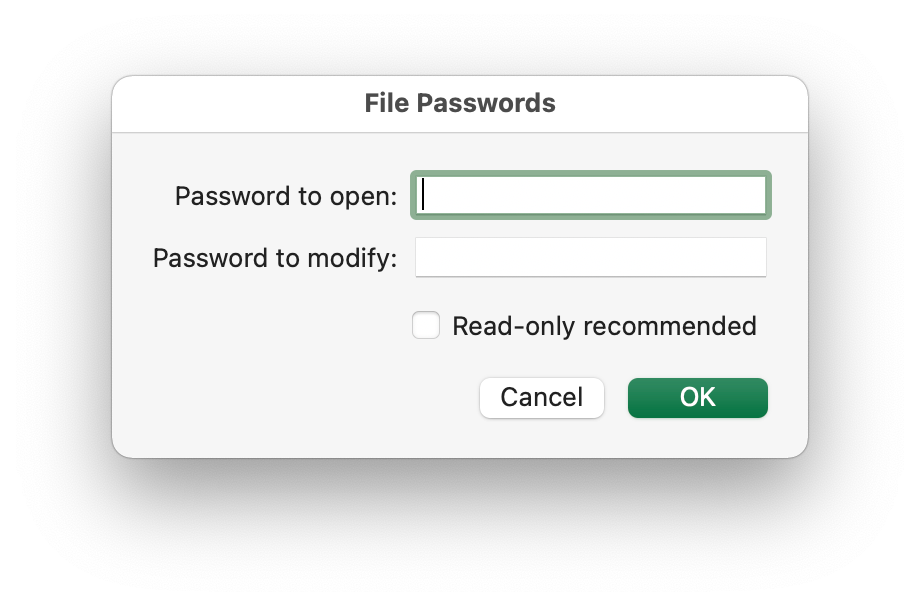
In Excel, you can password protect a spreadsheet by choosing File > Passwords. A small dialog displays, where you can set a password to open the document, and to modify it.
Microsoft PowerPoint
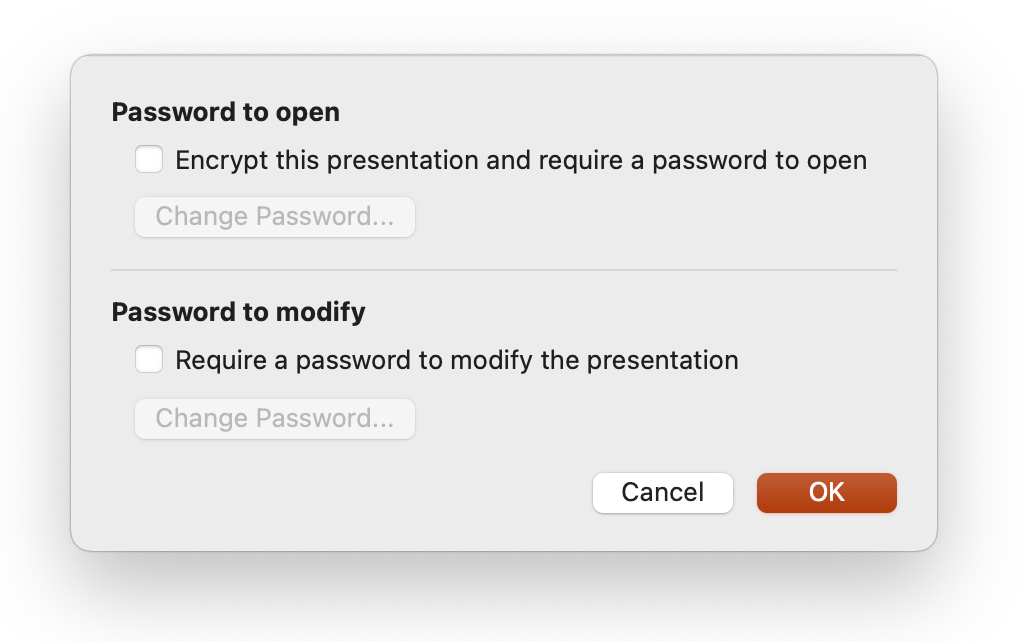
As above with Excel, you choose File > Passwords to protect a PowerPoint presentation. You can set a password to protect a document from opening and another to protect it from modification.
Creating a Password Protected .zip Archive
If, for whatever reason, you cannot password protect the file or folder you want to secure, such as if the file needs to be compatible with another operating system, wrapping files or a folder in a .zip archive can come in handy. Any file, whether it’s an image, document or video, can be archived. Size is not an issue, but will depend on what you do with the archive once it’s created. You may, for example, have limitations to the size of attachments, if you want to send it by email. However, you can send attachments using MailDrop; see this article for more on MailDrop, and for a number of ways to securely send files.
Creating a password protected archive is convenient if you need to send files quickly and securely, and if the archive needs to be compatible with other operating system. If you send this type of archive to a Windows user, they can open it. If you plan on creating large archives for storage or to transport on a flash drive, I recommend using the above mentioned encrypted disk image instead. Creating a password-protected zip archive is, unfortunately, not as easy as the above mentioned methods; it requires the use of the command line.
To create a password protected .zip archive, follow these steps:
Archiving a Single File
Dark-Star:~ kirk$ zip -ej ~/Desktop/report.zip ~/Desktop/report.pdf Enter password: Verify password: adding: report.pdf (deflated 25%) Dark-Star:~ kirk$Archiving a Folder
As you can see above, the zip command shows you how much space it’s saved for each item in the folder. Since these photos are already compressed, no space is saved, but what’s important here is protecting the archive with a password. In other cases, you will save space when performing this operation.
Encrypt Backups
Your Mac may be set up like Fort Knox, but your backups are copied to an external drive or server. If your backups are not encrypted, an unauthorized user doesn’t need to go through all the trouble of accessing your Mac; they can just take your backups instead. Luckily, Apple makes it very easy to encrypt Time Machine backups. There are two ways to do this, and I will cover both. In this example, I will walk through the first time setup of Time Machine.
To set up an encrypted Time Machine backup, follow these steps:
How to Back up to an External Drive or External Drive Partition
How to Back up to a Server, NAS, or Time Capsule
The process for backing up to a server, such as a NAS or file server, is similar to that of backing up to an external drive drive partition. You can also back up to a Time Capsule, Apple’s wi-fi router with a built-in hard disk, that was discontinued in 2018. If you are backing up to a NAS, check the documentation for that device to find out how to turn on Time Machine discovery, if this is available. And you can also back up any Mac to another Mac, if file sharing is turned on. See this Apple support document for information about using a network device for Time Machine backups.
Follow these steps to backup your data to a server:
Distributing Files Securely
When you want to send files securely to others – friends, family, or colleagues – there are many options, and the one you choose depends on the size of the files you want to send, and which software they use. As mentioned above, you can send an encrypted disk image or zip archive by email, using Apple’s MailDrop, and not have to worry about the attachment being intercepted, because it’s protected by a password.
But there are other ways to send files securely. You can use secure messaging, such as iMessage; you can use online secure file transfer services, such as WeTransfer; you can even use cloud storage, like iCloud, Dropbox, or OneDrive. Because cloud services store files securely, transferring files to others can be as easy as uploading them to your cloud storage service, then sending a link to someone else.
Read our article How to Send Files Securely for more on the various ways to send files securely.
Summing Up
This article has shown you the many ways you can ensure that data and files on your Mac is secure. While this may seem like a lot of work at first, once you set up some of these routines, you’ll find that it becomes second nature. Take some time to think about how to secure your files, so you don’t have to worry about your data being stolen.
How can I learn more?
 Each week on the Intego Mac Podcast, Intego’s Mac security experts discuss the latest Apple news, security and privacy stories, and offer practical advice on getting the most out of your Apple devices. Be sure to follow the podcast to make sure you don’t miss any episodes.
You can also subscribe to our e-mail newsletter and keep an eye here on Mac Security Blog for the latest Apple security and privacy news. And don’t forget to follow Intego on your favorite social media channels: Facebook, Instagram, Twitter, and YouTube.
About Jay Vrijenhoek
Jay Vrijenhoek is an IT consultant with a passion for Mac security research. View all posts by Jay Vrijenhoek →
-

