Apple + How To + Recommended
How to Verify Your Mac’s Hardware Is Working Properly
Posted on
by
Jay Vrijenhoek
 Your computer consists of both hardware and software and a number of things can go wrong. In this 2-part series, we’ll take a look at how to check your Mac’s hardware and software to verify your system is in good shape or if certain components are failing. In part 1 below, you’ll learn how to check and verify your Mac’s hardware is working properly. See part 2 to learn about all the ways you can test your Mac’s software to verify it’s running smoothly.
I get asked all the time how to solve issues on a Mac, but rarely do I get asked how to simply verify a Mac’s hardware is in good shape even when it’s not experiencing issues. Not many people check their systems when everything is working properly, it’s usually when an issue arises folks start troubleshooting—and by then it could be too late.
Think your Mac’s hard drive is failing? Want to determine which hardware component is failing? In this article, I’ll list some of the ways you can check your Mac to make sure everything is working the way it should. After all, just because everything seems to be running smoothly right now does not necessarily mean everything is actually OK.
NOTE: Checking a system in most cases requires it to be put through the wringer. This can stress out and break components that may already be failing. Make sure you have one or more backups of all your data and proceed at your own risk!
There’s quite a lot to cover here, so if you’d rather skip to the hardware you want to test, click on the appropriate section below.
- General Apple Diagnostics
- Hard Drives (HDD/SSD)
- Memory (RAM)
- Processor (CPU)
- Graphics (GPU)
- Sensors
- Physical (ports, keyboard, enclosure, etc.)
Hardware Health Checkup
There is so much going on inside your Mac. Dozens of sensors and components that get really hot, moving parts (not so much on newer Macs), and so much more—things the macOS does not tell you about or let you control, and all of it makes up the “It just works” experience.
When dealing with hardware woes, it can be a daunting task to determine which hardware component is failing. Let’s begin the health checkup with a hardware diagnostic test.
General Apple Diagnostics
This is available for any Mac from June 2013 and newer.
To launch Apple Diagnostics, begin with your Mac turned off, and simply start up your Mac and hold down the D key right after pressing the power button. Keep holding the key until you get the option to select a language. With the arrow keys on your keyboard, navigate to the language you want and hit the return key.
It’s possible that you will first get asked to join a Wi-Fi network if the diagnostic image can’t be pulled from the machine itself, but it should join known networks automatically. Of course, it will skip this step if an ethernet cable is connected. Once a language is selected, Apple Diagnostics will get to work.
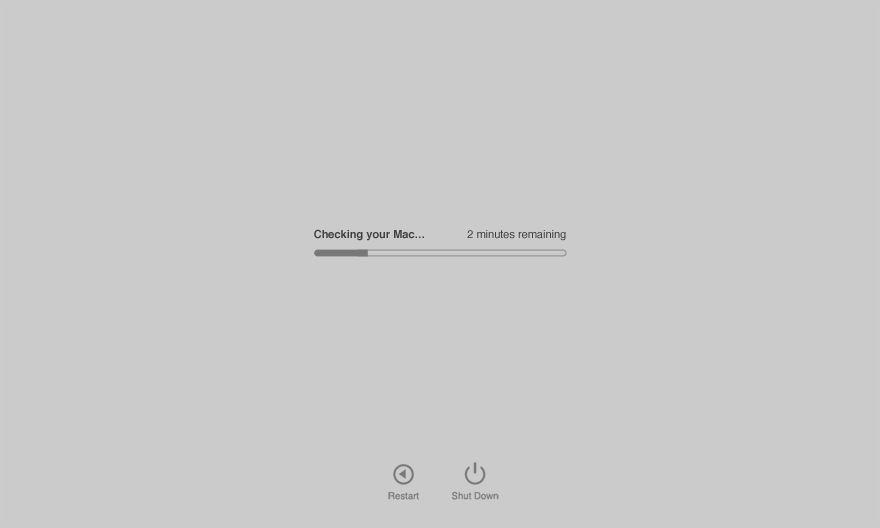
Testing will take 2 or 3 minutes and will present you with a “No issues found” message or a list of issues and reference codes.
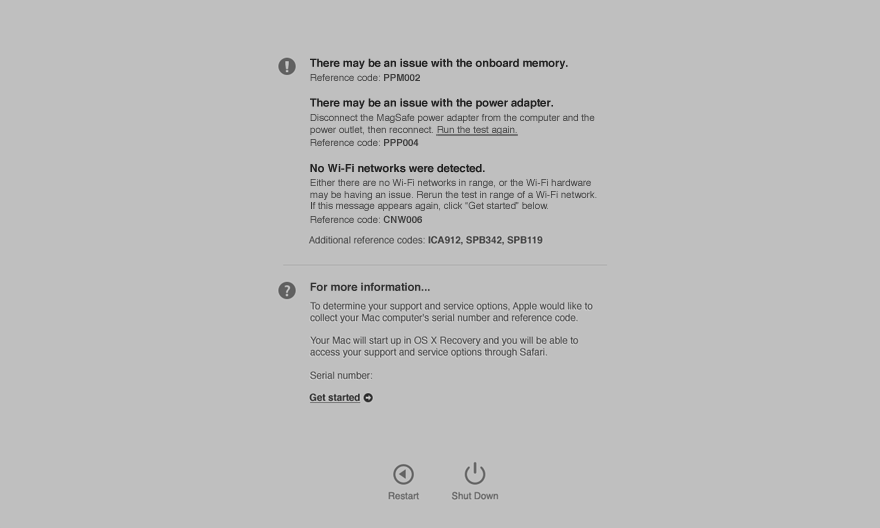
Have you found issues with reference codes? Those can be looked up here. Note that occasionally a reference code is not listed on Apple’s support website or the suggested fix for a particular problem is to simply “Contact Apple.” Either way, you’ll know if your system is more or less OK or if it needs service by the time this test completes.
If holding down the D key at startup doesn’t start Apple Diagnostics:
- If you’re using a firmware password, turn it off. You can turn it on again after using Apple Diagnostics.
- Hold down Option-D at startup to attempt to start Apple Diagnostics over the Internet.
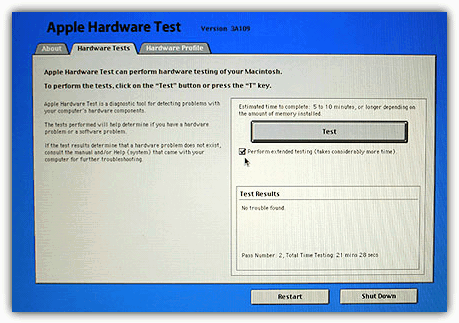
On Macs that were built before June 2013, booting up while holding the D key will start the Apple Diagnostics predecessor, called Apple Hardware Test (AHT).
Similar to newer Mac models, AHT will also present to you a language selection window, but once a language is selected the test environment will load and not automatically run. To start the test, you must click the “Test” button, but before you do there is an option to select “Perform extended testing.” The extended test will take considerably longer, but it does a much better job testing every block of your RAM than the simple test (or even the newer Apple Diagnostics, for what it’s worth).
If AHT tells you everything is OK after an extended test, you can be sure your RAM is in tip-top shape. Most Macs that run Mac OS X 10.7 Lion will run AHT, but for Macs that are even older you may need the original install DVD’s that came with your computer. This includes any pre-Intel Mac and most Intel Macs until 2007.
Apple Diagnostics (or AHT) is a good start, but the test is pretty basic. For testing that thoroughly analyzes every single component, you’ll have to visit an Apple Store unfortunately. There you have a couple of options (if your Mac is still supported):
- MRI: A quick test that is run at the Genius Bar. It checks if all the important components are detected and if the sensor readouts are within specified ranges. It’s basically what the Apple Diagnostics does for you at home, but with a graphical representation of the results.
- Apple System Diagnostics (ASD): The Mac daddy of Apple’s test suites, this will test your Mac in every way Apple can. Unfortunately, this test will require you to leave your Mac at the Apple Store, so they can run the test overnight as it can take anywhere from 1 to 4 hours to complete. If a full hard drive scan is included, add several hours to the test based on the size of the hard drive.
If your Mac is no longer supported (here’s a list of machines that Apple won’t touch under almost any circumstance) or you can’t get to an Apple Store, there are more things you can do at home to check for hardware issues.
Hard Drives (HDD/SSD)
There are still plenty of hard drives out there, and as we all know, sooner or later those drives will fail. If you use hard drives, they may already be failing without you even noticing, so it’s best to check up on these spinners once in a while.
When it comes to checking the overall health of a hard drive, there are two utilities I recommend: DriveDx and S.M.A.R.T. Utility.
These utilities will both look at and interpret the S.M.A.R.T. data of a drive and tell you if it’s in good shape or not, and they do an excellent job of it. It’s important to keep in mind that interpreting S.M.A.R.T. data is a game based on experience and guess work as that data is merely an indicator. A drive that’s OK today may still crash completely tomorrow, but a good interpretation of the S.M.A.R.T. data can more often than not mean the difference between saving your data and losing it. You can use these utilities once in a while or let them keep an eye on your hard drives every few hours automatically—this way you get a notification the moment a new issue is detected.
If you’re in the market for a new hard drive and want to know which brands/models to buy and which ones to avoid, take some time to browse the Backblaze quarterly drive stats. I use these lists as a guide when I buy new hard drives and *knock on wood* so far it has paid off. I haven’t had a hard drive fail in years. Of course, there are no guarantees, but I’d like to think buying a drive that does well in a harsh environment will also do well for me.
Memory (RAM)
Testing the RAM can be tricky, because you want as little of it in use as possible during the test. If you run a RAM test from the OS that you use every day, several gigabytes worth are in use by the OS to function; therefore, this RAM cannot be tested. Still, some is better than none at all, so here’s the first utility:
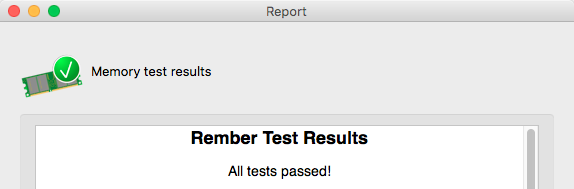
Rember: A small utility that gives you just a few controls. Rember is a graphical representation of the command line utility memtest and will give your RAM a proper workout with several different algorithms. If an issue is present, Rember will likely find it. Depending on the amount of RAM you have and the speed of that RAM, Rember can take a very long time to run and if you’ve told it to test all the available RAM it can get its hands on, your Mac will be pretty much unusable for the duration of the tests.
Make sure you quit as many applications as you can so that more RAM is available for testing. You may also want to loop the test a few times so that it can get its hands on different memory blocks in between tests. If all goes well, this will be the result:
And here is the second utility option:
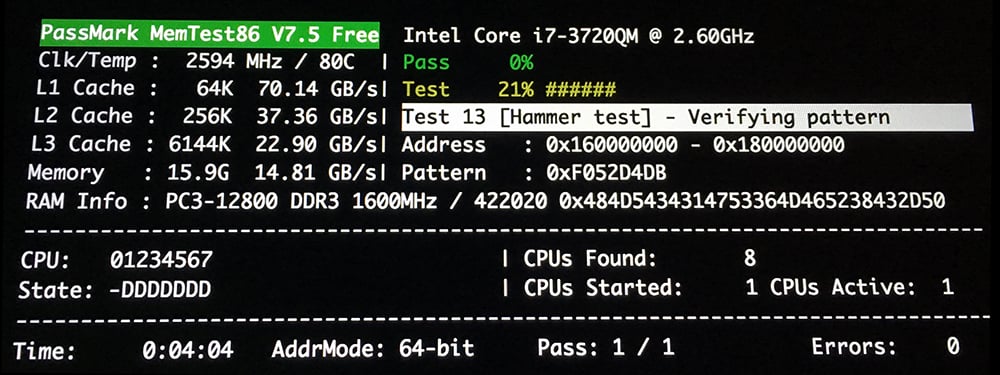
memtest86: This test is based on Rember, but includes more options. To run this test, a bootable flash drive or CD must be created, and once booted from that source no slick user interface will be found. The interface you will get is text-based, ugly and a little intimidating, but this test is extremely powerful, so it’s worth running anyway. By booting from this external volume, little to no RAM is used, which means pretty much all of it is available for testing. memtest86 will put your RAM to work like probably nothing else ever will, and if your RAM survives a few rounds of memtest… there is no issue there. With a range of algorithms, including one lovingly called the Hammer Test, memtest86 is the best possible option for RAM testing out there.
The free version will be enough to give your RAM a good workout and expose any issues there may be. Here is memtest86 running the hammer test on a MacBook Pro:
Processor(s) (CPU)
Your CPU works, among other things, hand in hand with your RAM. While you were testing your RAM, your CPU also got a bit of a workout, but there are utilities specifically designed to give your processor a good beating to see if it is performing as it should.
Benchmarking
By design, benchmark utilities include a range of algorithms to test the performance of a CPU. Also, the resulting benchmark score can be an indication your hardware is not performing as it should.
Geekbench is likely the most well known computer benchmark utility out there. Geekbench gives your CPU a good amount of data to crunch. Various algorithms test your CPU in different ways and the final score—which you can compare to other Macs with same or similar specs—tells you if it crunched all that data in the expected time frame. These tests are short and only half of them really task the CPU 100%, so you’d have to sit there and restart the test as soon as it finished for an hour to get an idea of how the performance handles a semi-continuous workload.
Stress testing
This is where your CPU is really pushed to its limit. The right stress tests put your CPU to work in ways that real world usage probably never will. After all, we don’t want a real world workload, we want the absolute max it can take to see if it fails.
The “Yes” test is the most cited and most recommended CPU stress test for Mac for as long as I can remember. It is still used by computer repair shops and even the Genius Bar today. It’s not a test that puts a CPU through its paces, but if anything it will test the cooling system and show you if it’s able to keep the CPU from overheating. The concept is simple: Give the CPU a command that evokes an affirmative “yes” response over and over and over. Do this for every CPU core to give them all 100% utilization, and then let it run for a few hours to see if it fails. To begin the “Yes test,” simply open the Terminal app and type (or copy/paste) the following, followed by enter:
yes > /dev/null &
If you open Activity Monitor and look at the CPU tab, you’ll see a single process “yes” running at 100%. To kill the process, go back to the Terminal window and type “killall yes” (without the quotes) and hit enter. This puts only a single CPU core at work, so you want to repeat the command as often as you have cores, then again to hit the virtual cores. For a 4-core CPU that has 8-cores total with the virtual cores included, the command becomes:
yes > /dev/null & yes > /dev/null & yes > /dev/null & yes > /dev/null &yes > /dev/null & yes > /dev/null & yes > /dev/null & yes > /dev/null &
To abort the test at any time, type “killall yes” followed by enter and quit Terminal. Chances of it failing such a simple test are slim, so if you want to step it up, try the following:
Prime95 is the ultimate CPU stress test. This works your CPU in different ways and also taxes the caches, communications with the RAM, the RAM itself, and more. Prime95 was created to help find new Mersenne prime numbers, but so many people started using it to stress test their CPU’s that the app’s creators built a dedicated stress test into the app. Called the “Torture Test,” it certainly lives up to its name and taxes your CPU and subsystems to its maximum capabilities. Running the Torture Test for several hours (8-10 hours recommended by the communities) will prove, without a doubt, your CPU is either a number crunching monster with an endless appetite or ready for recycling heaven.
Graphics (GPU)
Your graphics chip/card is important whether you’re a gamer or not. Without it, you’d just be staring at a blank screen. Apple’s macOS relies on your GPU to render windows and effects, and your browser needs it to play YouTube videos. Of course, games can’t live without it; and, if you use any of the Adobe, Final Cut or other graphics intensive apps, then you most certainly need it. GPU’s run just as hard, if not harder, than your CPU. It runs hotter and consumes a lot more energy, so the chances of it failing are much greater. How will you know if your GPU is able to provide you with the power you need when you need it? Here are a few options:
Benchmarking
Yup, just like the CPU test, benchmarking a GPU can be useful to see if it crunches data as fast as it should. As with the CPU benchmarking, these tests are pretty short, so it would have to be run a few times to get an idea of the performance and cooling. Here are a few that do a good job of benchmarking your GPU: Cinebench, Geekbench, and LuxMark. (Read each of the pages for a description and how-to operate.)
Stress testing
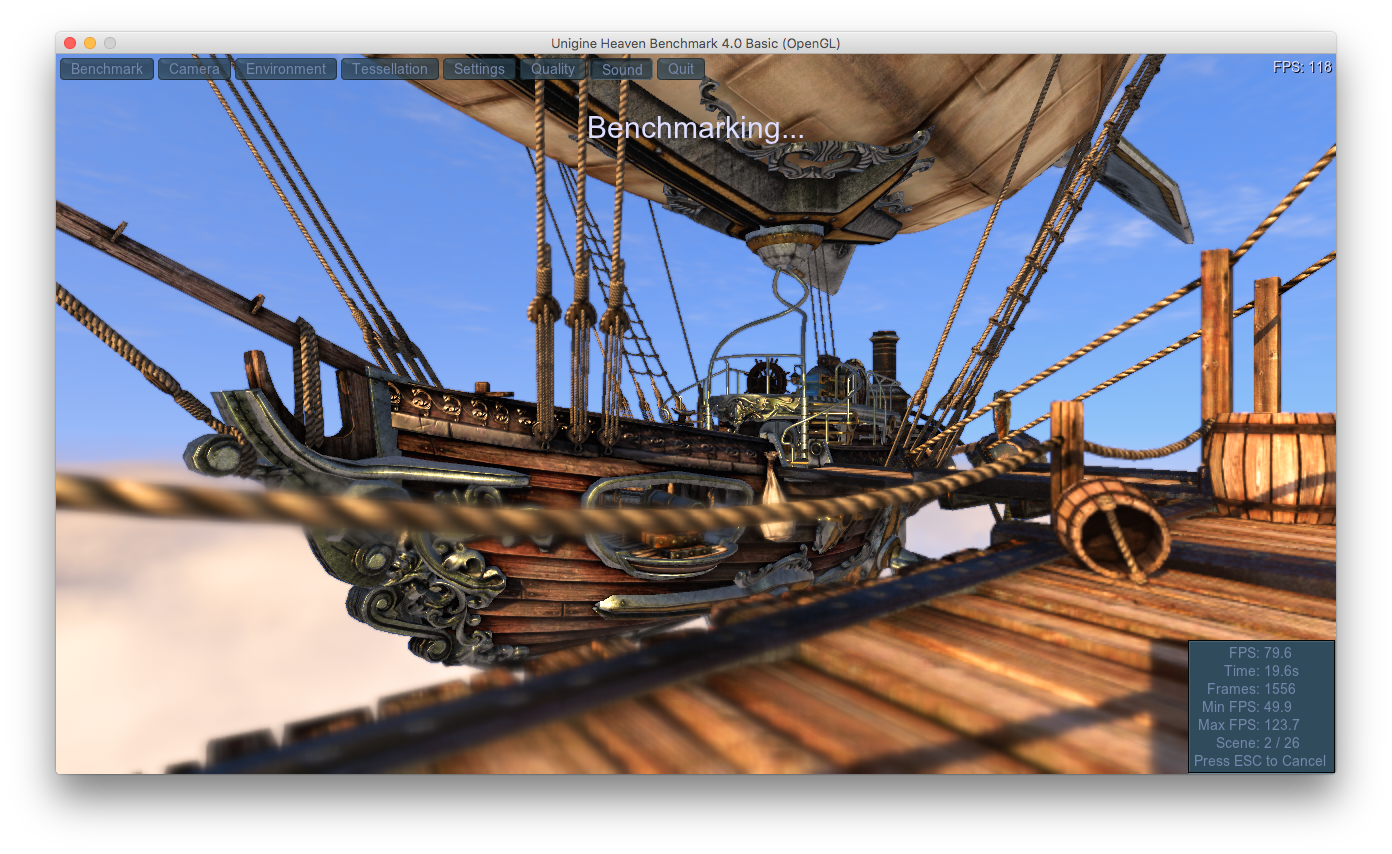
If you really want to know if your GPU is up for long gaming, video editing or even bitcoin mining sessions, you must hit it with a sizable workload for an extended time. There’s really only one application that comes to mind for this: Heaven.
While technically a benchmark, Heaven’s settings can be configured in a way that puts maximum pressure on the GPU. The “basic” and “extreme” presets can be used, but a “custom” option is also available that really lets you go all out. The test will render game scenes at the quality and resolution you set; a higher quality and resolution will mean more work for your GPU and thus a better stress test. You will have to re-start the test when it finishes to get a few loops out of it (the free version), but at insanely high settings your GPU will probably take a long time to finish a single run anyway.
Sensors
One of the most difficult things to test at home are the various sensors inside your Mac. There are utilities that can read out and test these sensors, but only Apple (and their Diagnostics) really know what the correct value ranges are and if a sensor passes or fails a test. If you run the Apple Diagnostics, all of the sensors in your Mac should be tested. And if no issues are mentioned, you can assume all sensor tests have passed. However, if you’d like to take a closer look at the sensors to make sure their measurements are what you want them to be, or just to satisfy your curiosity, there are a few options available.
But first, a bit about the different kinds of sensors:
- Temperature sensors: There are quite a few temperature sensors in your Mac and the failing of just a single one can cause your Mac to run incredibly slow and/or the fans to always be on 100%. Readings that are too hot may also indicate an issue with the fan(s) or heatsinks but more on that later.
- Voltage sensors: As the name implies, these are all the sensors that register Volts.
- Current sensors: These would be all the sensors that register Amps.
- Power sensors: These are the sensors that register Watts.
- Light sensors: And finally these are the sensors that register light.
A lot of sensors take multiple readings, so a sensor that reads the power your hard drive takes can do Volts, Amps and Watts; however, they are listed as separate sensors. A lot of continuous checking is going on inside your Mac to make sure all these readings are what they should be, and while you typically never need to know these readings, they can help you verify your Mac’s hardware is working properly. The one application that can read out all these sensors is TechTool Pro. It is a pretty comprehensive system test suite that includes sensor testing.
Physical (Ports, Keyboard, Enclosure)
We’ve covered pretty much all the internal components of your Mac, but there are a few things that are often overlooked in system testing. These are as follows:
- Ports: Yup, your USB, FireWire, headphone jack, etc. Just connect devices to all your ports to see if they still work.
- Optical drives: Not nearly as extinct as Apple would like you to believe, a lot of Mac users still have them in their older machines or use them externally. To verify if all the features of your optical drive still work, there is really only one way to find out: Use them all. If an optical drive is able to read a CD, DVD or Blu ray, it does not mean it’s able to burn one. Depending on your drive’s features, burn one of each supported medium. If your optical drive can burn a DVD, it’s a safe assumption it can handle dual-layer and RW as well, so simply test with a CD, a DVD and a Blu ray and you should be all set.
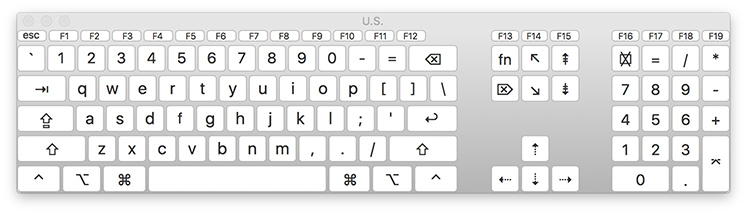
- Keyboard: This one us more for the laptop users, but can apply to any keyboard. Testing the keyboard can be as simple as opening up a TextEdit file and testing every letter, but if you want to know if other keys register properly when pressed, you can use a handy macOS built-in tool, called the Keyboard Viewer. To enable it, go to System Preferences > Keyboard and check the box next to “Show keyboard and emoji viewers in menu bar.”
Now, from the menu bar, pull up the Keyboard Viewer.

Simply press each key and see if it registers with a gray color in the Keyboard Viewer. Now you’ll know if all your keys work, even the ones you never use. The Keyboard Viewer adjusts to the keyboard you use, so as long as it’s recognized by macOS you should get an accurate representation of your keyboard. For example, here is the Keyboard Viewer for an Apple Extended Keyboard:
When you’re done testing, go back to System Preferences > Keyboard and uncheck the checkbox next to “Show keyboard and emoji viewers in menu bar.”
If there is an issue with your mouse or trackpad, you will find out during normal use, so I won’t suggest any tests for those. The same goes for the hinges of your laptop screen.
What about a Mac’s cooling system?
The one thing I have not covered in this article is your Mac’s cooling system. If your Mac survived all of the above stress tests without suddenly shutting down or bursting into flames, it’s safe to say your cooling system is good to go. However, there is a big difference in keeping a system cool enough (to keep it from overheating) and keeping it cool enough to make it last.
The cooling system is more than just the fan(s), it also involves heatsinks, thermal paste, thermal pads and airflow. (Perhaps this will be a topic for another article later down the road.) For now, to keep your Mac running nice and cool, open it up and clean out the dust. Take the proper ESD precautions and go as far as you’re comfortable with taking your Mac apart. Mac Pro users are probably not new to this, but most laptop users likely will be. For laptops, it’s typically enough to remove the bottom cover and carefully blow out the dust from the boards, fan(s) and heatsinks. More airflow results in a cooler Mac.
Congratulations!
You’ve done it! You pushed your Mac to the limit, tested everything worth testing, and your Mac took it all with a smile. The CPU, GPU and RAM tests mentioned in this article go far beyond what even the diagnostics at Apple will do, so if your Mac passed them all with flying colors, I have no doubt it can handle whatever workload you throw at it. I run these tests once a year or when a component was replaced/upgraded. (OK, I admit, I just like to see my Macs break a good sweat once in a while for no good reason.)
Knowing your Mac can handle even the hardest work is a good feeling. There are so many people out there using just a fraction of their Mac’s power for fear they might crash it or it runs too hot. Your Mac is not a delicate flower, it’s a powerful number cruncher and even if you only use it to check Facebook or work on a Pages document, it’s nice to know it can handle an afternoon of RAW photo editing or a Final Cut Pro montage of your niece’s graduation when needed. Most of you will probably agree that you’d rather have the power and not need it, than need it and not have the power.
How can I learn more?
 Each week on the Intego Mac Podcast, Intego’s Mac security experts discuss the latest Apple news, security and privacy stories, and offer practical advice on getting the most out of your Apple devices. Be sure to follow the podcast to make sure you don’t miss any episodes.
You can also subscribe to our e-mail newsletter and keep an eye here on Mac Security Blog for the latest Apple security and privacy news. And don’t forget to follow Intego on your favorite social media channels: Facebook, Instagram, Twitter, and YouTube.

