How to Install macOS Sequoia on Unsupported Macs, for Security Improvements
Posted on
by
Joshua Long and Jay Vrijenhoek
From a security standpoint, using the latest version of macOS—the Mac operating system—is essential, especially if you want to stay safe from actively exploited vulnerabilities.
However, if your Mac is several years old, there’s a good chance that the current version of macOS won’t run on your Mac. Apple drops support for Mac models that it declares to be vintage or obsolete. In fact, Apple may even stop releasing the latest macOS for Mac models years before those models are declared “vintage.”
If you wish to use the newest version of macOS but Apple no longer supports your Mac, the best option (in terms of speed, system stability, and the full range of Apple features) is to simply buy a new Mac. Of course, not everyone can necessarily afford to do so.
But there’s also a (very much unsupported) way to continue running the newest and safest version of macOS for much longer than Apple is willing to support your Mac model. Let’s explore how to make your old Mac run the latest macOS: Sequoia.
In this article:
- There’s hope for older Macs
- Preparing to patch
- How to install macOS Sequoia on an unsupported Mac
- Installing macOS updates (minor and major)
- Additional tips
- Welcome to the legacy patching community!
- Is macOS Sequoia supported?
- How can I learn more?
There’s hope for older Macs
There is hope for users of many old Mac models. With a bit of effort, you can use a source-available, third-party utility that makes it possible for you to run the latest macOS version on significantly older hardware, with (for the most part) relatively minimal caveats.
The current Mac operating system is macOS Sequoia. Following is the complete list of Apple’s supported models:
MacBook Air (2020 or newer)
MacBook Pro (2018 or newer)
iMac (2019 or newer)
iMac Pro (2017)
Mac mini (2018 or newer)
Mac Pro (2019 or newer)
Mac Studio (2022 or newer)
The list of additional Macs that can currently run macOS Sequoia—unofficially (we’ll explain what that means later), includes some much older models, as follows:
MacBook (Late 2008 through 2019)
MacBook Air (Late 2008 through 2017)
MacBook Pro (Early 2008 through 2017)
iMac (Mid 2007, after upgrading the CPU)**
iMac (Early 2008 through 2018)
Mac mini (Early 2009 through 2017)
Mac Pro (Early 2008 through 2018)
Xserve (Early 2008 through 2010)
**The mid-2007 iMac requires a processor upgrade (not for the faint of heart). But incredibly, this computer that is now 17 years old can still run macOS Sequoia. I happen to have such an iMac, and I’ve upgraded its macOS several times past its official maximum operating system:
Older Macs deserve #security updates, too.
Over the weekend, I installed #macOS Monterey on my 15-year-old iMac, thanks to OpenCore Legacy Patcher. It works great! 🤩
(The chipset misidentifies my upgraded 2.6 GHz CPU as 700 MHz. 🤪 Most ≥2008 Macs don’t require new hardware!) pic.twitter.com/Tx2jnkea2k
— Josh Long (the JoshMeister) (@theJoshMeister) April 19, 2022
That unofficial list looks incredible next to Apple’s officially supported list, right? Perhaps it seems too good to be true. To be fair, there are some known issues with some of those models (see the OpenCore Legacy Patcher supported models list for details).
You might be wondering how such a thing could possibly work. In part, it uses a similar methodology to so-called “hackintosh” computers, where additional Apple drivers from previous versions of the operating system are included to make the current version of macOS work with a wider range of hardware.
Apple may not want to exert the effort to keep the latest macOS working on your old Mac hardware. (This actually makes a lot of sense, especially when you consider that Apple makes money by selling new Macs and doesn’t directly profit from macOS upgrades.) But thankfully, a handful of hobbyists are willing to pour a lot of hours into making new macOS versions work on older Macs without any support from Apple.
Preparing to patch
If you want to run macOS Sequoia, but can’t due to your Mac not being officially supported, here is how to go about it:
- First, go to your Apple menu and select “About This Mac.” Write down what it says next to “Model” (if it’s listed). Then click on “System Report…” (or “More Info…”). In the hardware overview window that pops up, a “Model Identifier” will be listed; write this down as well.
- Now that you’ve confirmed your Mac model, next you’ll need to verify that OpenCore Legacy Patcher works with your Mac by reviewing the supported models list.
- Back up all your data. Use Apple’s Time Machine and/or Intego Personal Backup, follow a “3-2-1” backup strategy, and ensure that your backups are really working.
- Grab a USB flash drive (or any USB/FireWire/Thunderbolt external hard drive) that can be erased and is at least 20 GB in size, e.g. 32 GB. (Ideally, choose a fast external drive. This will save time when copying the macOS installer to the drive and booting your Mac from it during installation.)
- Download the latest version of OpenCore Legacy Patcher from this site. Be sure to choose the “OpenCore-Patcher.pkg” version.
- If you normally use a Bluetooth wireless keyboard and/or mouse, it’s ideal to instead use a wired USB keyboard and mouse for this process. (If you’re upgrading a MacBook, the built-in keyboard and trackpad are fine, in most cases.)
As an aside, you can find many of the steps from this guide (and a few additional details) on the OpenCore Legacy Patcher site. But I’ll take the journey with you using my iMac (20-inch, Mid 2007, with an upgraded CPU) and add some helpful tips based on my experience. Mine is the oldest supported (er, unsupported) model, and it’s ten years older than the minimum iMac model that Apple still supports. (Note that I’m upgrading from an older patched version of macOS, but the steps below are the same regardless.)
Recommended, but not required: update your hardware
Although hardware upgrades are not usually required, you may wish to upgrade your Mac in two key ways (assuming your Mac model is user-serviceable and you’re comfortable doing such upgrades):
- Upgrade your Mac to the maximum amount of memory (RAM) that it can handle.
- Replace your hard drive with a solid state drive (SSD), if it came with a rotational (spinning) hard drive.
Both of these hardware upgrades can potentially make your Mac run significantly faster. OWC is a parts manufacturer that happens to focus on Mac RAM and SSDs. (Note that OWC is not a sponsor, and this doesn’t constitute an official Intego endorsement.)
Of course, it probably goes without saying, but Intego cannot provide technical support if something goes wrong—with either hardware or software modifications you make. Proceed at your own risk.
Now that you’ve got everything ready to go, let’s begin!
How to install macOS Sequoia on an unsupported Mac
Note: This step-by-step guide was originally written for macOS Monterey and later updated for macOS Sonoma, hence a few older screenshots. However, the steps in this guide have been updated to apply to macOS Sequoia. See the section Is macOS Sequoia supported? for additional details about Sequoia.
Having completed all your prep work from the previous section, now you can follow this step-by-step guide to installing macOS Sequoia on your unsupported Mac.
-
- Plug in your USB flash drive or external hard drive. (You’ll need this for later steps.)
- Open the “OpenCore-Patcher” app in your Applications folder. (This app will be present only if you’ve completed all the steps in the “Preparing to patch” section above.)

- In the app’s main window, click on the “Create macOS Installer” button.
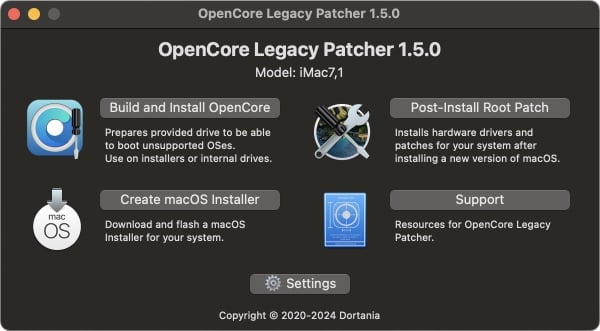
- Next, choose the option to “Download macOS Installer.” (Or, if you’ve recently downloaded one, choose “Use existing macOS Installer” instead.) A new window will appear listing available macOS versions. Click on the most recent non-beta version, which should appear near the bottom of the list.
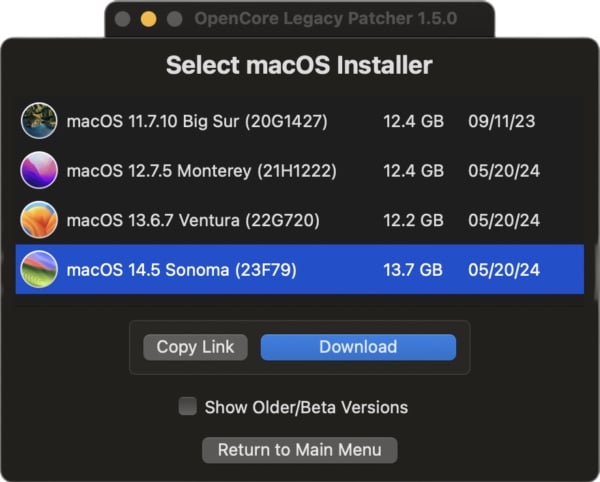
- The macOS version you selected will begin to download. When the download finishes, you should have an “Install macOS Sequoia” app (or whichever OS you chose in the previous step) in your Applications folder. (Note: If you run into trouble on this step, you may need to download the appropriate InstallAssistant.pkg and install it to Applications via an alternative method.)
- Next, click on the “Flash Installer” button. You’ll then be prompted to choose the “Install macOS Sequoia” app that you downloaded in the previous step. (If you have multiple options, choose the most recent version of Sequoia in the list.)
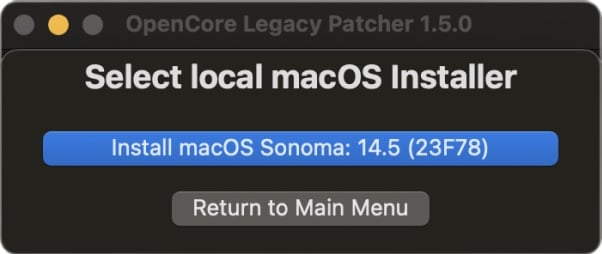
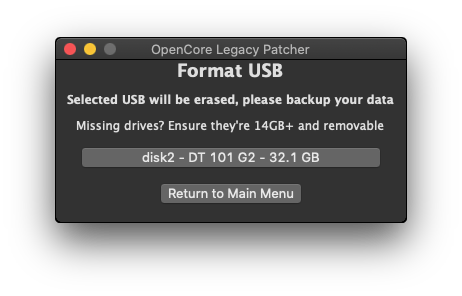
- You’ll then be prompted to choose your USB flash drive or external hard drive; this drive should be at least 20 GB, for example a 32 GB thumb drive. (If you have multiple options to choose from, select carefully; the next step will completely erase the drive.) You may wish to write down the disk details; you’ll need to choose the same disk again later.
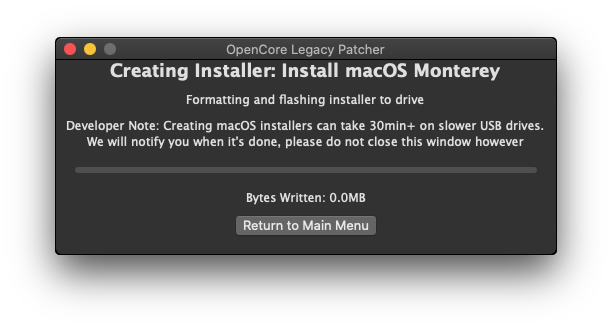
- As explained on the “Creating Installer” screen, the process of copying data to your external drive can potentially take a very long time; this step took about 90 minutes on my 2007 iMac.
- Once that process is complete, you’ll get a “Success” dialog box, and then you can click on the “Return to Main Menu” button. (Note: If you run into problems verifying the installation drive, you may have an old, unreliable flash drive; if so, try buying a new one from a reputable brand and seller.)
- At the “main menu” window, click on the “Build and Install OpenCore” button.
A new window will appear; click on the “Build OpenCore” button to continue.
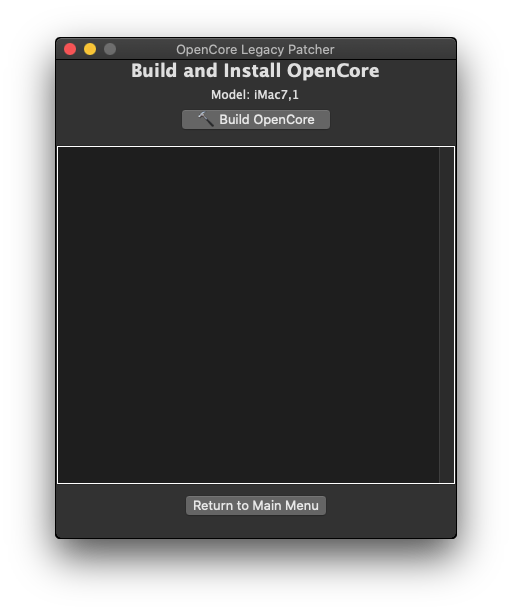
- Once the text stops scrolling, the “Build OpenCore” button will change to say “Install OpenCore” instead; click on Install OpenCore.
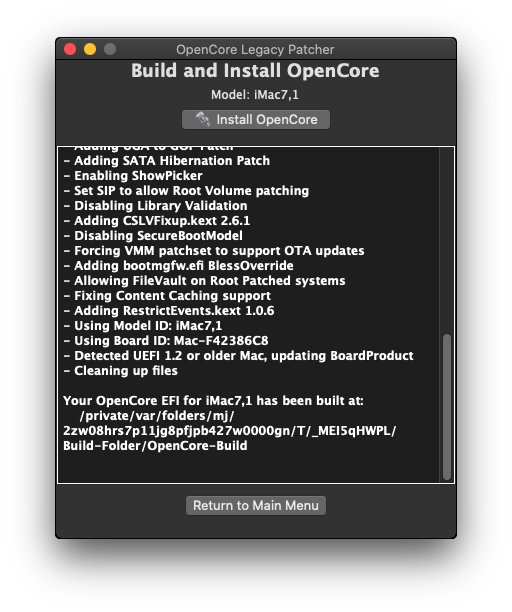
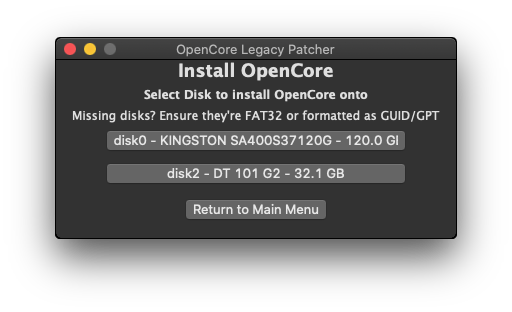
- In the “Install OpenCore” window, click on the button for the same disk that you chose in step 7 above (i.e. your external drive).
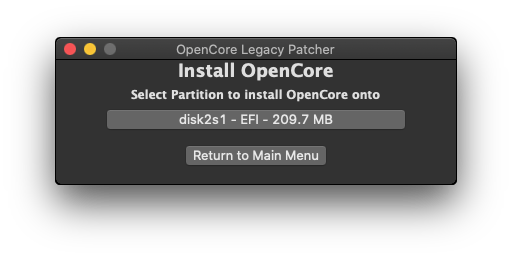
- Next you’ll need to choose the partition. There should only be one button in this list (it will probably say “EFI” in the middle). Click on that button to continue.
- Enter an administrator’s username and password if prompted; this may be necessary to prepare the external drive for the next steps.
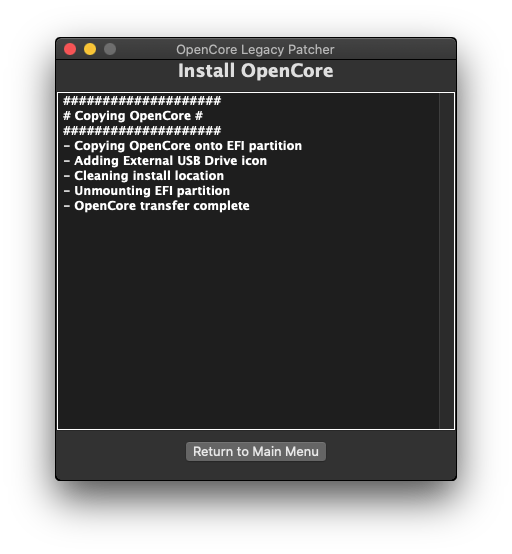
- Moments later, you’ll see a bit of text, ending in “OpenCore transfer complete.” Your Mac is now ready to install macOS Sequoia.
- Now it’s time to install the new OS on your Mac! Read this entire step carefully before you proceed; you’ll need to be ready to press buttons on the keyboard quickly. Click on the Apple menu, then select “Restart…” and click Restart again when ready. Immediately begin holding down the Option key on your keyboard (or “Alt” if you’re using a third-party USB keyboard). Immediately as soon as you see multiple drive options, stop holding the Option/Alt key, and use the arrow keys to choose the “EFI Boot” option with the blue-and-white OpenCore logo. Press the Return or Enter key to select this option.
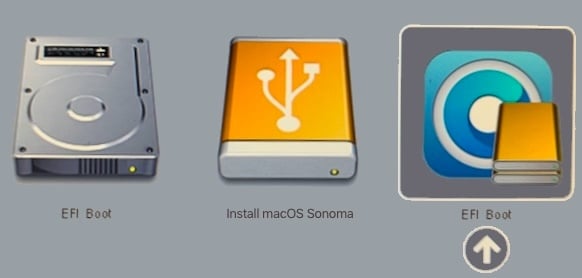
Next, use the arrow keys and Return/Enter to select the “Install macOS Sequoia” option. 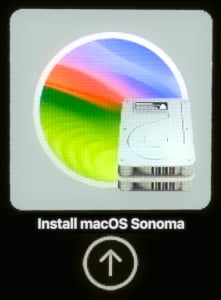 Your Mac will start booting up from the installation disk. Depending on the age and speed of your Mac and your external drive, this may take a few minutes.
 - Once your Mac finishes booting, you should see the following options: Restore from Time Machine, Install macOS Sequoia, Safari, and Disk Utility.
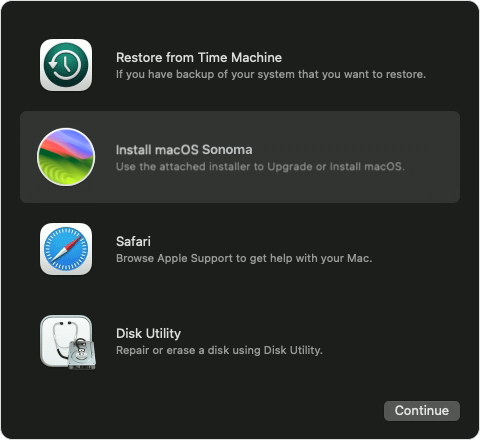 Choose “Install macOS Sequoia” and let the installer run as normal. In the pane where you’re prompted to select a disk, be sure to choose your Mac’s internal drive (e.g. “Macintosh HD”).
 - After a while, your Mac will probably restart on its own. If it brings you back to the screen shown in step 17, just click on the Apple menu in the top-left corner and select Restart, and immediately begin holding Option again. Select “EFI Boot” again, but this time you’ll need to choose the “macOS Installer” option with the internal hard drive icon superimposed (pictured below). This will allow the operating system installation to complete.
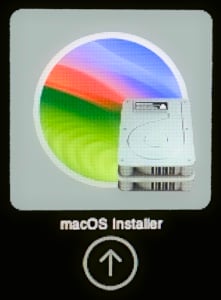
- When macOS Sequoia has finished installing, there are just a few more steps remaining. First, you’ll want to set up your internal drive properly to ensure you no longer need the external drive attached. To do this, open the OpenCore-Patcher app (the one you used in step 2). From the main menu (as depicted in step 3), repeat steps 10 and 11 again to build and begin installing OpenCore.
- Although in step 12 you chose your external drive, this time you’ll instead select your internal drive (which is most likely disk0, but may vary depending on your Mac).

- Similar to step 13, there should only be one option that says “EFI” near the middle; click this button.
- Enter an administrator’s username and password if prompted.
- Once you see a window similar to step 15, again you’ll see a bit of text ending in “OpenCore transfer complete.” Click on “Return to Main Menu” to prepare for the next step.
- From the main menu, click on the “Post-Install Root Patch” button. (This will help you install any additional fixes that may be necessary to make Sequoia work with your Mac’s legacy hardware.) Then click on the “Start Root Patching” button.
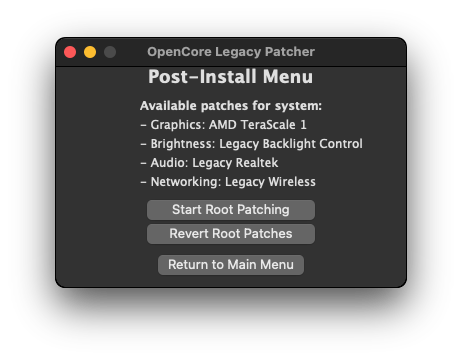
- If you receive a “Relaunch as root?” prompt, click Yes. Again you might be prompted for an administrator’s username and password, and the app may relaunch at the main menu, at which point you should repeat step 24. Then proceed to step 26.
- Once it says, “Patching complete,” you’ll also see the message, “Please reboot the machine for patches to take effect.” Before you reboot, drag your external (e.g. USB) drive’s icon from the desktop to the Trash to eject it, and then physically unplug the external drive from your Mac. Then click on the Apple menu, click “Restart…” and then click Restart. Hold Option/Alt one more time, and select the internal drive’s EFI Boot option.
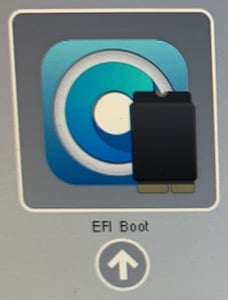
You’re all set! Your Apple-unsupported Mac is now running macOS Sequoia!
Installing macOS updates (minor and major)
The next time there’s a minor macOS update, i.e. a new version of Sequoia, here’s what to do to ensure everything goes smoothly:
- Back up important files from your computer. (Refer to step 3 in the “Preparing to patch” section of this article for tips.) You should do this anyway, regardless of whether you’re using a Mac that’s supported or not.
- Run the OpenCore-Patcher app to check for updates, or check manually here. If an update is available, download the latest “OpenCore-Patcher.pkg” version.
- Most of the time, you may be able to install minor macOS Sequoia updates like normal.
- However, updates might occasionally include significant changes that may require an OCLP update first. You may want to wait a day or two after Apple releases a new Sequoia update, and check OCLP’s known issues page or Mr. Macintosh’s YouTube channel, before installing Sonoma updates. You can get the latest Sequoia update via Apple menu > System Settings > General > Software Update.
- After installing a Sequoia update, your Mac will reboot automatically. After you log in, you’ll need to reinstall the Post Install Root Patch (steps 24 and 25 above), and then restart your Mac again. This should reenable any legacy drivers that your Mac requires.
Before you consider upgrading to a major new macOS version (like macOS Sequoia, aka macOS 15), you’ll need to wait to ensure OCLP is compatible first. An update to OCLP is always required before you can safely upgrade to the next major macOS version. (If you want to upgrade to macOS Sequoia, see the section “Is macOS Sequoia supported?“)
If the installation was successful and you’re thrilled to be able to run the latest operating system on your old Mac hardware, consider offering to donate old Mac hardware to the OpenCore Legacy Patcher developers. (Or, if you prefer, the project also accepts financial contributions that may be used toward purchasing hardware.) This will help the OCLP team test updates more quickly and thoroughly on a wider variety of older Macs.
Additional tips
Now that you’re using macOS Sequoia on an unsupported Mac model, here are a few more things you might like to know:
- Back up your important files often. Not only are you running macOS in an unsupported manner, but your hardware is also quite old, so there is an increased risk of data loss. To keep your documents safe, you can use Apple’s Time Machine and/or Intego Personal Backup, use a 3-2-1 strategy, and confirm that your backups actually work.
- Keep the external drive handy that you used to install Sequoia. You will need it for installing future major macOS updates, like macOS Sequoia (assuming, of course, that your Mac will be “unofficially compatible” with it).
- Another way to stay aware of OpenCore Legacy Patcher software updates is to subscribe to Mr. Macintosh on YouTube. He releases a video for each new OCLP update and macOS update, so if you have any concerns about the process or want to be sure there aren’t any “gotchas” before you update, this is a good way to keep informed.
Welcome to the legacy patching community!
Congratulations! Your older Mac will now be able to keep up with the latest security updates. Although firmware updates are not included (those are model-specific, and Apple only releases them for supported Macs), your macOS will nevertheless be much more secure than it was with the old version of Mac OS X you were running before.
Every time a new macOS is released, I look forward to the next macOS patcher, as it keeps our beloved—and still more than capable—old Macs around for just a while longer.
Is macOS Sequoia supported?
Apple’s latest Mac operating system, macOS Sequoia, is being officially released to the public on Monday, September 16, 2024.
As usual with new macOS versions, macOS Sequoia eliminates support for a couple of Mac models. The following models that Apple officially supported for macOS Sonoma are not officially supported for macOS Sequoia:
- MacBook Air (2018), which Apple sold new until July 2019
- MacBook Air (2019), which Apple sold new until March 2020
The team behind OpenCore Legacy Patcher is working to add macOS Sequoia support for these models, if it’s possible to do so. As of September 14, OCLP 2.0.0 supports all previously supported models. This means that only the 2018 and 2019 MacBook Air models are left in limbo, and will need to remain on macOS Sonoma for now.
In preparation for macOS Sequoia on Monday, we're proud to announce OpenCore Legacy Patcher 2.0.0!
And with it, all 83 Macs we supported in Sonoma are supported in Sequoia!https://t.co/w3s6r4d64V pic.twitter.com/PIa9oosZ1i
— Mykola Grymalyuk (@khronokernel) September 14, 2024
To check for the latest stable version of OCLP, check their GitHub releases page.
How can I learn more?
 Each week on the Intego Mac Podcast, Intego’s Mac security experts discuss the latest Apple news, including security and privacy stories, and offer practical advice on getting the most out of your Apple devices. Be sure to follow the podcast to make sure you don’t miss any episodes.
You can also subscribe to our e-mail newsletter and keep an eye here on The Mac Security Blog for the latest Apple security and privacy news. And don’t forget to follow Intego on your favorite social media channels: ![]()
![]()
![]()
![]()
![]()
![]()
![]()
