How to Verify Your Backups are Working Properly
Posted on
by
Jay Vrijenhoek
Every one of us has some type of data we can’t afford to lose. Pictures, spreadsheets, emails, financial data or the draft of that novel you’ve been writing—you name it. I’m referring to the data you think of when, for instance, I ask, “What would you hate to lose most if your Mac crashed and burned, right now?”
Of course, by now, if you’ve been an avid reader of The Mac Security Blog, you should know to have at least one backup of all your important data at all times (three is better), and luckily these days more people are indeed backing up their data. Yet something most people rarely do, if ever, is verify that your backups are working properly.
When was the last time you tested your backups to verify they are actually working?
Backing up your data is great, but it doesn’t mean a thing if your backup is corrupted or if the drive or disc that holds the backup is damaged. Here are a few things you can do to make sure your backups are in top shape.
Verify the original data and media is in good shape
If the original data is damaged or corrupted, the backup will likely be as well. To ensure the original data is in the best shape, here are some ways to check both the data and the media it exists on.
Hard drives (and even solid state drives) go bad eventually. Sometimes this can happen in a few months, other times it can take years before an issue manifests. Sudden loss of power, improper shutdowns or botched installations or updates can also damage a drive’s formatting. This is not a hardware type of damage, but it can affect your data.
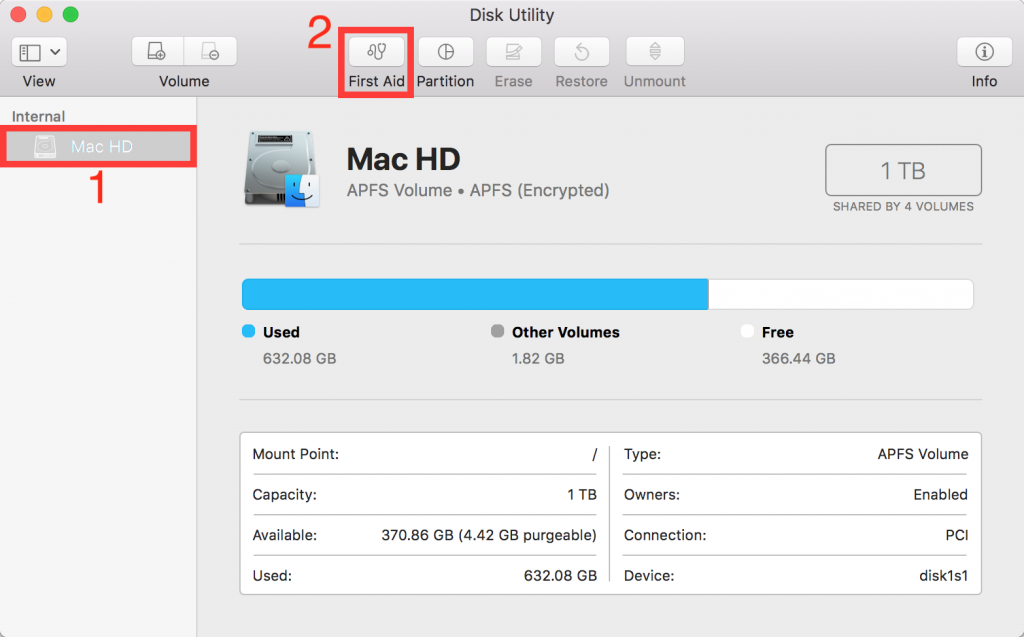
A quick way to check the basic health of a drive is by using Disk utility, which is built-in to macOS and found in the Applications > Utilities folder. Using Disk Utility is pretty straightforward. Select your drive in the left column; the one you want has the same name as your startup disk, in case more than one drive is listed, and then click the “First Aid” button.
Click through the pop-up windows to start the First Aid process and, if all is well, this should be the result:
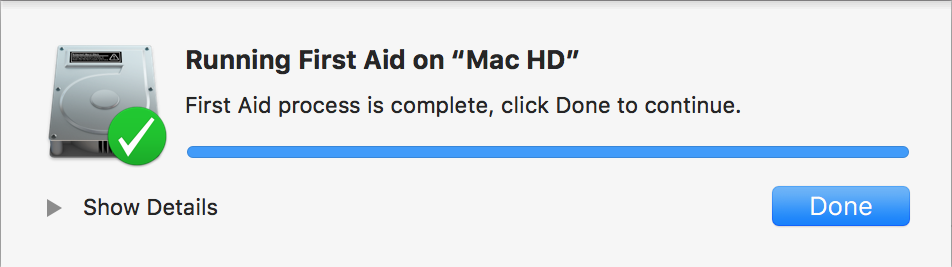
You can click on the triangle next to “Show Details” to see exactly what went on in the background, if you want. Then click “Done.”
Unfortunately, Disk Utility is absolutely useless when it comes to verifying your drive’s S.M.A.R.T. status. By the time Disk Utility informs you about a failing S.M.A.R.T. status (you have to be lucky enough to open Disk Utility; there are no alerts or notifications unless the app is open) your drive is likely already toast.
You’ll need a utility that actually interprets the S.M.A.R.T. parameters of a drive properly, so that it can inform you at the very first signs of trouble. This is actually what S.M.A.R.T. is all about!
SMART Utility by Volitans Software is the best tool for the job. It reads out your drive’s S.M.A.R.T. parameters, interprets them and immediately tells you if there is an issue creeping up on you. The utility sits in your menu bar and stays out of your way until you need it. I can’t begin to tell you how many drives I was able to save data from before it failed completely thanks to this utility. Run SMART Utility to see if the hardware is in good shape, and then move on to the next step.
With the drive’s formatting and S.M.A.R.T. parameters all checking out, there is one more thing to check: the actual data on the drive. For this, there is only one tool to recommend and that’s DiskWarrior by Alsoft (NOTE: As of DiskWarrior 5.2, it does not support APFS formatted drives). It checks your files and folders, and also offers to optimize and replace the current file structures. This utility is as close to magic as you’ll ever see; I’ve seen it bring back files that were corrupted, fix the dreaded spinning beach ball, speed up the Mac, and more. Mostly used once a Mac starts experiencing issues, this is also an amazing preventative maintenance utility. I run it once a month or when it tells me a volume is in less-than-great-shape to rebuild my directories, and have been doing so for over a decade.
With these checks and repairs done, and if everything checked out OK, you at least know if the source data is in good shape. Now it’s time to shift focus to the backups.
Check the backup settings
The backups are made by either the macOS or a 3rd party utility you use, so checking the settings is important to make sure the software responsible for making your backup is configured properly. Things you want to pay attention to here are:
- When was the last backup made?
- Was that backup made without errors?
- Is there data in the exclusion list that should be backed up?
- Are backup made frequently enough?
Whether it’s Time Machine, Personal backup or another utility, these should all be things you can check on. I’ll cover Time Machine and Personal Backup, below.
Time Machine
Time Machine is built-in to macOS, so there is really no reason to not have this feature enabled. Time Machine simple and requires little effort to set up. You can use it to back up to external drives or network volumes. Checking the above mentioned settings is as easy as opening the preferences from the menu bar icon or by going to System Preferences > Time Machine.

This window will tell you most of the relevant information (how much space is available on your backup drive, the last time a backup was made, and when the next backup will occur). To see if there are items in the excluded list that shouldn’t be there, click the Options button.
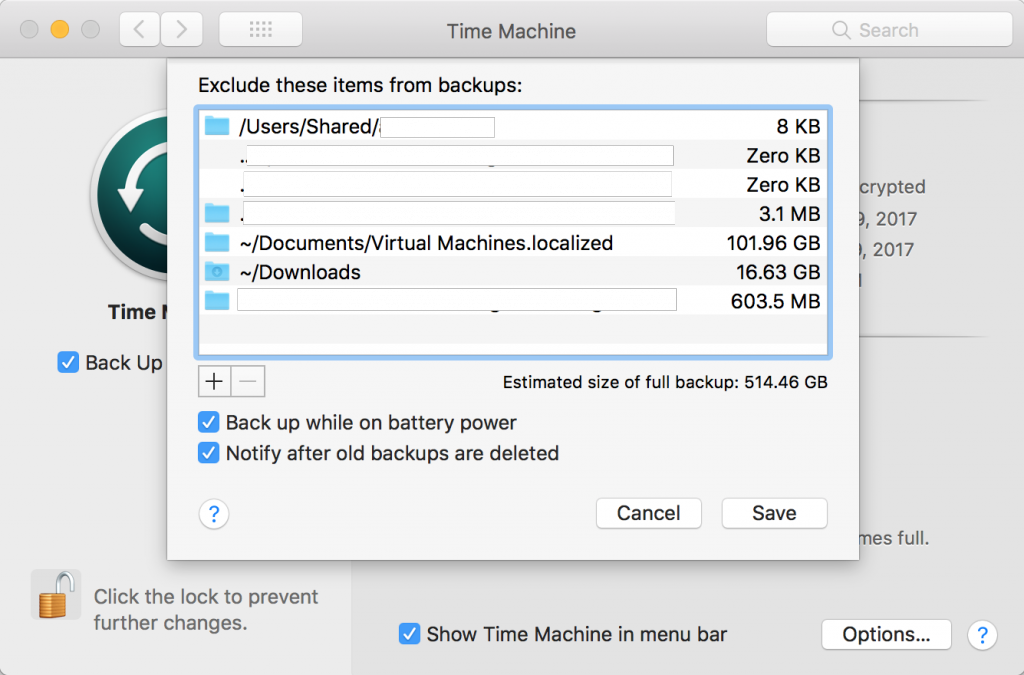
This list should only show items you do NOT want backed up. Organize as needed and click Save.
Personal Backup
Personal Backup users can see the above-mentioned information in the main window of the application.
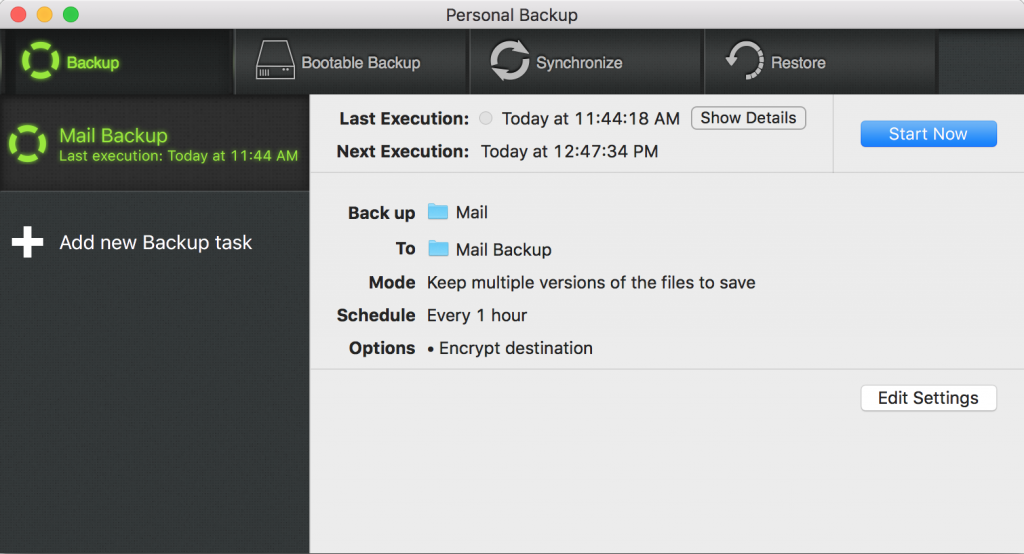
To see a log of all past executed backups, click the “Show Details” button next to the last execution date. If you want to verify the settings or make changes, click the “Edit Settings” button. We’re making good progress here! The source data is OK, as well as the media that data sits on and your backup settings all check out. Now it’s time to see if the backups themselves are in good shape.
Verify your backups
While this article focuses primarily on using Time Machine and Personal Backup, verifying your backups is pretty much the same concept for any backup software, whether it’s made with the software covered here or any other third-party software.
Time Machine
If you backup to a Time Capsule or other kind of network share, the Time Machine menu bar icon gives you a handy verification option. You can access it by clicking the icon and holding down the Option key.
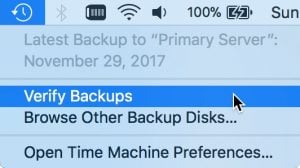
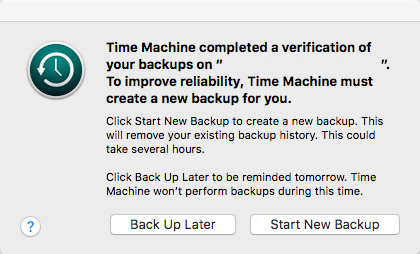
Depending on the speed of your network and the size of your backup, the verification can take a long time. If everything is OK, Time Machine will carry on as usual after the verification has finished. However, if an issue is found, Time Machine will let you know.
Unfortunately, this type of verification with Time Machine only works on network drives, not on drives directly connected to your Mac.
The most reliable way to verify backups are working
The most reliable way to verify your backed up data is in good shape is by simply restoring it. You can use the Time Machine menu bar icon’s “Enter Time Machine” to browse all your backups, select a file and restore it. For other backups, like those made with Personal Backup, you can browse the backup data through the Finder, pick a random file and just drag that back to your desktop.
Once a file is restored, open it to see if there are any issues, and then repeat the process with different files from different time periods. Of course, picking a few random files to test the backup is more than most people do, but this method still leaves a lot of data untouched and untested. Therefore, the most reliable way to verify a backup is to restore the whole thing. This is, of course, a very time consuming task and takes some preparing, but depending on how important your data is, it is a task that needs to be done every so often.
If your backup is a full drive clone, like those you can make with Personal Backup, you can boot from the clone and see if the macOS boots, applications launch, and that your important files open as expected. Then boot back to your internal startup drive when you’re satisfied with the results and continue backing up.
If your backup does not include the full macOS, only select files and folders, the only way to verify all that data is to restore all of it. You can use another drive or partition that has enough space and copy all the backup data to it. If there is damage or corruption, the data copy will usually fail with an error message.
Once the backup data has been restored you can open your most important files to check for any issues. Photos are among the most important data for most, so opening the Photos library and browsing around is a good idea. Restoring this data and manually verifying it should ensure you don’t run into things like this later down the road:

If you find any signs of damage or corruption, there are a few things that need to be done:
- Create a fresh backup of your data on a new drive immediately. Even if the drive currently used ends up being fine, you want a backup that sits off to the side while you troubleshoot.
- Check the backup media for S.M.A.R.T. issues just like you did with your internal drive. This can be done with any external hard drive and most network drives (once connected to a Mac). This does not work with a Time Capsule though, but it is said these check for limited S.M.A.R.T. issues automatically. You can use AirPort Utility to see if any warnings pop up. You can also give the backup drives a once-over with Disk Utility, or DiskWarrior if your drive uses the HFS+ format.
- Check your network. Old and damaged Ethernet cables and routers or switches that have issues can all contribute to corruption of data as it’s being transferred.
Make time to do these steps every once in a while
I verify my backups once every 3 months. I also make sure to have a full day to get it done, just in case I run into issues and need to troubleshoot. A calendar reminder lets me know a week in advance when the backup verification day is coming up, so I have enough time to plan for it. Sticking to that schedule is very important; if you skip it once because you don’t have time or don’t feel like it, you will likely forget or not verify until the next time the reminder pops up. Before you know it, 6 months or longer have passed and if an issue crept in during this time, then it may be too late to reverse the damage. Original data may have been altered or deleted and the backed up data is damaged, so you can’t undo the damage.
This is your data at risk, and as long as that data is entrusted to hard drives, solid state drives, CD’s, DVD’s or tape, it is stored on media that degrades over time. There is no way to know how much time you have until a drive goes bad or optical media starts degrading, this varies per manufacturer and model and is further impacted by storage temperatures, how many hours it’s been used, etc. Too many factors, so playing it safe is the only solution.
As mentioned at the beginning of this article, it is better to have multiple backups. If a backup goes bad you can restore your data from another source, but the occasional verification is still highly recommended.
Do you verify your backups? Any tips you’d like to share with other readers? Have something else to say? Drop us a comment below!
Further reading:
- How to Verify Your Mac’s Hardware Is Working Properly
- Get Organized: How to Store and Archive Backups Securely
- Understanding RAID for Data Storage and Backups

