How to Use Apple’s Hide My Email
Posted on
by
Kirk McElhearn

With the next versions of macOS, iOS, and iPadOS, due to be released in the fall, Apple is introducing Hide My Email, which allows you to create random email addresses that forward to your iCloud email address. You can use them to register for websites, apps, and services, and delete them if you don’t want to be contacted any more.
Here’s how Hide My email works.
What is Hide My Email?
In 2019, with the release of macOS Catalina and iOS 13, Apple introduced Sign In with Apple. This system allows app developers and websites to offer users a way to sing in anonymously, using their iCloud email address. When you use Sign In with Apple, you can choose whether the app or service accesses your real email address, or a random email address at icloud.com. You can use these random addresses to protect your real address, and you can turn them off at any time, if you get spammed.
Building on this, Hide My Email allows you to use this feature for any emails you send from your iCloud account. You can create addresses for one-time use on individual websites, and they get forwarded to your iCloud address. You can turn them off at any time, so if you get spammed you can cut the spam at the source.
You could create one address that you use for all new web sign-ups, or you could create unique addresses for each website or service that you sign up to.
Hide My Email is available to all iCloud users, and does not require a paid iCloud+ plan.
How to Use Hide My Email
To create new addresses for Hide My Email, go to System Preferences > Apple ID > iCloud on Mac, or Settings > your name > iCloud on iOS or iPadOS. You don’t enable or disable Hide My Email, but just create a new address. On iOS or iPadOS, tap Create New Address, or on Mac click Options, then click +.
On all of these platforms, you’ll see any existing email addresses you’ve set up with Sign In with Apple, as well as any Hide My Email addresses you’ve created.
When you create a new address, you’ll see a dialog like this:
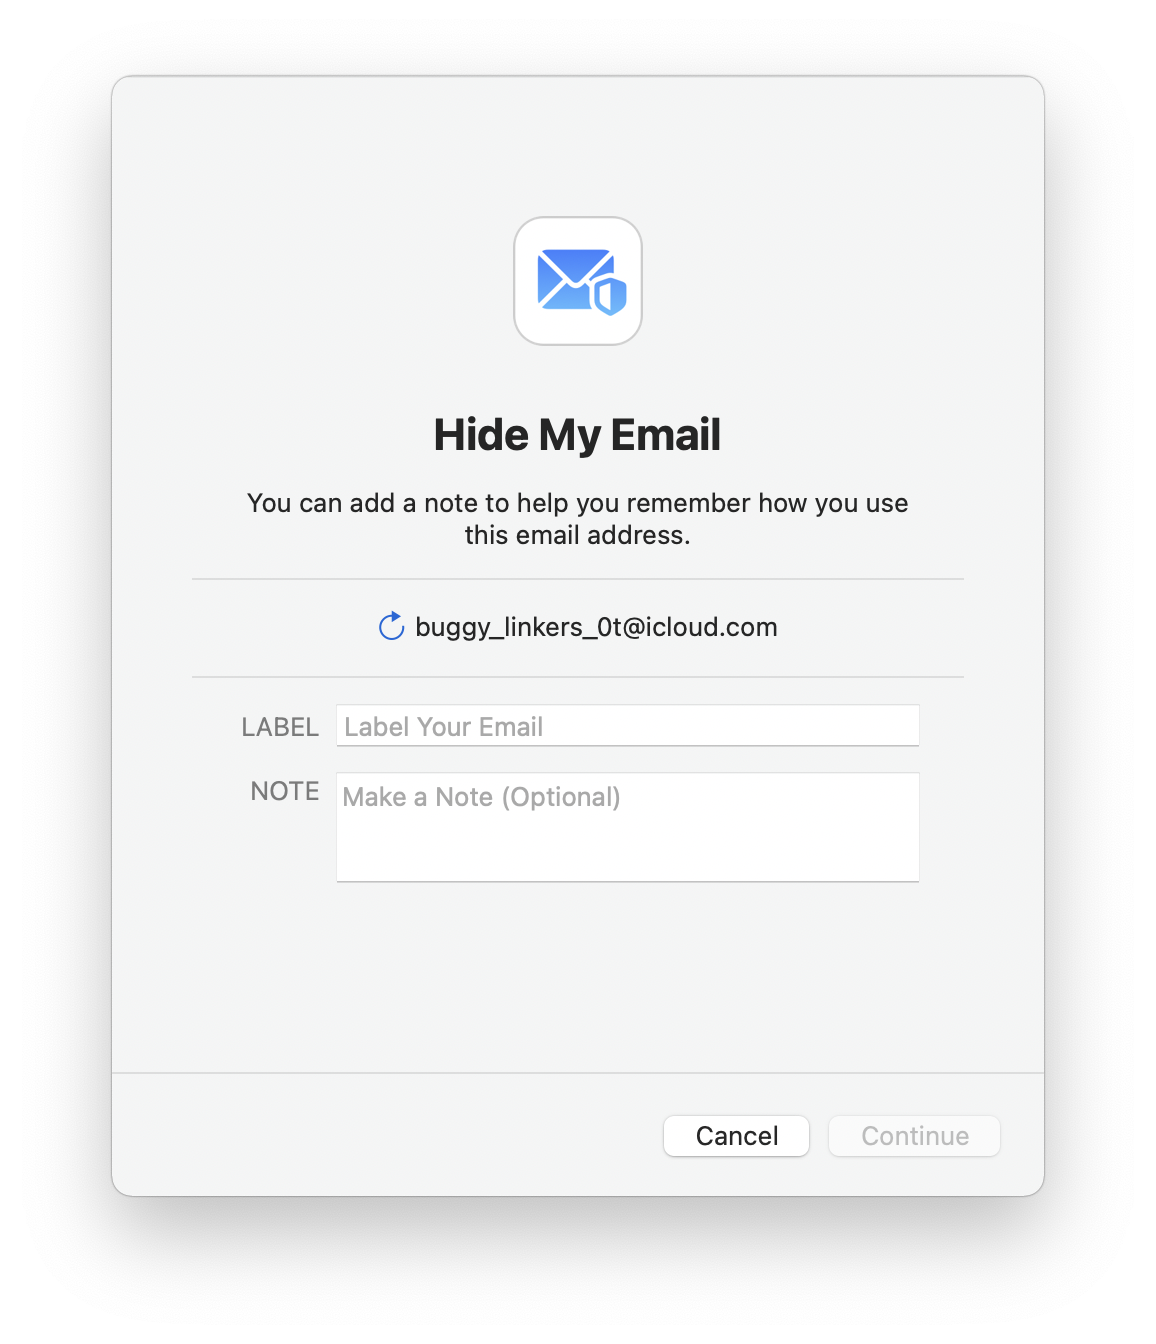
Enter a label – such as the site or service you’re using the address with – and any notes you want to use. Click or tap Continue, and the address will be active.
When Hide My Email is active, you’ll be able to choose any of the addresses you created as the From address in new emails you compose on your iCloud account, though this is currently not implemented in the public betas. You can, however, copy an address from either System Preferences or iOS/iPadOS settings to paste it in a website or app.
You can try out Hide My Email even if you’re not using the betas. Go to https://beta.icloud.com, click Account Settings, and there should be a Hide My Email section below My Devices. Click Manage and follow the instructions. However, currently, even on the iCloud beta website, there’s no way to select a Hide My Email address in the From line when you create a new email.
Manage Hide My Email addresses
When Hide My Email is active, you can view all of the addresses you’ve set up and choose to disable or delete them. These addresses include any you’ve using with Sign Up with Apple, as well as those you’ve created manually for use with specific websites or services. Note that you can only create 100 Hide My Email addresses.
The easiest way to do this is to go to System Preferences > Apple ID, then, next to Hide My Email, click Options. On iOS or iPadOS, go to Settings, tap your name, then iCloud > Hide My email. And you can also access this information on iCloud.com as mentioned above. Here’s how this looks on a Mac:
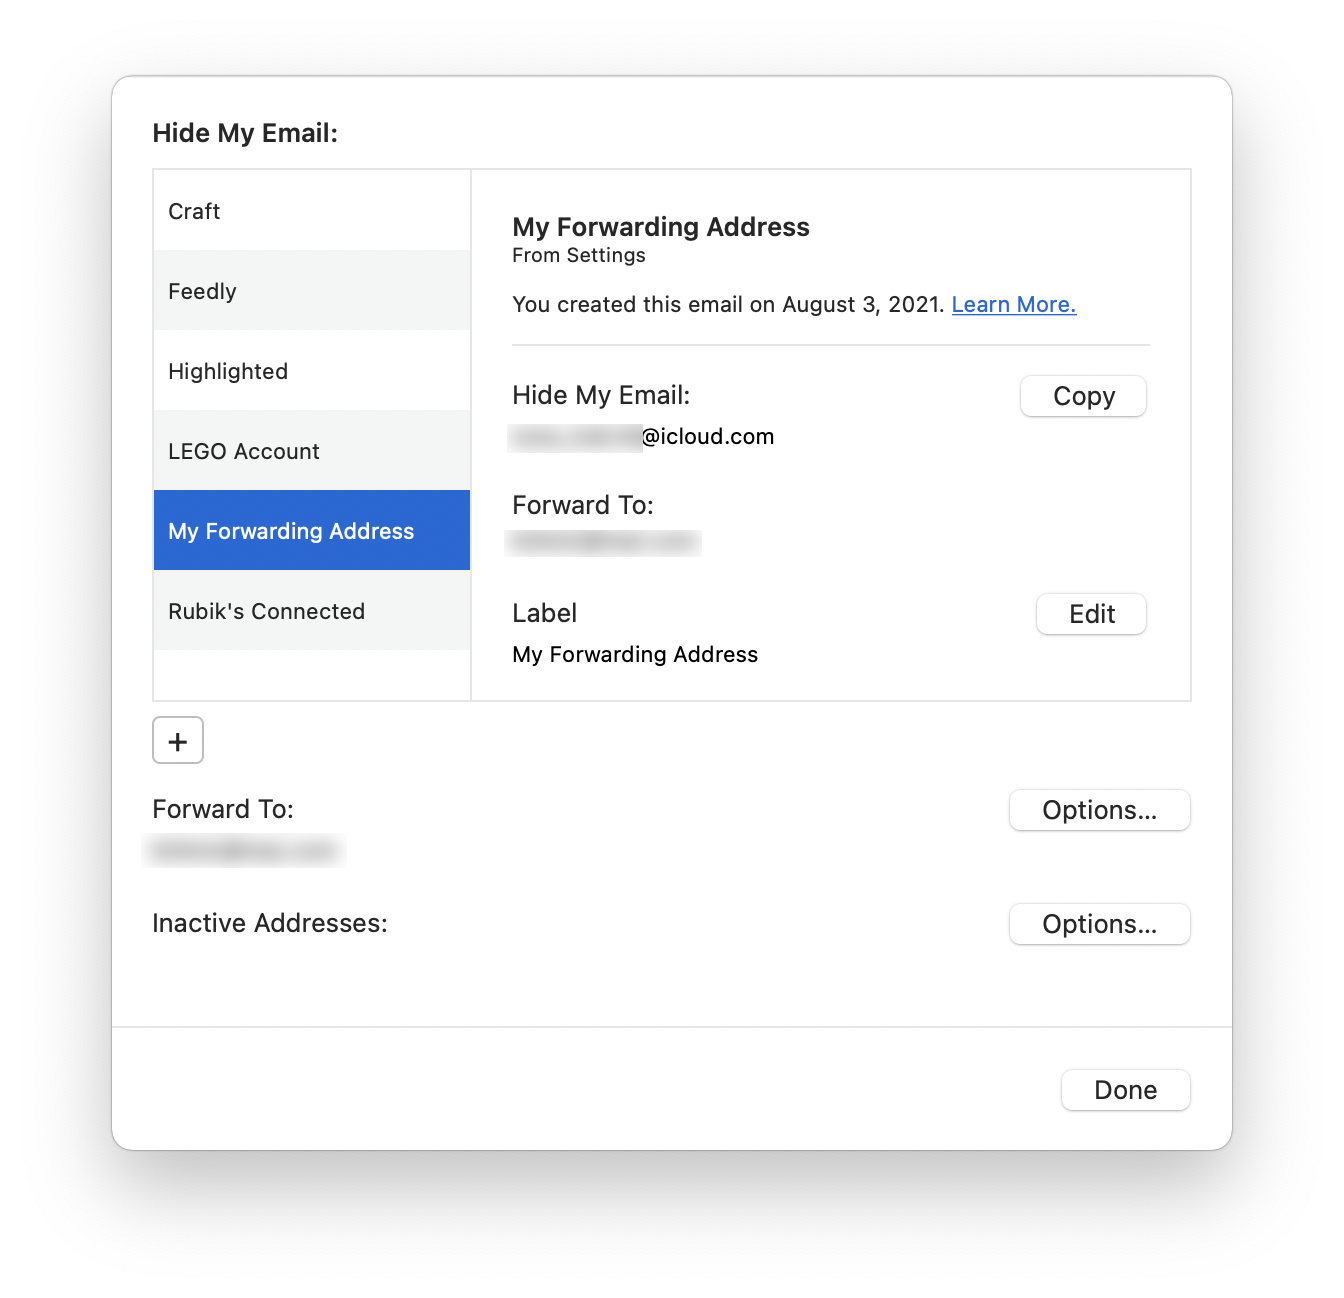
You can copy an address by clicking Copy; on iOS, tap and hold an address then choose Copy. You can edit the label you’ve created for the address; the addresses above the selected address in my screenshot are the names of apps with which I’ve used Sign In with Apple. You can change the option for forwarding; you can choose among the various domains available with iCloud, such as @mac.com, @me.com, or @icloud.com. However, email aliases set up on iCloud.com don’t seem to be available for this purpose. You would choose one of the three iCloud domains in case you want to use rules to sort messages, for example.
(Note that if you have an iCloud account, then the address [email protected], [email protected], and [email protected] are all aliases of each other.)
If you scroll down a bit, you can add notes to any Hide My Email address, and you can click Deactivate Email Address to deactivate it. This turns off the address; emails to that address will no longer work. You won’t receive emails sent to deactivated addresses, and they will bounce, so the sender will know you haven’t received them.
You can see a list of addresses you’ve turned off by clicking Options next to Inactive Addresses; click Reactivate Address if you want to use the address again, or Delete Address to permanently delete it.
Hide My Email is a useful feature that you can use to prevent getting spammed by websites and services, and you should consider using it to create disposable, easy to delete addresses.
How can I learn more?
 Each week on the Intego Mac Podcast, Intego’s Mac security experts discuss the latest Apple news, security and privacy stories, and offer practical advice on getting the most out of your Apple devices. Be sure to follow the podcast to make sure you don’t miss any episodes.
You can also subscribe to our e-mail newsletter and keep an eye here on Mac Security Blog for the latest Apple security and privacy news. And don’t forget to follow Intego on your favorite social media channels: Facebook, Instagram, Twitter, and YouTube.

