Apple + How To + Recommended
How to Set up Your Own Time Machine Server
Posted on
by
Jay Vrijenhoek

Time Machine is a generally quick and convenient way to back up your data and has come a long way in terms of reliability since its inception in 2007. You simply connect an external drive to your Mac and you will be up and running with Time Machine in a matter of minutes. If you prefer a more centralized approach, you can use one of Apple’s Time Capsules and your backups will run so long as you’re on the same network as your Time Capsule. But what if a Time Capsule isn’t big enough? What if you don’t want to spend $300 or $400 on a backup solution you can’t expand over time?
Well, if you have a spare Mac around, you can set up your own Time Machine server for just $19.99 plus the cost of whatever size hard drive you want to use. This article covers how to set up your own Time Machine server on a Mac.
System Requirements for a Time Machine server
A Mac mini or Mac Pro are ideal candidates for server use, but you can run Apple’s server app on any Mac — so if you have an old MacBook Pro or iMac, you can use that too. For best compatibility, your Mac will need to be able to run macOS Sierra comfortably. This means, at the very least, you need 4 GB of RAM and a Core i5 or i7 processor. Older Core 2 Duo processors can get the job done, but make sure the RAM is maxed out and the Mac is used strictly for Time Machine server purposes.
I wouldn’t use anything older than the following for a Time Machine server:
- Mac mini (Mid 2010)
- iMac (Late 2009)
- Mac Pro (Mid 2010)
- MacBook (Late 2009)
- MacBook Pro (Mid 2010)
- Don’t bother with a MacBook Air 🙂
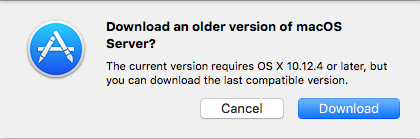
These machines (and newer) will be able to run macOS Sierra and the latest Server app. If the Mac you have in mind for this task cannot run Sierra, you can use an even older machine with El Capitan 10.11.6 on it. To get a compatible version of the Server app though, you must already have it in your purchase history. Even though only the latest version is technically available, if you download it you will be presented with a window such as this one:
Also keep in mind, using an older OS and older Server App means you’ll not have the latest security patches and enhancements. If security is not a concern because, for example, your Mac will only be accessible from an internal network and not connected to the Internet, then an older version will get the job done. (In this article I will only cover the latest version, but older Server app versions have a similar setup process.)
How to prepare a Mac for a Time Machine server
As mentioned before, if the Mac you’ll be using is old and low on resources, try to use it just for Time Machine server purposes. If you have a more recent Mac with plenty of horsepower and resources, check out the bonus content at the end of this article.
- Install software updates to ensure you have the latest macOS version.
- Install the Server App. You can get it from the Mac App Store for just $19.99.
- Connect the external hard drive that you want to use for storage. Using the internal drive of your Mac is not recommended, unless you’re using a pre-2013 Mac Pro that has several internal drives. Depending on how many Macs will be using this server to backup their data and how much data those Macs have on it, select a storage capacity for your external drive appropriately. It is also important for this external drive to be empty.
- While using Wi-Fi is possible, you’ll get a lot more speed if you use ethernet. Even more so if multiple Macs will be using this server as a backup destination.
That’s it, your Mac is ready!
How to configure the Server app as a Time Machine server
Once the Server App is installed, it needs to be configured. For use as a Time Machine server the setup is a breeze. To configure the Server app as a Time Machine server, follow these steps:
- Open the Server App.
- Using the “Continue” button, follow the initial setup. No need to configure anything at this time.
- With the Server App now open, select “Time Machine” from the list of services.
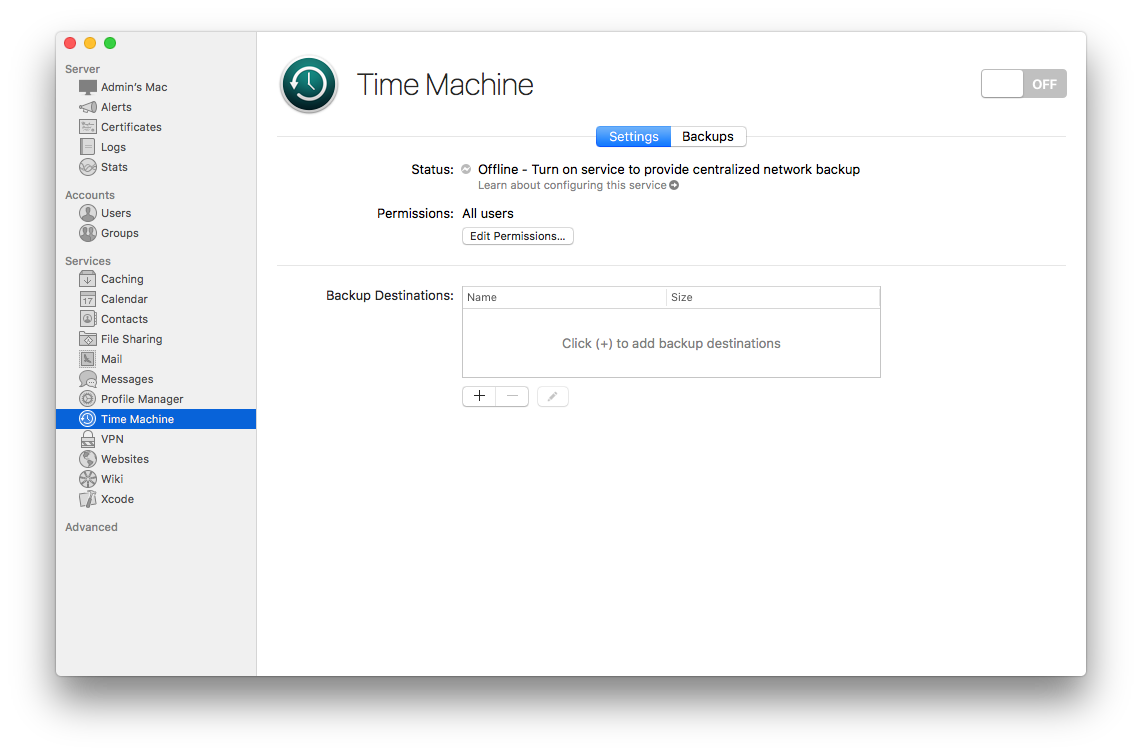
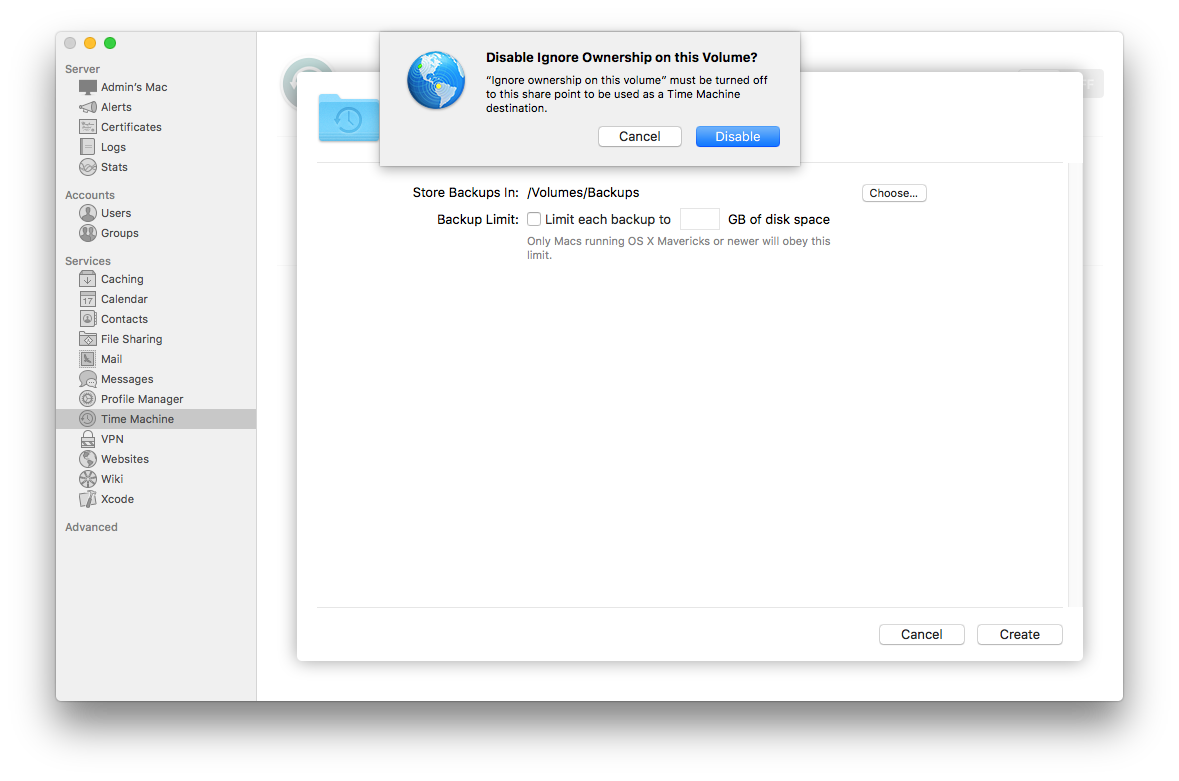
- Using the “+” button, select your external drive as a backup destination. You can now also set a size limit for each backup. Once you click “Create,” a message will pop up and ask, “Disable Ignore Ownership on this Volume?” This is required for the external drive to function as a Time Machine backup destination, so you can click Disable.
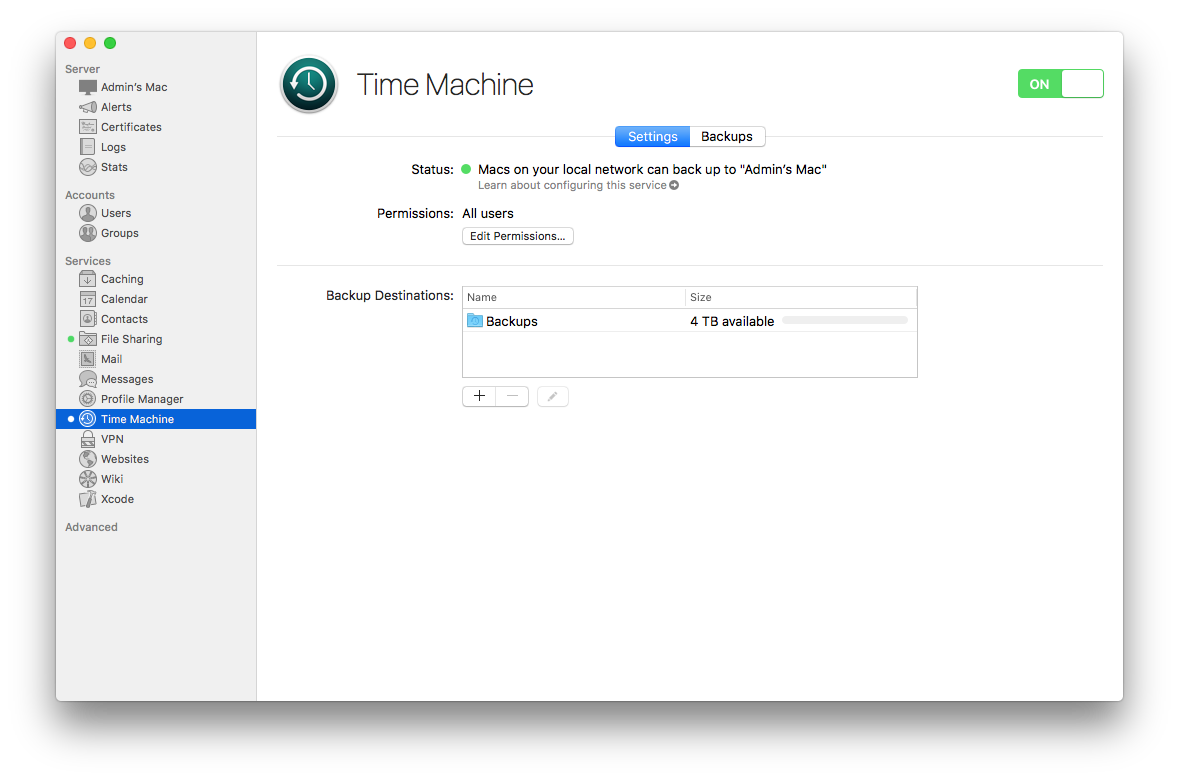
- Turn on the Time Machine service by simply toggling the switch at the top right of the window. Another service that will automatically activate and configure itself is File Sharing. You can click on that service to have a look around, but no changes are required for Time Machine server to work.
At this point, the service is up and running and ready to start receiving backups. There is just one more thing to look at before connecting your Mac(s) to the server: Users.
Even if it’s just you that’ll be backing up to this server, it’s best not to use the server’s admin credentials to connect. Instead, you should make a new account for yourself that you will use to connect. In this way, if the account is ever compromised, access to the server and services will be limited.
If there are multiple people backing up to this server, give each user their own account rather than sharing a single “backup user” account. To create users, select “Users” from the list of services and use the “+” button at the bottom to start adding users. Make sure the password is a secure one and the home folder is set to “None – Services Only.” This way the users cannot log in to the server directly, instead they can only use the services which they have been granted access.
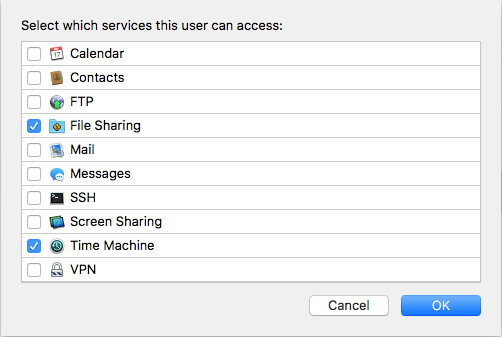
Once all your users are created, select one and click the gear icon at the bottom of the window. From there, select “Edit Access to Services.” For the user to be able to use Time Machine, select only File Sharing and Time Machine. Service access can be adjusted at any time, so if you decide to run more services later you can simply let users have access at that time.
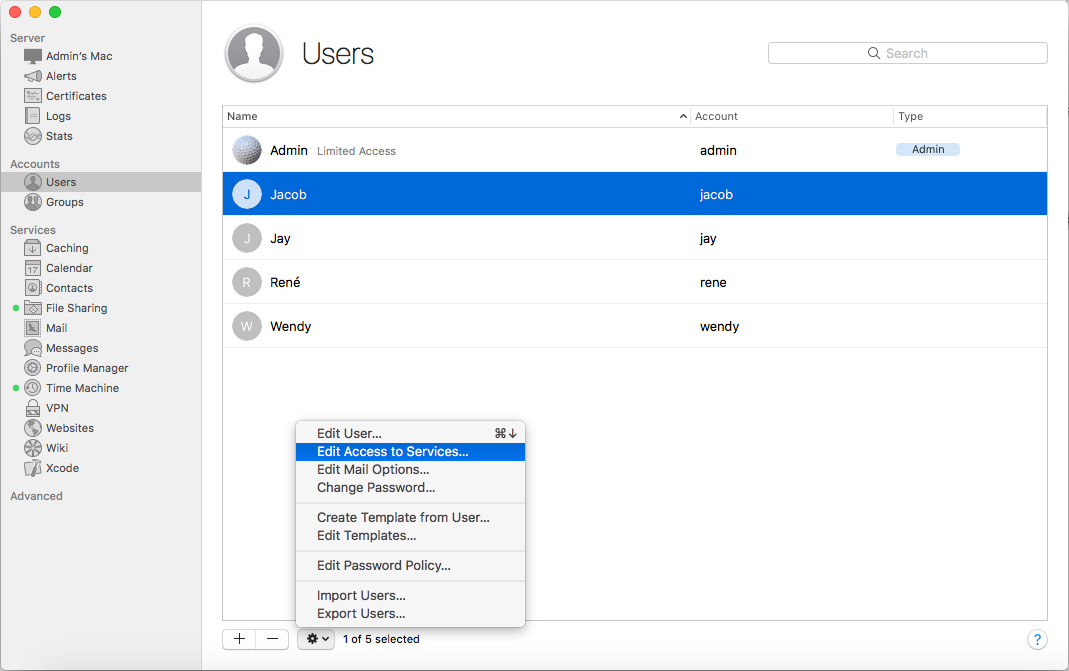
Make these Service Access changes for each user, including yourself.
How to connect users to Time Machine server
Now comes the easy part: connecting users to Time Machine server.
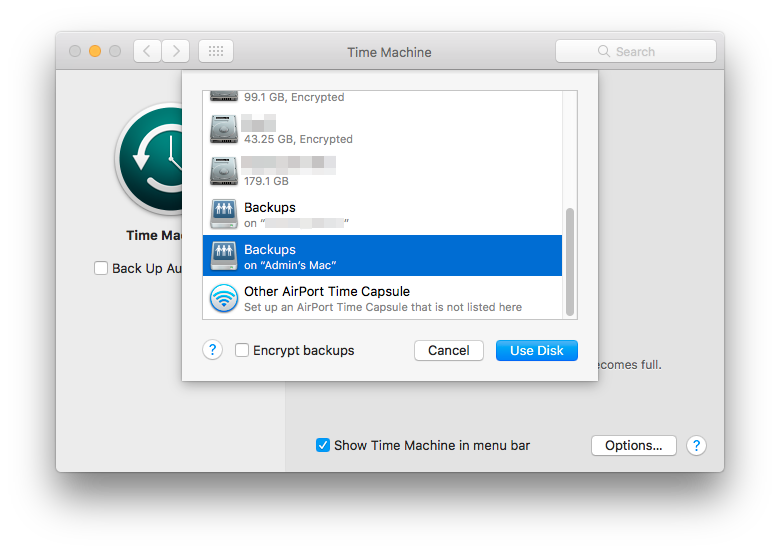
- On the Mac that you want to connect, open up System Preferences > Time Machine and click the “Select Backup Disk” button.
- In the list you will notice the server that you just set up will be an option to select — go ahead and select it. Before you click the “Use Disk” button, you can choose whether you want that user’s backup to be encrypted or not. If encryption is selected, you will be asked for a password after the “Use Disk” button is clicked.
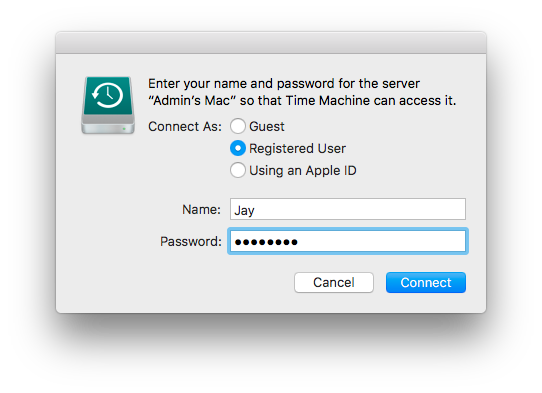
- Enter the account name and password when asked, click “Connect,” and the connection will be made.
- The first backup will start automatically in two minutes. In this time, click the “Options” button and exclude data that should not be backed up by dragging it to the exclude window or by clicking the “+” button. The user’s Downloads folder, for example, can contain many gigabytes of data that will fill up the server’s backup drive but are not relevant. Single files, folders, hard drive partitions or entire hard drives can be added to the exclude list.
 It’s best to have this list set properly before the first backup runs, so if you need more than two minutes to get this done, just turn off Time Machine by clicking the “Back Up Automatically” checkbox.
 - When you’re all done, click the checkbox again and Time Machine will do its job.
Keeping an eye on things
With all the backups going to your server, you can leverage a few of the perks running a server gives you. If you click on the Time Machine service in the Server App, you can select the “backups” tab. A list of all the backups currently stored on the server will be presented to you with some useful information.
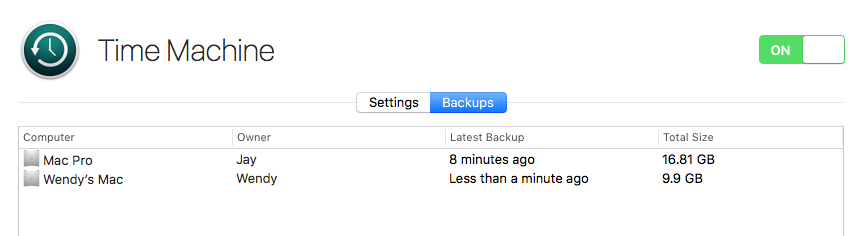
At first glance, check to see when was the last time that user/machine was backed up. If you know the Macs that are backing up to this server, never leave the network for longer than a day; seeing a laptop that hasn’t backed up in over a week is a good reason to investigate why. The total size of the store backups for each machine is listed as well. Let’s say there is one backup that uses up 2 TB of data while all other machines only use a few hundred GB’s, you know that user doesn’t have much data that needs to be backed up. Therefore, you can investigate and see if maybe a hard drive that should have been excluded was overlooked.
Before you go… bonus tips!
If your server has enough horsepower, RAM and storage space (not on the startup disk but other internal or external drive), you should take a look at the Caching service in the Server App. (Even more so if you have multiple Macs on your network and/or frequently install or reinstall systems.) The Caching service intercepts software updates for macOS, iOS and tvOS and stores them. So if you just downloaded and installed the latest macOS update on your Mac, that’s 1.1 GB stored in the Caching service. Rather than every other Mac downloading this same update directly from Apple, it’ll be served from your server. If your Internet is slow or if you have monthly data limits, this can save you many gigabytes of data every month.
How to set up Caching service
Setting up the Caching service is a breeze. Simply select the service from the list, set the cache location (any hard drive that is not your startup disk) and set a cache limit. The permissions are set to their best options automatically (only your network), so no need to worry about that. You also don’t have to give users permission to use this service, macOS handles it all for you.
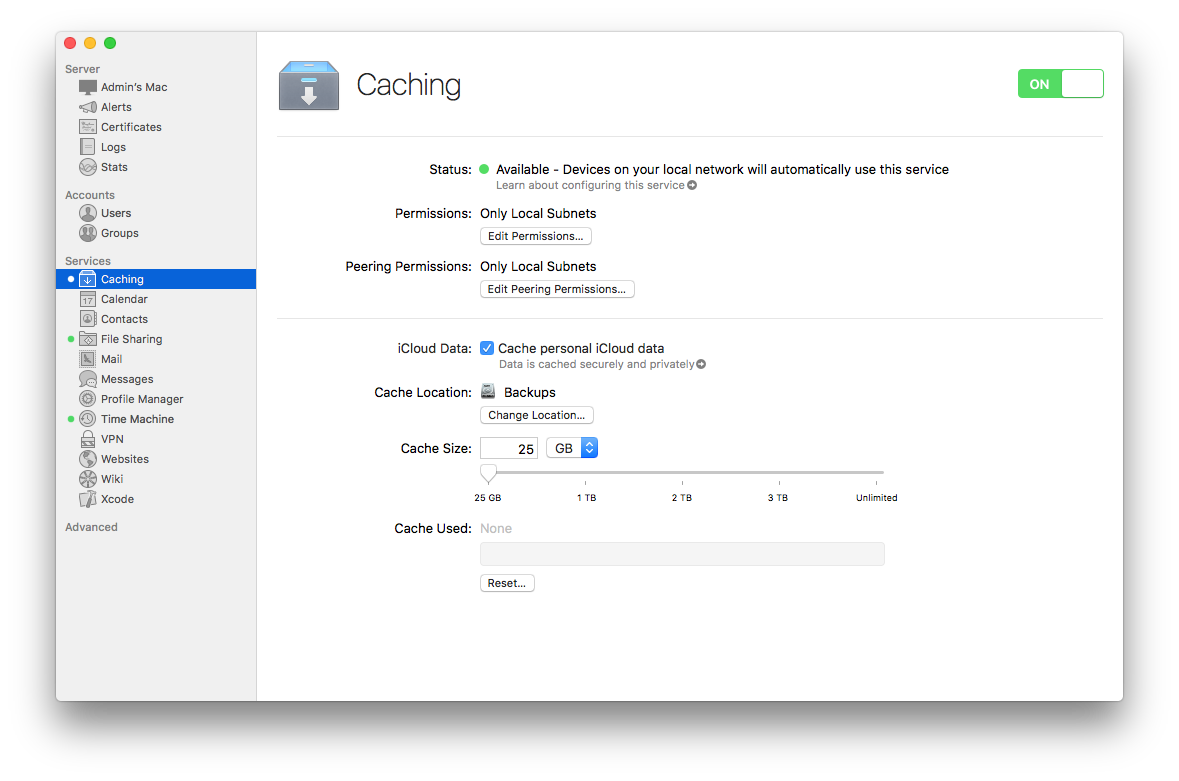
As long as a device is on your network and needs content that exists in the cache, it will receive it from that cache. If the content does not exist in the cache, the Caching service will put it there so the next user can benefit. A small graph bar will form over time, which will show you how much cache space is used and what kind of content is using up that space simply by hovering your mouse over the bar.

iCloud data can also be cached, which can speed things up for users considerably. More info on the Caching service can be found here.
Should you use a Virtual Private Network (VPN)?
Need a VPN service when you’re away from home? Why not set up your own? One option is to set up a VPN router to protect your Internet traffic, and another option is to use macOS Server.
With macOS Server, you can configure a solid VPN service that will allow you to connect to your home network from anywhere in the world. With the Server, you can access your files or just make sure all Internet traffic flows through the encrypted connection. Configuring the VPN service is not as straightforward as the Time Machine or Caching services, so this will be covered in a future article.
macOS Server is very versatile, so take a look around and see what other services are offered; some might be great for your environment or give you ideas you had not considered before!
Have something to say about this story? Share your comments below!

