How to Encrypt Email with Any Email Provider
Posted on
by
Jay Vrijenhoek
Previously, I wrote about secure email providers — what to look out for and some suggestions of email providers you should consider trying. But what if you already have an email address that’s been in use for years? Switching to another email address can be a real pain and old email addresses tend to stay active, just in case you forgot to tell someone you made the switch. You likely end up with two or more email addresses to keep track of, along with other addresses that can collect spam.
Luckily, there are ways to bolt-on encryption to an existing email address! You can continue to use the email provider that you’ve been using all along and choose when to sign, encrypt or both sign and encrypt your outgoing emails. There are two ways to get this done. One is S/MIME, the other is PGP. This article will cover S/MIME, in which I’ll explain what it is and how to implement it (get ready for a lot of screenshots).
What is S/MIME
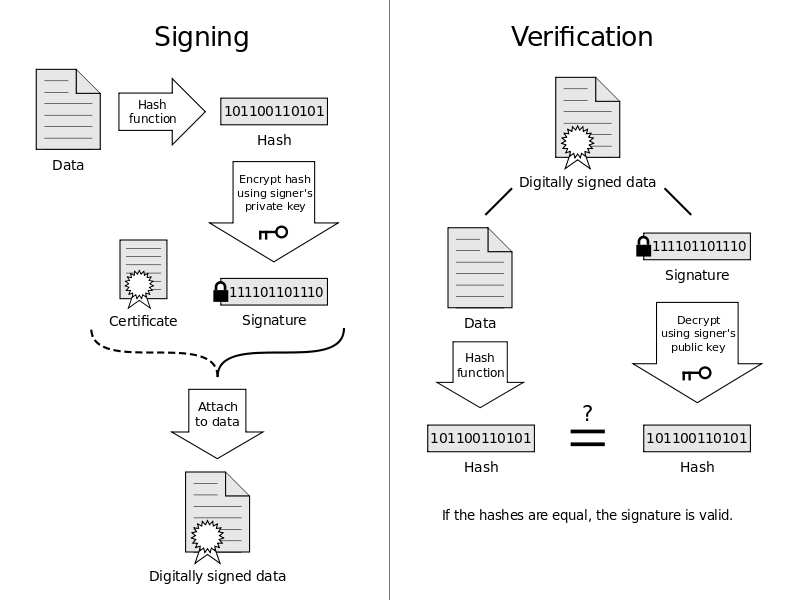
S/MIME (Secure/Multipurpose Internet Mail Extensions) is a standard for public key encryption and signing of MIME data (MIME data being your emails). The encryption part is self explanatory; the email contents and attachments are encrypted and can only be seen by you and the intended recipient. The signing aspect is more than simply letting the recipient know the email came from you, it also proves that the email contents were not altered after you clicked “Send.”
Two encrypted keys are used on your device to digitally sign an email, the private key and the public key. The private key exists only on your device(s) and the public key is sent to the recipient along with your email. The public key is used to decrypt the email contents.
What you need to make S/MIME work
- An email address
- An S/MIME certificate
- A macOS or iOS device
- A recipient that has S/MIME set up as well
How to obtain the certificate
There are quite a few places where one can get an S/MIME certificate — free, paid or even self-generated. For this example I’ll stick with my go-to source, Comodo.
To get started, visit Comodo’s website here and click on the “Free Download” button under “Free Email Certificate.” You will be asked for some details, including your email address, private key size and revocation password. Make sure that the email address you fill out is the one you want to apply the encryption. All other steps are explained on the page and should take but a minute to complete.
Now you must wait for an email to be sent to you, which will contain the download link for your certificate. Once downloaded (Use Safari if you can, Firefox may cause some issues) you’ll have a file that looks like this:

Back up this file as it is the only existing copy! You will need it again if you re-install your Mac or use another Mac on which you want to send and receive encrypted email. If you believe there’s a chance someone might ever get their hands on this certificate, consider storing it in an encrypted disk image.
How to install the certificate
To install the certificate, double click the .p7s file and Keychain Access will open and ask you where you’d like the certificate installed. I personally import these certificates into my System keychain to have it available on all user accounts, but you can choose the Login keychain as well to make it available just for your current user account.
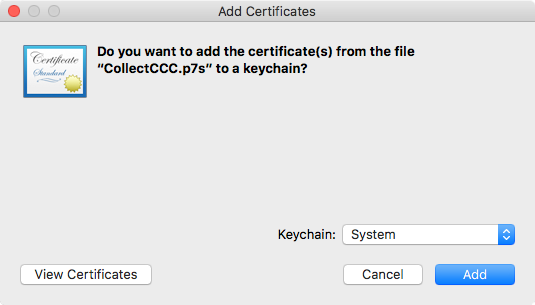
Select the keychain you want to import the certificate in and click the Add button. That’s it! The certificate is installed and ready for use.
How to configure Mail to use the S/MIME certificate
To configure Mail to use the certificate is typically as easy as restarting the Mail app, but there are a few other things to check and make sure that your email is as secure as possible. In Mail, open Preferences and select the Accounts tab. Now select the account you will be using the S/MIME certificate with and go to the Server Settings tab. You’ll want to uncheck the box next to “Automatically manage connection settings” for both incoming and outgoing server settings; this way, additional options appear as indicated below.
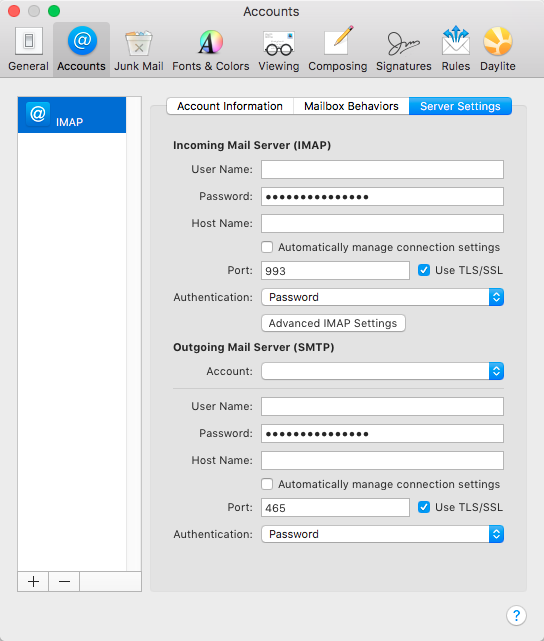
Make sure your account is configured to use TLS/SSL with the right port and authentication. The right settings for your account can typically be found on the website of the company that provides your email address. This will ensure a secure connection between your Mac and the email server. It’s a good idea to check these settings for every email account you have, not just the one you’ll be using with S/MIME.
At this point, if you haven’t restarted Mail already, do so now.
How to use S/MIME
To use S/MIME, compose a new email message and make sure you’re sending it from the email address that has the S/MIME certificate connected to it. Type in the address of the recipient, someone you want to exchange encrypted emails with (so they need S/MIME configured as well), and you’ll notice two new buttons appear in the “From” bar (a lock and a seal).
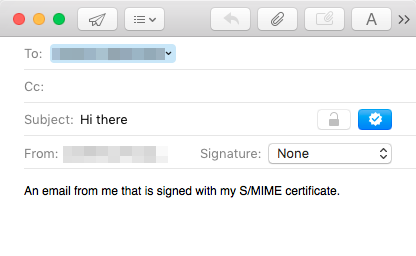
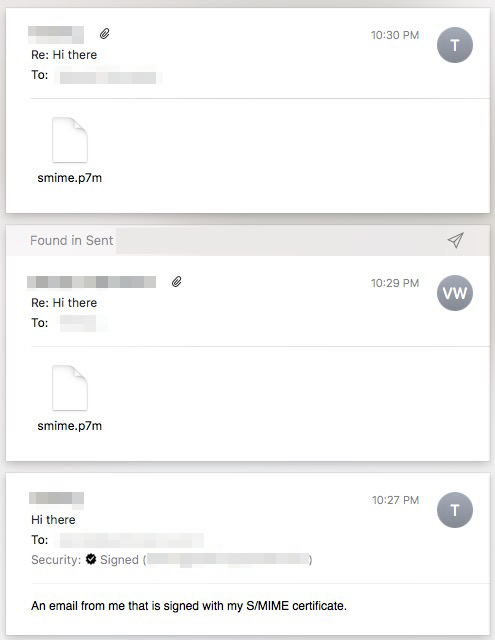
The lock (encryption) will not be available until you and the recipient exchange encryption keys, so only the seal (signing) will be available. Send the email and on the recipient’s end they will see the following:
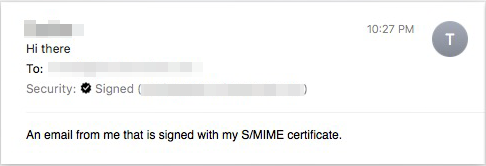
The content of the email is visible as no encryption was used, and the seal that shows the email was signed confirms the email was properly signed. The recipient can now reply to the email and use both signing and encryption. As the recipient has both their own S/MIME certificate and yours (automatically installed in their keychain upon receiving your email), the encrypt option becomes available.
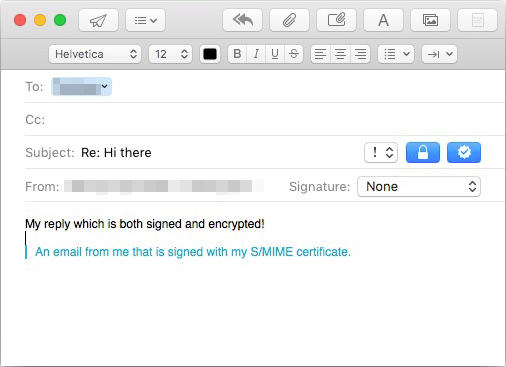
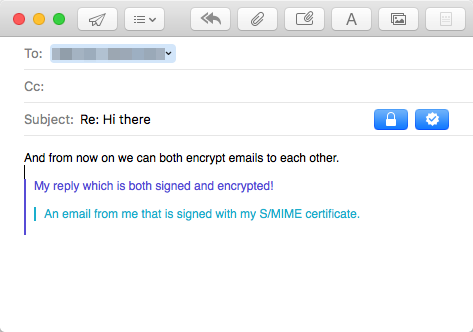
After receiving the reply to your first email, you now have the S/MIME certificate of the other person as well, so the encrypt option becomes available when you reply. This little dance is required for encryption key exchange between you and each person you want to send and receive encrypted emails to and from. It’s a one time thing, after that you can sign and encrypt every email you send to that person right away.
You can email anyone and sign your emails, but you can use encryption only after keys have been exchanged, which requires both the sender and recipient to have S/MIME configured.
Note that if you or one of the recipient loses the S/MIME certificate and stored keys, this will be the result:
All emails that were sent and received using encryption can no longer be viewed. And without the backup of your certificate, this content will be irretrievable. This is also what someone who intercepts your email would see, an encrypted attachment that can not be opened.
How to use S/MIME on your iPhone or iPad
You probably send and receive plenty of your email on your iPhone or iPad, so it would be useful if you can read the encrypted emails and reply to them as well. You can transfer your S/MIME certificate to your iOS device and after a few steps enjoy the security benefits there as well.
To use S/MIME on your iPhone or iPad, you must first extract the certificate from your Mac and export in a format iOS can work with. To do this, open the Keychain Access app and locate your certificate. You might find multiple entries in both the Login and System keychains, select the one that has a dropdown arrow next to it and has a key inside. The certificate you’re looking for is simply named with your email address.
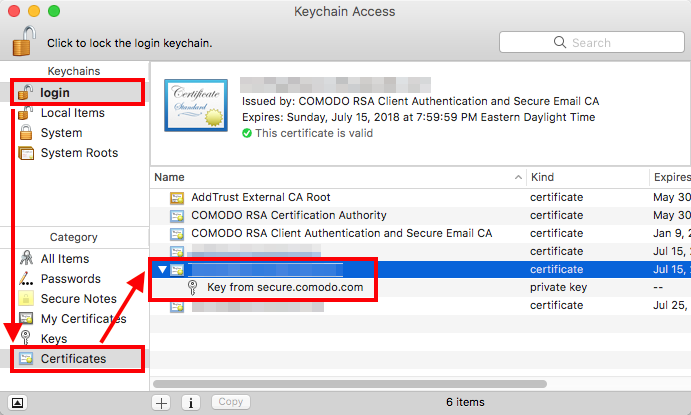
With the certificate selected, go to the File menu and choose Export Items. A window will pop up asking you to name the exported item and to select a File Format. The name can be anything you want, though I’d stick with letters and numbers only, and the file format has to be set to “Personal Information Exchange (.p12).”
![]()
Click save and you’ll be asked to secure the exported certificate with a password. Make it strong enough, but remember you have to type this in on your iOS device later, so don’t go overboard with special characters that you won’t remember.
Below is the resulting file that must be transferred to your iOS device:

This can be done through AirDrop or email. If you email this to yourself, make sure you don’t encrypt the email. Mail will give you the option as the certificate is already installed on your Mac, but the iOS device won’t be able to read the contents. The certificate you just exported has its own encryption with the password you entered, so don’t worry about it being sent in an unencrypted email. Regardless of how the certificate ends up on your iOS device, the following steps are the same. Click on the image below to view it in full size.
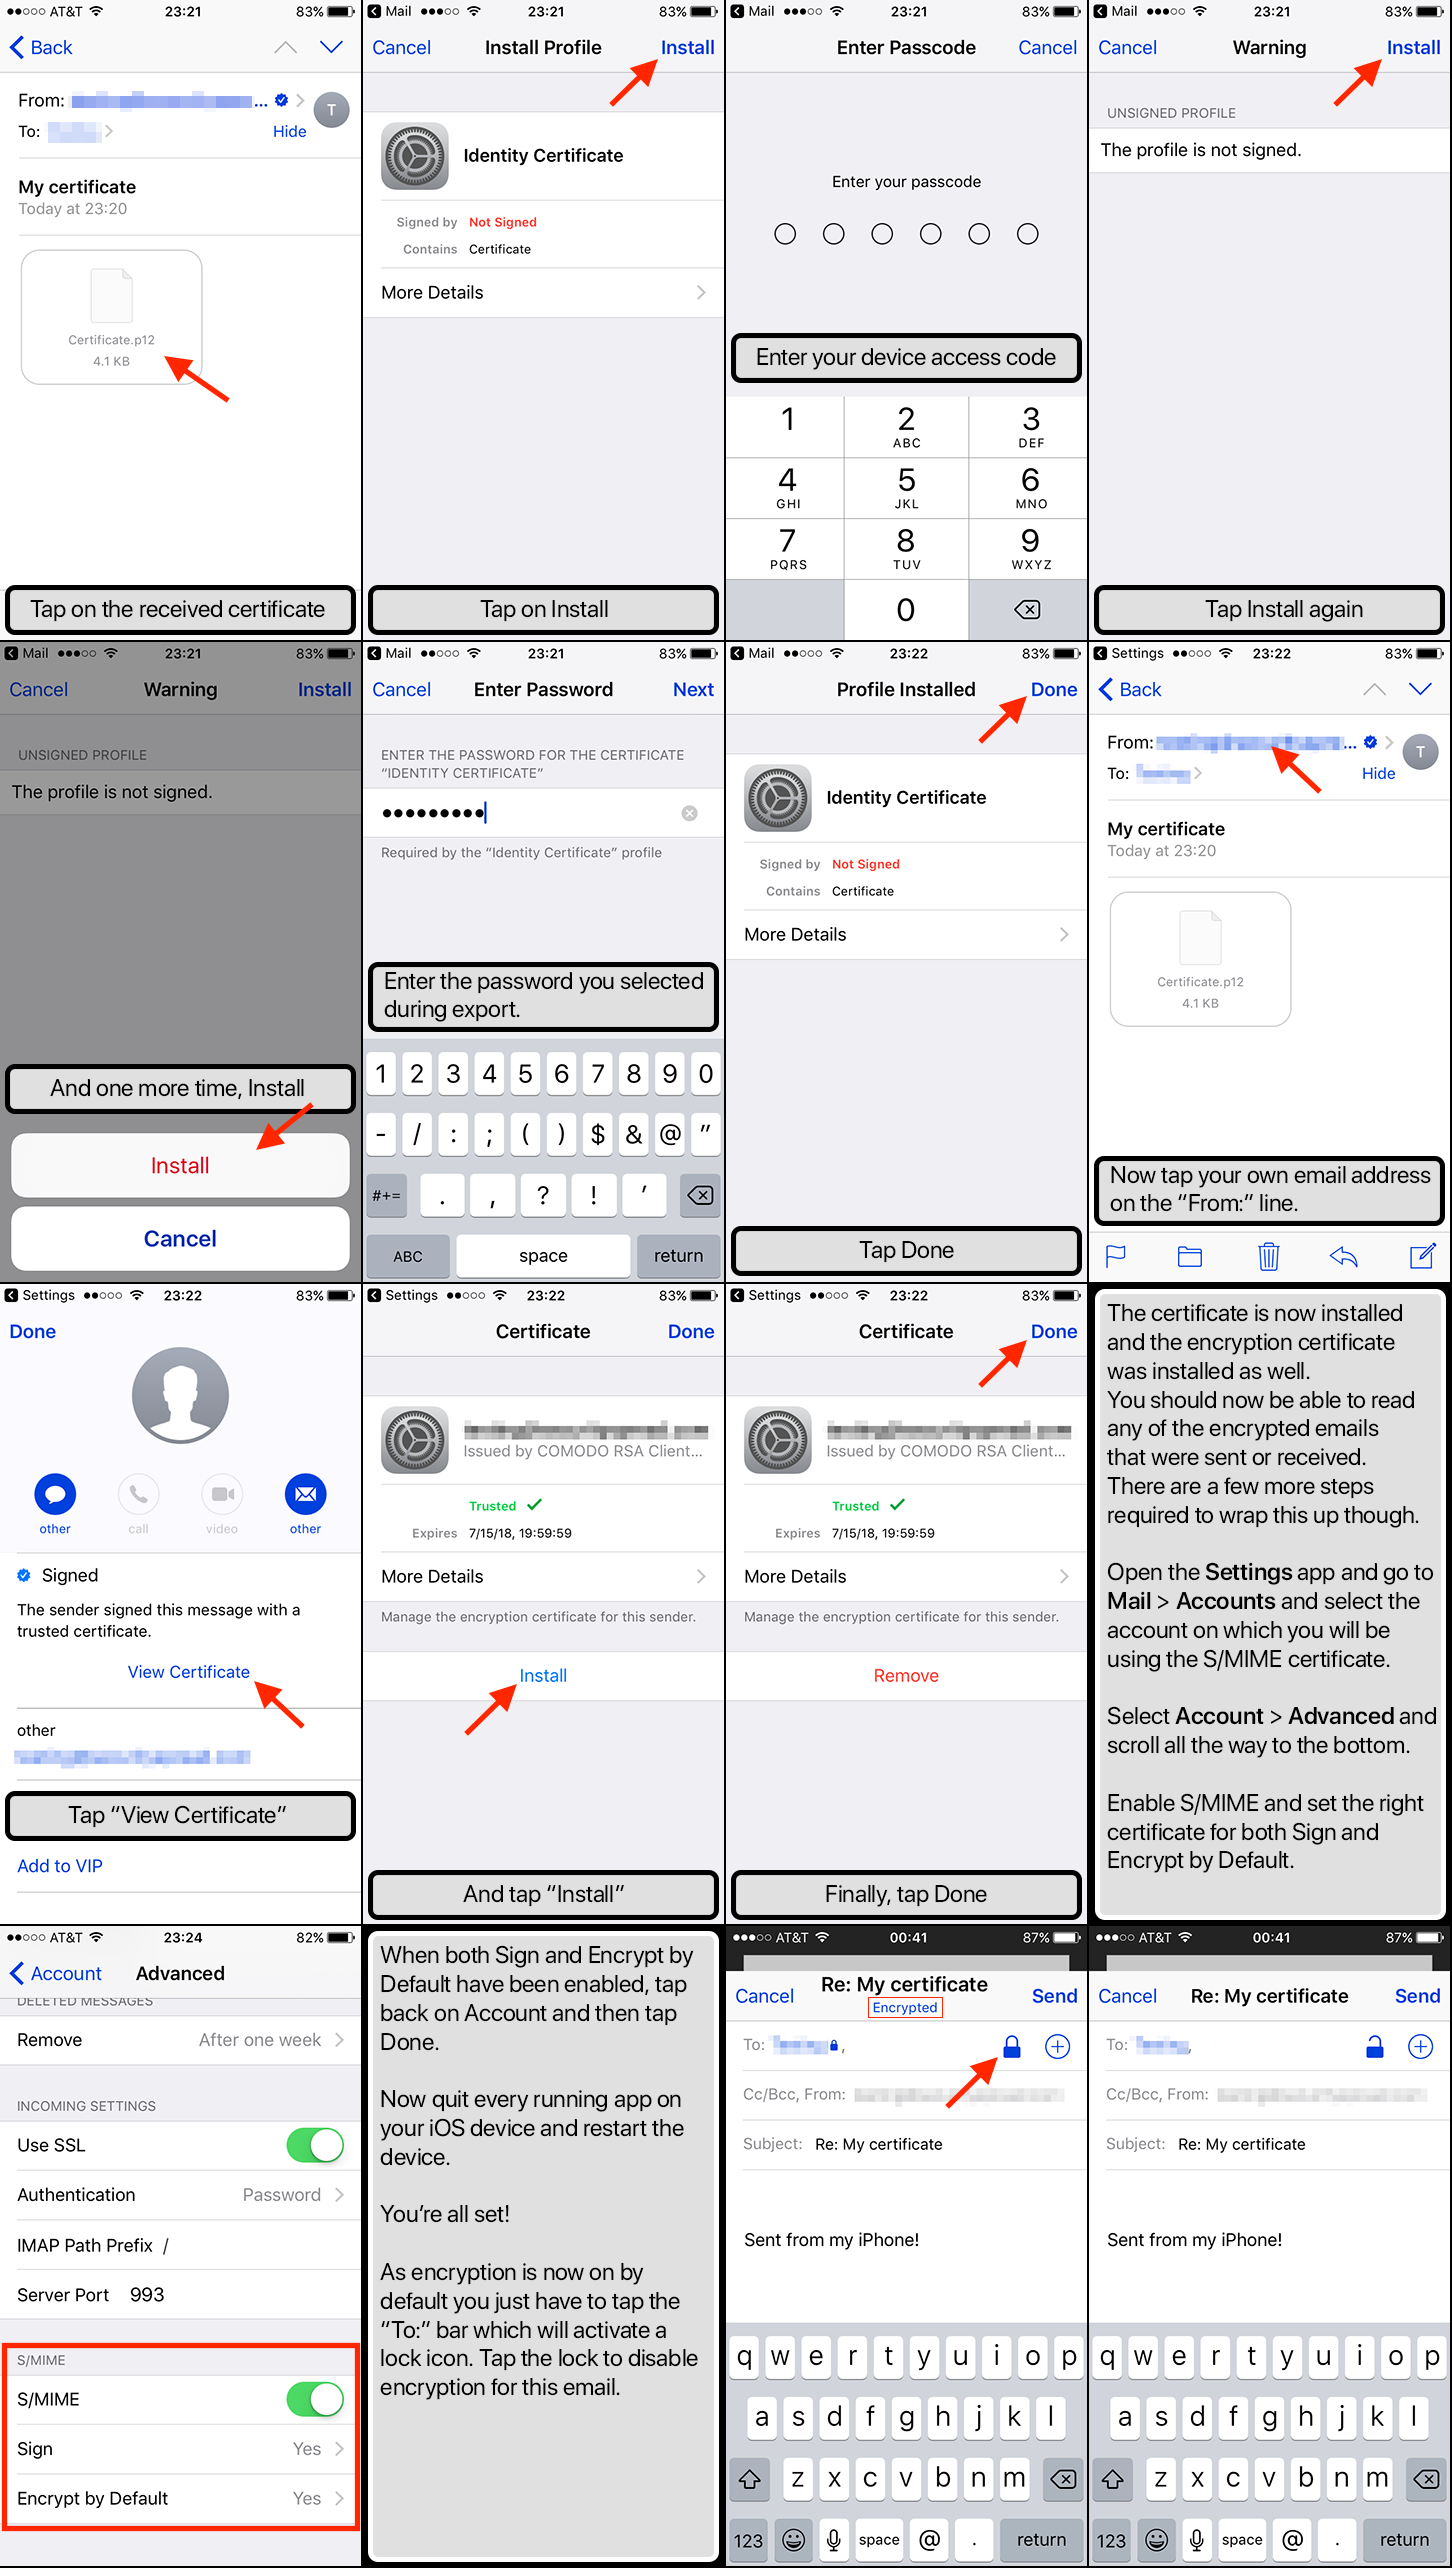
As you may have noticed, using S/MIME on your iPhone or iPad is not as straightforward as it is on macOS, but now that you’ve done it you can see how easy it is to set up. There are many steps, but they are all easy. In the last step, the lock icon may show as open/unlocked even though encryption is still on; this is a bug in iOS that has been there for quite some time, but it does not reflect the true state of encryption. For a more accurate status, just see if the header shows the word “Encrypted” or not.
You need to tap on the email address of each recipient who uses S/MIME, view their certificate and install the encryption certificate, just like you did when configuring your Mail to use the S/MIME certificate. On macOS, accepting the sender’s certificate, key and encryption certificate will all happen automatically for you as soon as you receive the email. On iOS, this must be done manually, hence all the extra steps. Unfortunately, you also have to follow all of these steps on every other iOS device you have.
There you have it! Signed and encrypted email on all your devices to and from anyone who also has S/MIME configured. It’s a bit of a task to set it up, but once done you won’t have to look at it again. That is… until your certificate expires and you have to renew it. 😉
Renewal consists of you obtaining a new certificate and repeating the above steps again. As lengthy as this article is, performing all the steps takes about 10 minutes, and it becomes easier as you do it more often. If you ask me, spending the time to set this up is a small price to pay for private and secure email! And your old keys will still be in your Keychain, even though expired, so you’ll always be able to see old encrypted email contents.
S/MIME Pros and Cons
Pros
Easy to obtain a certificate
Easy to install on the Mac
Works on both macOS and iOS
No additional software or plugins required
Cons
Not so easy to install on iOS
I mentioned earlier that there is another way to get encryption with an existing email address: PGP. A followup article will cover how to do this, so stay tuned for more!
Have something to say about this story? Share your comments below!

