Stage Manager offers new way to work with windows in macOS Ventura and iPadOS 16
Posted on
by
Kirk McElhearn
While computers have changed a great deal since the first personal computers, one thing hasn’t: the way we work with windows. On the Mac, we went from being able to use one app at a time, to an early form of multitasking (the Multifinder, with System 5.0 in 1987), to true preemptive multitasking in 1999 with Mac OS 8.6.
Since then, the way we work with windows has not changed. You can open multiple windows, arrange them on the screen, switch from one to another easily, and even hide windows when you don’t want to see them.
Now, with macOS Ventura and iPadOS 16, Apple is introducing Stage Manager, the biggest change in the way we work with windows in decades. Here’s how Stage Manager works, and why you may want to use it.
What is Stage Manager?
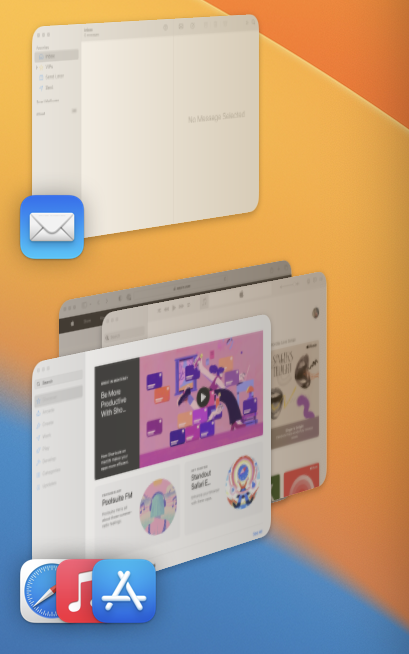
Stage manager is a new way for Apple’s operating systems to manage and display the windows of the apps you work with. Instead of having layers of overlapping windows on your screen, you can have a single app window visible, or you can create groups of windows from multiple apps that display when you want.
At the most basic level, with just one window visible, Stage Manager is a lot like activating an app window then hiding all other windows. (You can do this by choosing the menu with the name of the current app, then choosing Hide Others, or by pressing Command-Option-H.) This is a good way to focus on a single app, and not be distracted by other windows in the background.
Stage Manager also shows you thumbnails of other active apps on the left side of your display.
You can switch apps by pressing Command-Tab and using the Application Switcher, by clicking an icon in the Dock, or by clicking one of the thumbnails on the left of your display. When you do this, the app you click expands to become visible, and the last active app slides to the left of your screen.
How to activate Stage Manager
To activate Stage Manager, click the Control Center icon in the menubar (in the screenshot below, it’s the icon just to the left of the date). Click the Stage Manager icon, and you see this dialog:
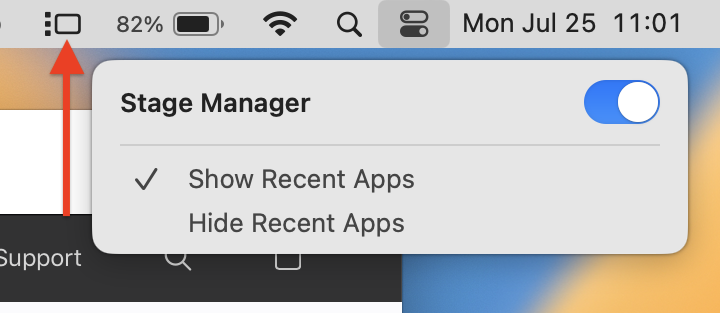
You can toggle Stage Manager on and off; this is useful, because there may be times when you want to work in this mode, and others when you don’t want to. You can also choose to show or hide recent apps; that’s the thumbnails on the left of the screen. If you hide recent apps, moving your cursor to the left of the screen displays these thumbnails.
If you plan to toggle Stage Manager often, you can add a menu extra to your menubar, indicated by the red arrow in the screenshot above. Go to System Settings > Control Center, then choose Show in Menu Bar.
You can also enable or disable Stage Manager in System Settings > Desktop & Dock, in the Stage Manager section. If you go to these settings, and click Customize, you can choose whether you want to show the Strip – that’s the icons on the left – and also whether you want desktop items to be visible.

Using Stage Manager on an iPad

Stage Manager is also available in iPadOS 16, with some limitations. Only a few iPads can use Stage Manager: all 11″ iPad Pro models, the 12.9″ iPad Pro 3rd generation and later, and the 5th generation iPad Air and later.
To activate Stage Manage on an iPad, Swipe down from the top right of your iPad screen, then tap the Stage Manager icon.
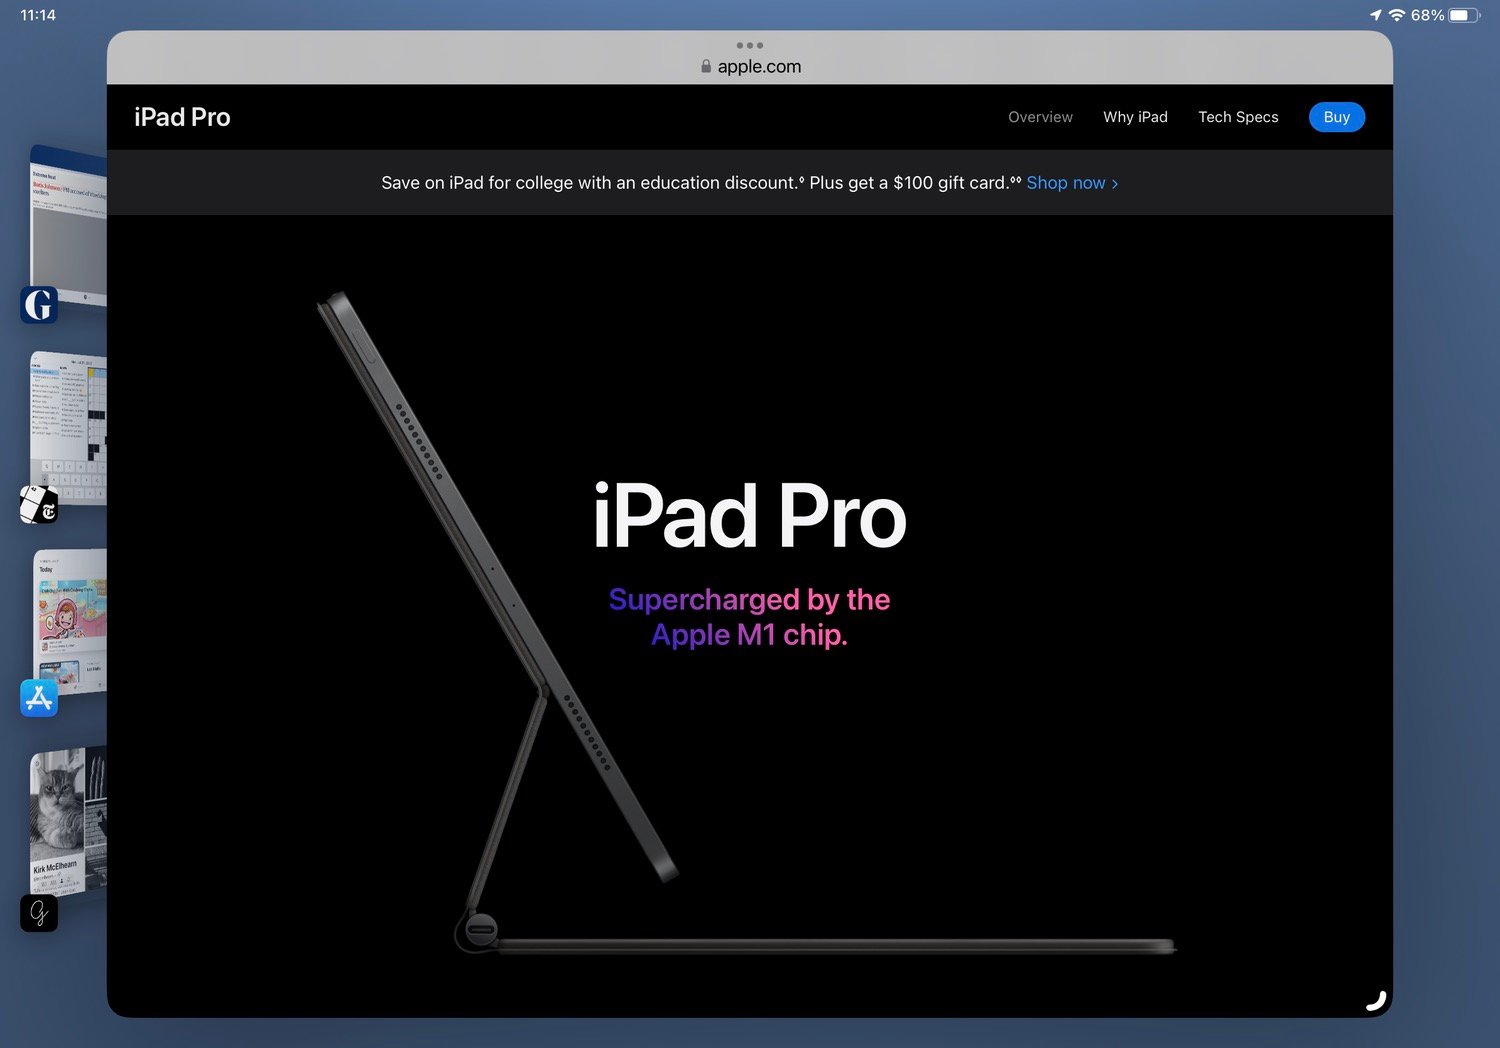
When Stage Manager is enabled, it looks like this:
Settings for Stage Manager are available in Settings > Home Screen & Multitasking > Stage Manager.
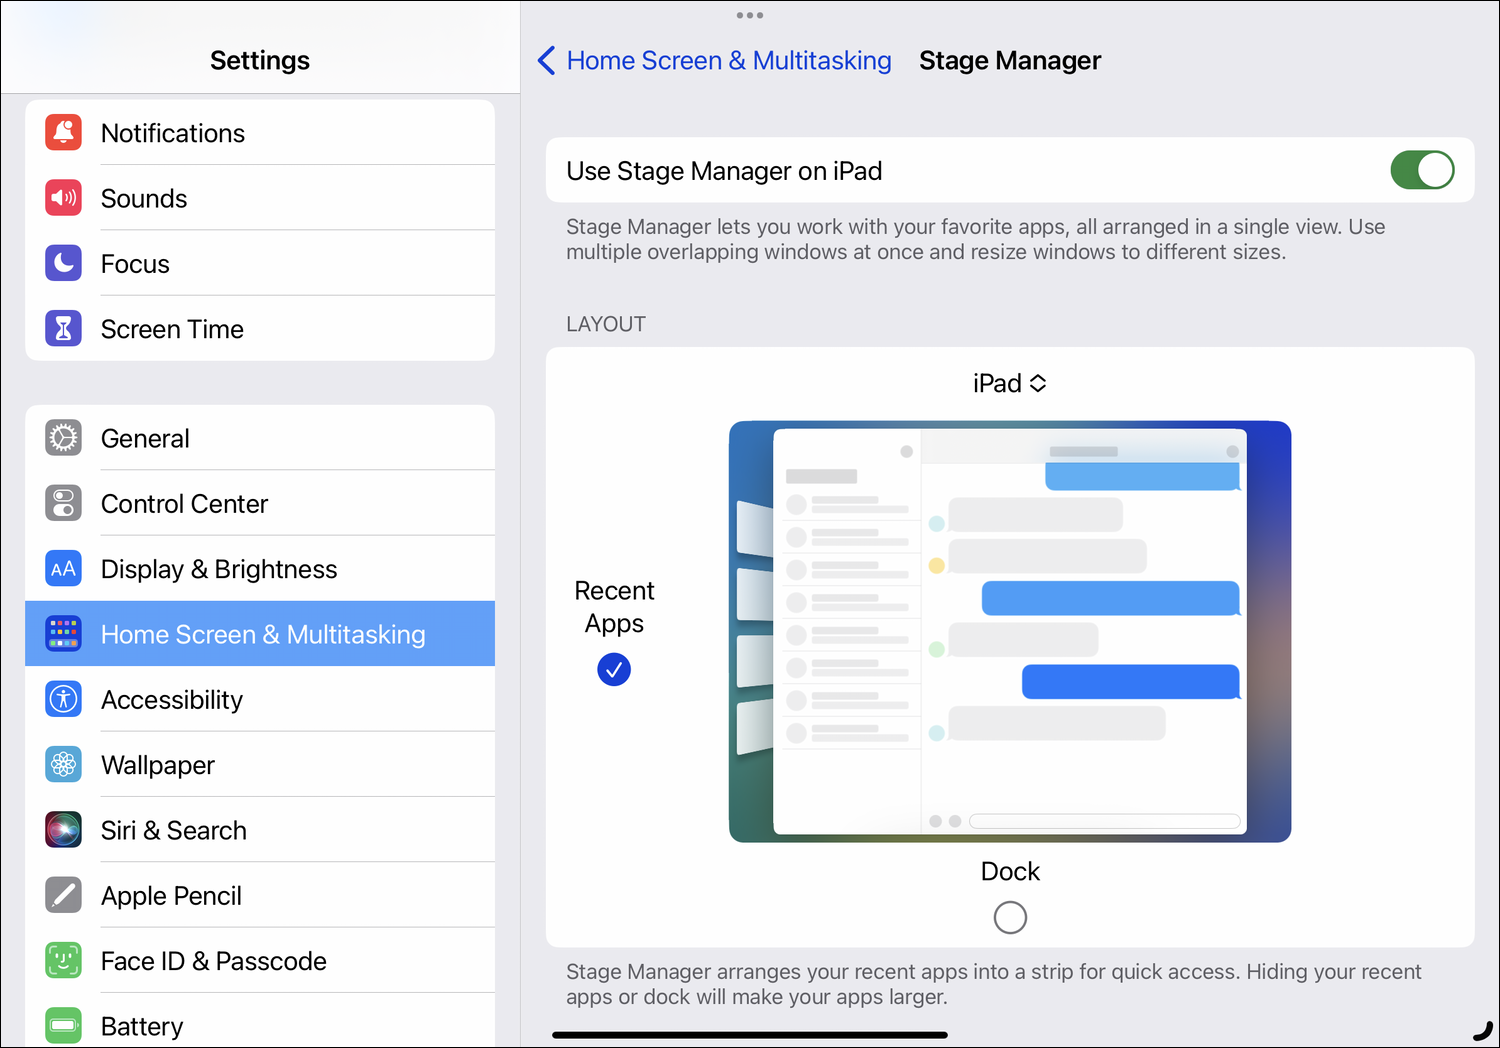
As you can see, you can show or hide the Dock, and you can show or hide Recent Apps.
Differences between macOS and iPadOS Stage Manager
In the screenshots above, you’ll note there are a lot of similarities. However, there are some differences.
On a Mac, Stage Manager displays up to six recent apps at the left of the screen, depending on the size of the display. On my 13 inch, MacBook Air, it only displays five. The iPad only displays four.
On a Mac, you can move your cursor to the Dock at any time, whether it’s visible or not, and you can switch to the Finder to open any file or app. On the iPad, you swipe up from the bottom of the display to go back to your main home screen, where you can open any app, and where you’ll see the Dock, if you had hidden it when working in Stage Manager.
One of the features of Stage Manager is that it focuses on a single app at a time (I’ll discuss grouping apps below). As such, it displays that app with lots of breathing room around it. You can resize apps in the usual way on the Mac – by dragging from any side or corner – while on the iPad, you must drag from the bottom right corner to resize an app.
How to create app groups in Stage Manager
To create an app group on a Mac, drag an app icon from the left side of the screen on top of a window. Arrange the two windows, and the Finder will remember this layout. If you activate another app, you’ll see multiple icons at the left. No matter how many apps you have in a group, you’ll only see three icons for the apps you’ve used most recently. I don’t know if there’s a limit to the number of apps you can add to an app group; I stopped trying after I added a dozen.
You can remove an app from an app group by quitting it; when you relaunch the app, it will no longer be part of the app group. Or, if you click the yellow button at the top left of the app window, it leaves the group and shows up on the left on its own.
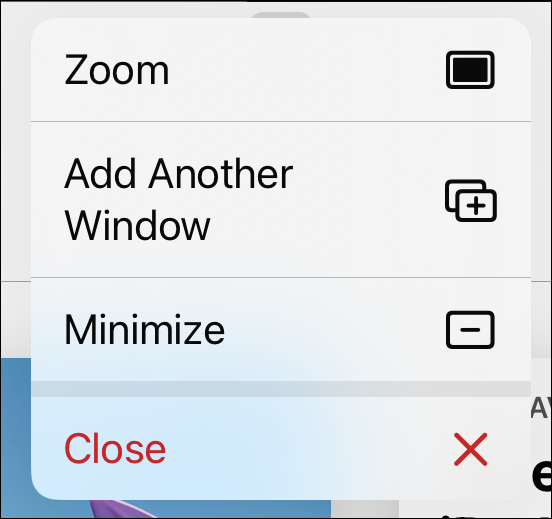
On the iPad, the … icon at the top center of windows is your control center for app groups. If you tap this, you can Add Another Window, to add another app to an app group – you can also drag an app from the left side to the frontmost window to do this; or you can Minimize, which removes a window from an app group; or you can Close the window.
How useful is Stage Manager?
I’m particularly excited about using Stage Manager on my Mac. I like the idea of focusing more on a single app, or setting up groups of two or there apps, and having everything else off to the side.
I don’t plan to use Stage Manager on my iPad Pro. The size of the display (I have an 11″ model) means that windows are quite small; there’s a lot of wasted space. Stage Manager is only useful on the iPad if you want to use two or more windows at the same time, but screen size and window size will limit how practical this is. However, Apple has optimized stage manager on the iPad for when it is connected to an external display. If you do want to work on your iPad like this, then the larger display makes it very useful.
Stage Manager may seem strange at first; we’re so used to the way we’ve worked with windows for decades. But try it out, especially on a Mac; you may find that this is a much better way of working with apps.
How can I learn more?
 Each week on the Intego Mac Podcast, Intego’s Mac security experts discuss the latest Apple news, security and privacy stories, and offer practical advice on getting the most out of your Apple devices. Be sure to follow the podcast to make sure you don’t miss any episodes.
You can also subscribe to our e-mail newsletter and keep an eye here on The Mac Security Blog for the latest Apple security and privacy news. And don’t forget to follow Intego on your favorite social media channels: ![]()
![]()
![]()
![]()
![]()
![]()
![]()

