Everything you can do with the Apple Pencil and Logitech Crayon on your iPad
Posted on
by
Kirk McElhearn
Steve Jobs famously said, about tablets, “If you need a stylus, you’ve already failed.” But he was talking about using a stylus as the main input device for a tablet. When the company released the Apple Pencil in 2015, this quote was revived to remind people that a) things have changed, and b) Steve Jobs wasn’t always right.
In 2018, Apple released a second version of its Pencil, with more advanced features designed for the then-new iPad Pro models. Logitech, meanwhile, sells the Crayon: a less expensive version of the pencil that’s compatible with certain iPads.
In late 2023, Apple released a third version of the Pencil. This one is said to be the “most affordable,” but cuts back on many of the features that make the device useful.
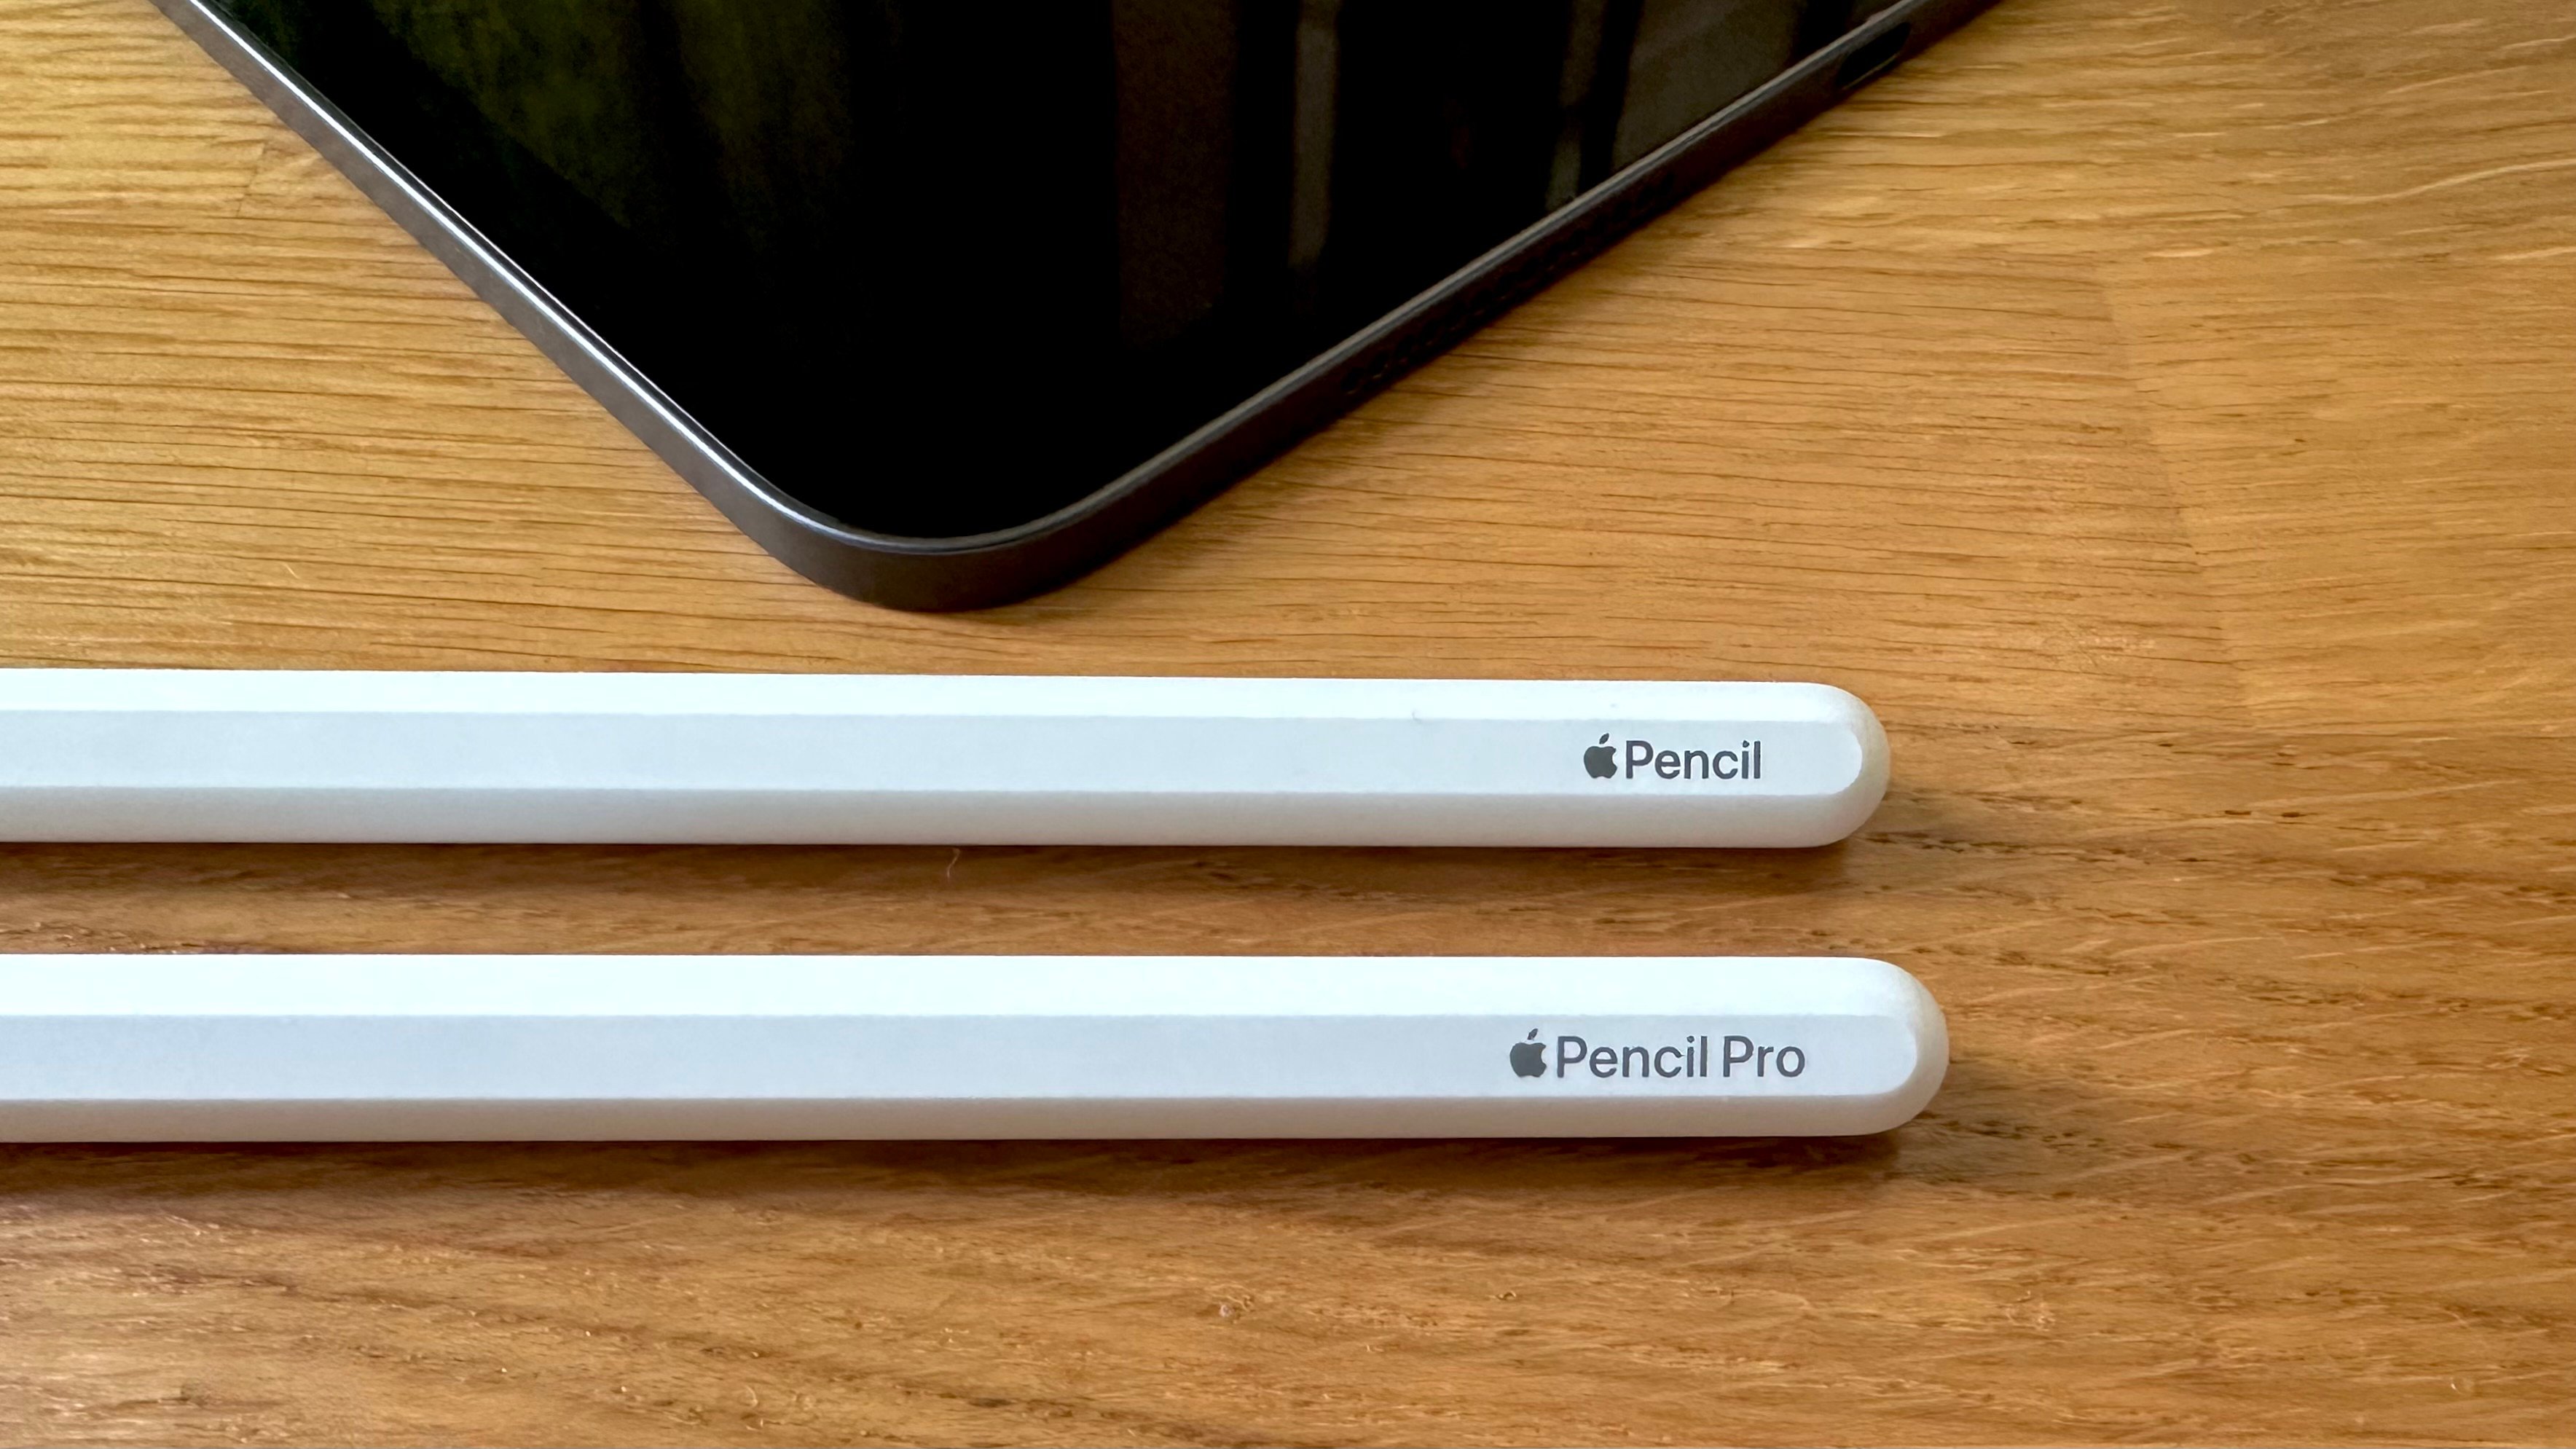
And in March 2024, Apple released the Apple Pencil Pro, a new stylus with more features, at a higher price.
In this article I’m going to tell you everything you can do with the Apple Pencil, and I’ll also look at the less expensive Logitech Crayon.
Apple Pencil and iPad compatibility
There are four different Apple Pencils, and each one has a different set of iPads it works with.
The Apple Pencil 1st generation costs $99 and works with a wide range of iPad models, some of which date back to 2015:

- iPad Pro 12.9-inch (1st and 2nd generation)
- iPad Pro 10.5-inch
- iPad Pro 9.7-inch
- iPad Air (3rd generation)
- iPad (6th, 7th, 8th, 9th, and 10th generation)
- iPad mini (5th generation)
It’s worth noting that the first-generation Pencil requires a USB‑C to Apple Pencil Adapter to work with the iPad (10th generation). This Pencil has a lightning connector to charge, and the iPad (10th generation) has a USB-C jack.
The 2nd generation Apple Pencil costs $129 works with the follow iPad models:

- iPad Pro 12.9-inch (3rd, 4th, 5th and 6th generation)
- iPad Pro 11-inch (1st, 2nd, 3rd and 4th generation)
- iPad Air (4th and 5th generation)
- iPad mini (6th generation)
The 3rd generation device, officially named Apple Pencil (USB-C), is the cheapest Pencil at $79, and is compatible with the following iPads:

- iPad Pro 13-inch (M4)
- iPad Pro 12.9-inch (3rd, 4th, 5th, and 6th generation)
- iPad Pro 11-inch (M4)
- iPad Pro 11-inch (1st, 2nd, 3rd, and 4th generation)
- iPad Air 13-inch (M2)
- iPad Air 11-inch (M2)
- iPad Air (4th and 5th generation)
- iPad (10th generation)
- iPad mini (6th generation)
As you can see above, the 3rd generation Apple Pencil is compatible with most devices that the 2nd generation model supports, and adds the basic iPad (10th generation), along with newer models. This third-generation Apple Pencil is meant to be a lower-cost device, selling for $79, and the company is targeting the education market with a $69 price tag for schools.
The $129 Apple Pencil Pro, released in May 2024, is only compatible with new iPads released at the same time:

- iPad Pro 13-inch (M4)
- iPad Pro 11-inch (M4)
- iPad Air 13-inch (M2)
- iPad Air 11-inch (M2)
You can use an older Apple Pencil with newer iPads; for example, the Apple Pencil (USB-C) lists compatibility for the 2024 model iPads, and the other older models may offer limited compatibility, but they likely can only tap and do basic drawing.
The Logitech Crayon is compatible all iPad models from 2018 or later. Logitech sells two versions of the device, which charge either with a USB-C connector or Lightning connector. Both versions of the Crayon are still available, but if you’re buying one now, it’s probably best to go for USB-C, since it’s going to be the standard going forward.

Charging an Apple Pencil
The original Apple Pencil has an odd way of charging: you remove the easy-to-lose cap and stick it into a Lightning port (on an iPad or iPhone). That’s right, the Pencil just sticks straight out from the iPad—risking damage to both devices if you aren’t careful.
The 2nd-generation Pencil connects magnetically to one side of the iPad Pro and powers up using induction charging. This also gives you a practical way to carry the Pencil with your iPad. The magnet is strong, but I’d still be careful if you’re carrying the iPad with its Pencil out in the open (i.e. not placed together in a case).
And the 3rd generation Pencil has a USB-C port that you reveal by pulling back the end of the device. It attaches magnetically to iPads, but doesn’t charge that way.
And the Apple Pencil Pro charges magnetically, like the 2nd-generation model.
To charge the Logitech Crayon, pull back the silicone cap at the end and connect a Lightning cable or USB-C cable, depending on the model.
Apple Pencil pricing
Current prices for these devices are $99 for the 1st-generation Apple Pencil, $129 for the 2nd-generation Apple Pencil, $79 for the 3rd-generation Apple Pencil, $129 for the Apple Pencil Pro, and $70 for the Logitech Crayon.
Apple Pencil features
The feature matrix for the Apple Pencil has gotten quite complicated over the years. If you scroll down to this section of the Apple Pencil web page, you’ll see a long list of features and indications of which model supports them.
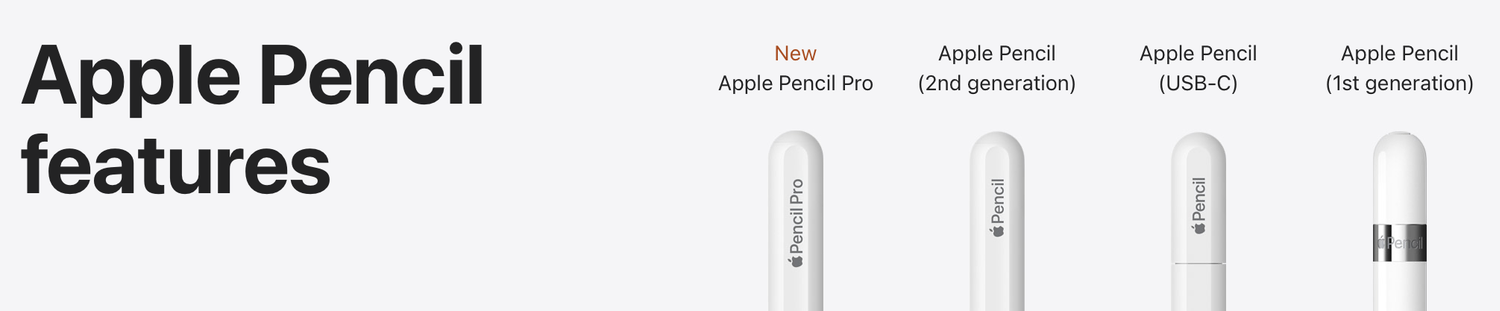
All four models have “pixel-perfect accuracy,” low latency, and tilt sensitivity. Every model except for the USB-C model have pressure sensitivity.
All models expect the first generation Apple Pencil attach magnetically to an iPad, but the 2nd generation and Apple Pencil Pro pair and charge when attached that way. The other models pair when you insert them into the lightning or USB port on an iPad.
Apple Pencil hover, which previews your mark before you make it, is available on all models except the 1st generation, but only with the iPad Pro 13‑inch (M4), iPad Pro 12.9‑inch (6th generation), iPad Pro 11‑inch (M4), iPad Pro 11‑inch (4th generation), iPad Air 13‑inch (M2), and iPad Air 11‑inch (M2).
Double-tapping the 2nd generation and Apple Pencil Pro changes tools. And both these models offer free engraving.
Finally, the Apple Pencil Pro brings a number of new features:
- Barrel roll: Rotate the barrel to change orientation of shaped pen and brush tools.
- Squeeze: Opens a palette to switch tools, line weights and colors.
- Haptic feedback: Feel feedback when squeezing, tapping and more.
- Find My support: Easily find Apple Pencil in the Find My app.
The Logitech devices are very limited, and don’t have pressure sensitivity—which is important if you’re creating detailed drawings on your iPad—nor do they have any of the more advanced features that Apple added to the Pro model Pencil.
However, if you tilt the Logitech Crayon, it does make thicker lines. This means that for basic note-taking and other general uses, the Crayon may meet your needs. But if you’re an artist who wants a tool for drawing digital artwork, you’ll almost certainly want an Apple Pencil.
Apple Pencil form factor
The original Apple Pencil was round all around, meaning that it would roll on a desk or table that wasn’t perfectly level.
All subsequent models have one flat side, preventing unwanted movement, but also allowing them to attach magnetically to an iPad. This change is a no-brainer; the round pencil was perhaps attractive from a purely aesthetic perspective, but it was impractical. The newer Pencils also have a matte finish, which is easier to hold and less slippery than the first model.
The Logitech Crayon is quite different, with an oval-shaped body; it’s quite wide, which may not feel comfortable to everyone, but it does stay flat on a table.
Setting up an Apple Pencil
Setup for all of these devices is simple. Make sure Bluetooth is turned on. With the first-generation Apple Pencil, remove the cap, then plug its lighting connector into your iPad, then tap the Pair button. For the 2nd generation model or the Apple Pencil Pro, place the Pencil on the magnetic side of the iPad. The iPad will immediately recognize the Pencil and pair with it. And for the 3rd-generation Apple Pencil, you must connect it to an iPad via a USB-C cable to pair it. When you connect the Pencil, the iPad briefly displays how much charge the device has.

For the Logitech Crayon, press and hold its power button for a second or two, until the tiny LED next to the button lights up, then start writing. It pairs automatically.
Apple Pencil Settings
There are a few settings for the Apple Pencil, including settings specifically for the 2nd-generation model and the Apple Pencil Pro. You can double-tap the bottom third of the device to effect a change. In Settings > Apple Pencil, you can choose whether this “gesture” switches between the current tool and the eraser, between the current tool and the last one you used, or shows the color palette. Other settings will be available for the Apple Pencil Pro when it ships.
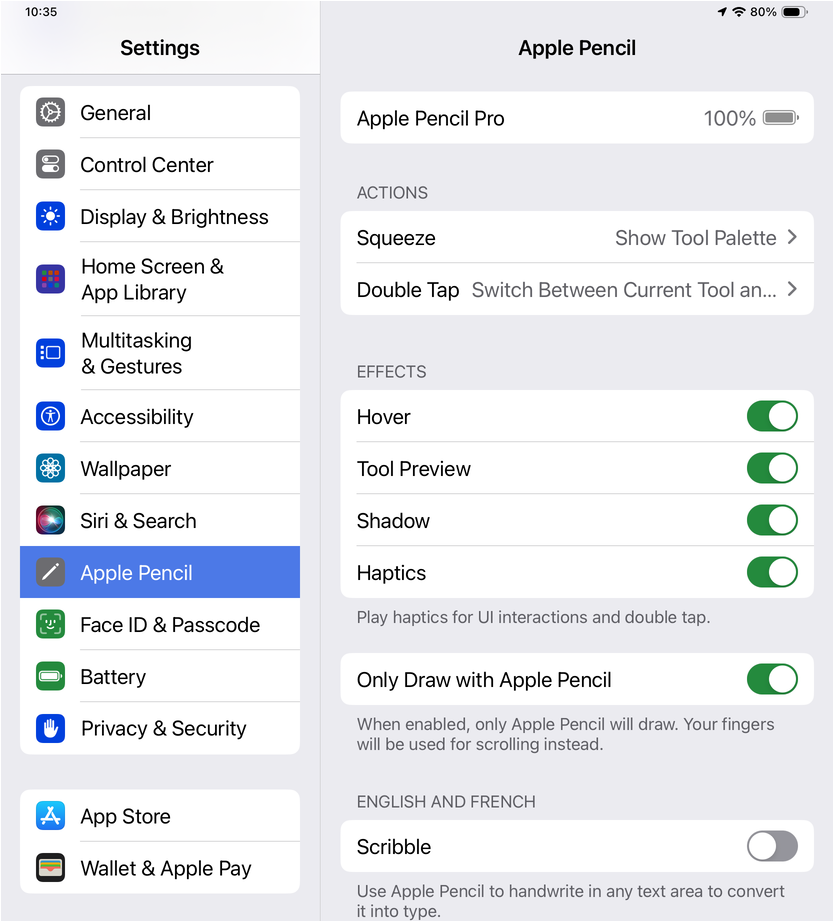
Other settings let you tell your iPad to only use your Apple Pencil or Logitech Crayon to draw. There’s a setting to activate Scribble, which we’ll discuss in the next section.
Hover
The 2nd and 3rd-generation Pencil, and the Apple Pencil Pro, has a nifty “hover” feature, which shows a preview of brushes as you approach the Pencil to the screen of an iPad Pro. Unfortunately, this is limited to iPad Pro models with M2 and M4 processors (see above for compatibility of this feature). This is useful when drawing to see what your lines or brushes will look like before touching the iPad screen.
Scribble
With the introduction of iPadOS 14 came Scribble, an innovative feature that takes advantage of the Apple Pencil or Logitech Crayon. Scribble lets you write on your iPad in any text area. While at first this might remind long-time aficionados of the Apple Newton MessagePad’s handwriting recognition of the mid-1990s (famously lampooned on The Simpsons) it’s actually much more advanced than that.
https://www.youtube.com/watch?v=u6qxixgQJ4M
With Scribble, you can use your Pencil or Crayon to write directly in Safari’s address bar, compose emails, and use smart selection to select, cut, and paste text converted from your handwriting. iPadOS uses data detectors to recognize phone numbers, dates, and addresses, so you could, for example, write a phone number, then tap it and call it.
Scribble isn’t just for writing words and number, though. It also recognizes shapes, so if you want to, for example, create a flow chart, your squares, circles, and triangles will be converted into clean shapes.
To use Scribble, just write—anywhere. If you write in Notes, you can tap the pencil icon with the A at the bottom of the window, then write; this tells Scribble to convert whatever you write with your Pencil or Crayon into text.
The best way to see how Scribble works is to go to Settings > Apple Pencil, make sure Scribble is enabled, then tap Try Scribble. The tutorial shows what you can do with Scribble. It even works with my very messy handwriting, as you can see.
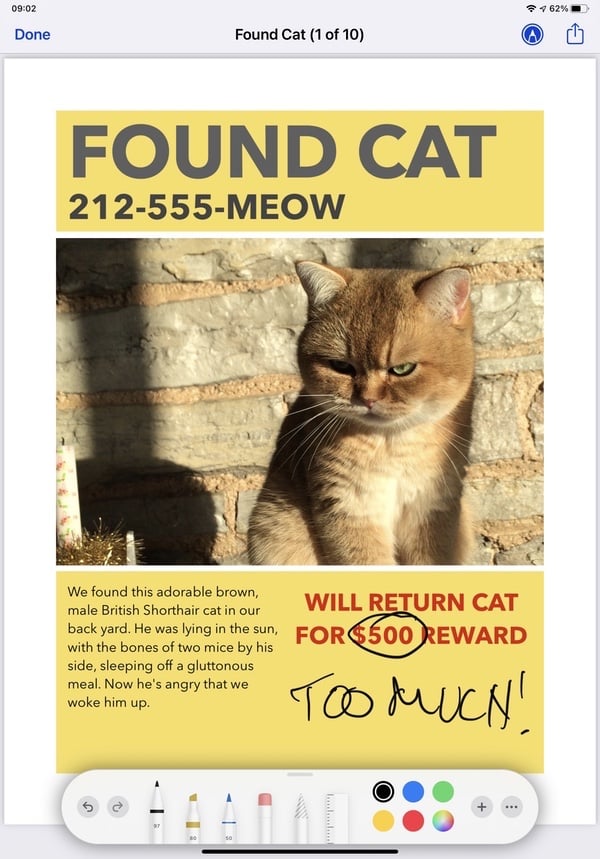
Getting started with Notes
![]()
Apple’s Notes app is the perfect way to start using the Apple Pencil or Logitech Crayon. Create a new note, then tap the Markup icon at the top right of the screen.
Notes displays a set of tools at the bottom of the screen. You can now begin to draw or even write text. The iPad Pro offers excellent palm rejection so it doesn’t think you’re writing with your entire hand.
There are four drawing options: from left to write they are a pencil for handwriting recognition, a pen, a felt-tip pen and a pencil. To the right of that is an eraser, then a selection tool. Tap one of these to activate them. Tap again and you can choose the thickness of the lines and the saturation of the color. (“Apple Pen” has never been an official nickname for the product, though it can behave like a pen when drawing.)
If you want to use Scribble for handwriting recognition, tap the pencil with the A. Start writing, and Scribble will convert your handwriting to text. Use the gestures presented in the video above to erase, select, and edit text.
To add drawings in your notes, switch to one of the other tools. You have a choice of colors, with black and the primary colors immediately available; tap the color wheel to choose a different color.
If you want to draw perfect shapes, such as circles and squares, draw the shape you want, and don’t lift the pencil right away when you finish. Hold it in place for a moment, and your rough shape will snap into a cleaner, more precise version.
You can use the eraser tool to erase anything you’ve drawn. To use it, just tap the eraser in the tools palette. Or, if you have the second-generation Apple Pencil and you’ve set that option, double-tap in the lower third of the display to switch to the eraser tool.
Another useful option in the tools palette is the selection tool. Use it to select an element, then tap and drag it to a new location. The selection tool doesn’t give you a fine selection; it selects entire objects that you’ve drawn. Note that the undo and redo buttons at the bottom left of the screen allow you to step backward and forward in your actions.
Here’s a great tip if you use Apple Notes. If your iPad is locked, tap the screen to wake it up; you’ll jump directly to your choice: a new note, the last note you viewed, or the last note you created. You can select your preference in Settings > Notes > Access Notes from Lock Screen.
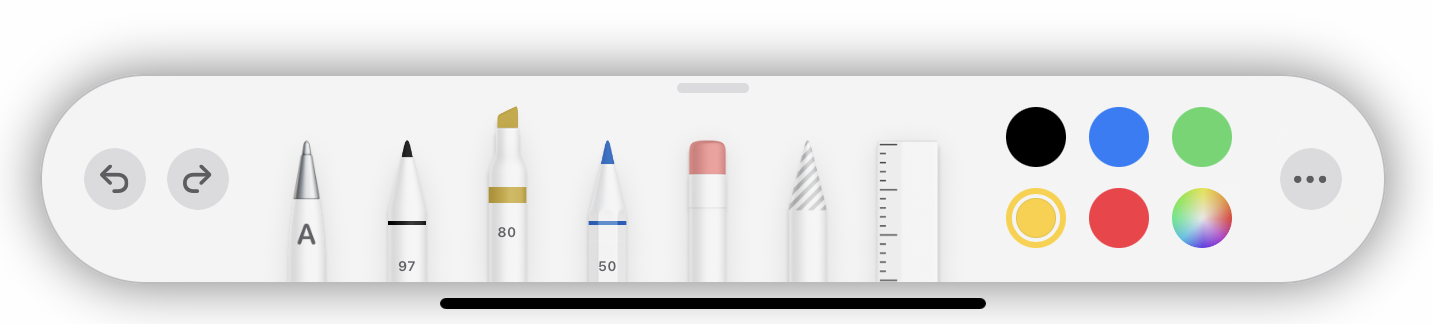
Switching tools with the Apple Pencil Pro
The Apple Pencil Pro has new features to switch tools. If you squeeze the pencil anywhere in the bottom three inches or so of the device, you get haptic feedback which feels like a slight click, and when you do this in an app that you can write or draw in, a new tools palette displays. You can tap a tool to select it, or tap … to see more options, such as to add shapes, text boxes, signatures, or stickers. Additionally, you can access settings from a gear icon in this secondary menu.
You can see below how the Apple Pencil Pro uses hover to show where it is ready to tap. Squeeze the pencil to bring up the tools palette, then double-tap to switch from pen to eraser and back to pen.
You can also use the Apple Pencil as a stylus
While the Apple Pencil and Logitech Crayon aren’t primarily intended to be used as styluses to control the iPad, you can use them as such. For some apps, this can be very practical. You can tap buttons, drag sliders and select objects. This is great for editing photos, for example, because it is a lot easier to tap some of the small icons in complex editing apps with the Pencil than with a finger.
You can navigate the iPad Pro with the Apple Pencil or Logitech Crayon performing just about every action with the stylus. I find it particularly useful for doing the New York Times crossword. The only things you cannot do are return to your home screen or switch apps (you need to swipe up from the bottom of the device with your finger), or display Control Center (swipe down from the top right) or notifications (swipe down from the top left).
Annotate PDFs with an Apple Pencil
You can annotate PDFs using the Apple Pencil or Logitech Crayon. This can be done either using the iOS Markup tools or with one of many such apps available for iOS. Open a PDF, tap the Markup icon and draw. You can also sign PDFs using these devices.
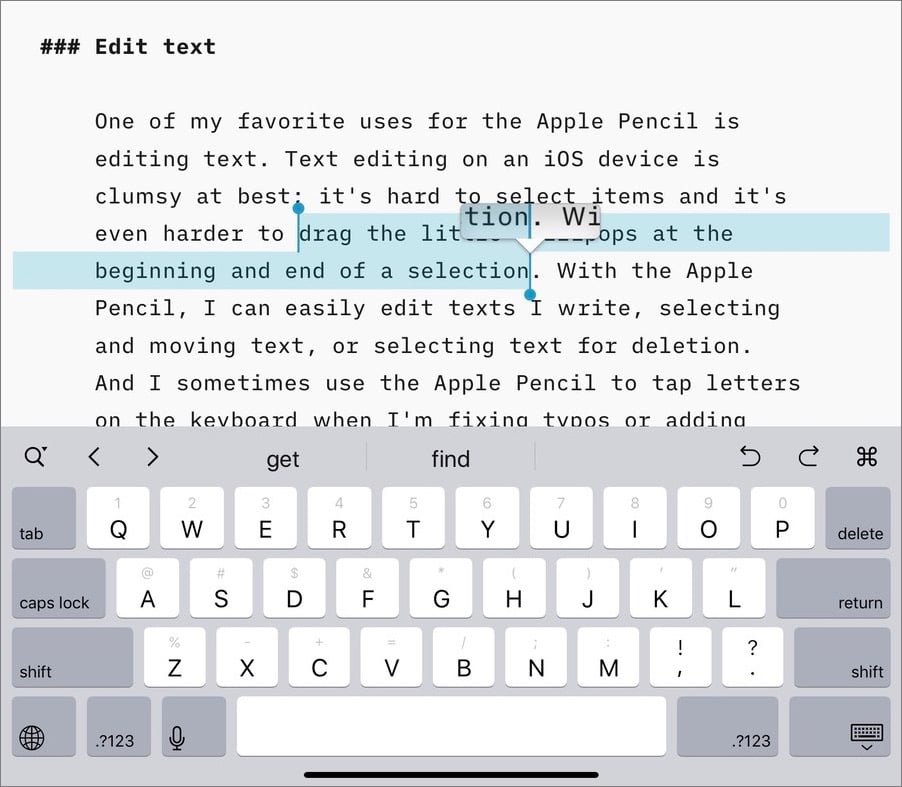
Edit text with an Apple Pencil
One of my favorite uses for the Apple Pencil or Logitech Crayon is editing text. Text editing on an iOS device is clumsy at best; it’s hard to select items and it’s even harder to drag the little lollipops at the beginning and end of a selection. With the Pencil, I can easily edit texts I write, select and move text, or delete text. I sometimes use the pencil to tap letters on the keyboard when I’m fixing typos or adding short words.
If you have an iPad, the Apple Pencil or Logitech Crayon is a worthwhile addition to the device. Even if you don’t draw, you may find lots of uses for your pencil device. It may help you streamline your work with the tablet.
How can I learn more?
 Each week on the Intego Mac Podcast, Intego’s Mac security experts discuss the latest Apple news, including security and privacy stories, and offer practical advice on getting the most out of your Apple devices. Be sure to follow the podcast to make sure you don’t miss any episodes.
You can also subscribe to our e-mail newsletter and keep an eye here on The Mac Security Blog for the latest Apple security and privacy news. And don’t forget to follow Intego on your favorite social media channels: ![]()
![]()
![]()
![]()
![]()
![]()
![]()

