4 Time-Saving Tips to Improve Your iOS Experience
Posted on
by
Kirk McElhearn
Have you got the new iPhone 6? Did you get a slim, fast iPad Air 2? Or do you still have an older model? No matter which iOS device you have, you want to have the best possible experience with that device, saving time, and getting things done smoothly.
To get the most out of your iOS device, here are four useful tips that will help you become an iOS expert, in no time!
Set up Touch ID
I’ve got several iOS devices. I have an iPhone 5s (the iPhone 6 wasn’t right for me), an iPad Air 2, as well as an older iPad mini and an iPod touch. Since getting the iPhone 5s, I’ve loved the ease-of-use that Touch ID offers. If you haven’t set it up for your device, you should do so immediately, for two important reasons: it saves time, and it’s more secure. But even if you have it set up, I’ll show you how you can make Touch ID even better.
First, to set up Touch ID—if you haven’t already done so—open the Settings app, then scroll down to Touch ID & Passcode. Tap that, enter your passcode when requested, then toggle the two options, which let you use Touch ID to unlock your iPhone, and to authenticate when downloading or purchasing items from the iTunes Store and the App Store. Use both of these options and you’ll save time not having to type your passcode or your Apple ID’s password.  Tap Add a Fingerprint, then follow the instructions to get your iOS device to recognize this finger. This takes a couple of minutes, because the device has to learn your fingerprint from different angles. When it’s done, try out Touch ID. Turn off your iOS device, then press the home or power button to wake it up, and press your finger—the one you recorded with Touch ID—on the device. Pretty magical, isn’t it?
But let’s go further with Touch ID. How many fingerprints have you recorded? When I first started using Touch ID on my iPhone 5s, I only stored the fingerprint for my right thumb, the one I use most. But I quickly realized that wasn’t enough. When my iPhone is on my desk, it’s easier to use my first finger. And when I’ve got, say, a cup of tea in my right hand, I need to use my left hand.
You can record up to five fingerprints; I suggest you record both thumbs and both forefingers. That way, you can quickly access your device if one of your hands is busy, or if it’s not in a position where you can use your thumb. And you might want to use the fifth fingerprint slot for your spouse, partner or significant other, in case you want them to be able to use your device.
Set Up a Long Passcode
Now that you’re using Touch ID, that four-digit passcode seems pretty feeble, doesn’t it? Well, you’re not limited to just four digits. Why not set up a more secure passcode? To do this, you want to be in the Touch ID & Passcode settings, as above. Scroll down a bit, and you’ll see a toggle that says Simple Passcode. Toggle this off, enter your passcode, then enter a new passcode. 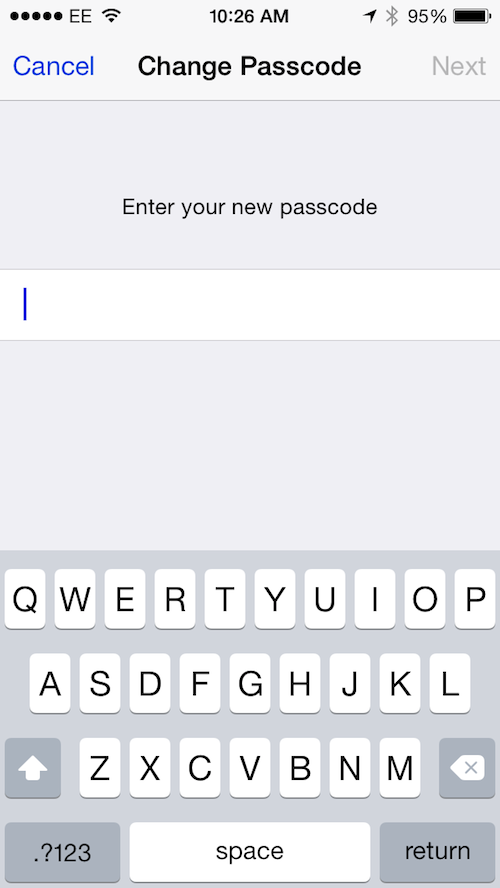 You’ll see that you can use the entire keyboard; you can create a passcode with letters and/or numbers, and one as long as you want. Don’t make it too long, but anything is better than those four digits, even four letters is much more secure (as long as it’s not an easy-to-guess word, such as the name of a child or pet).
Put Apps in Folders
If you’ve had your iOS device for some time now, you have probably downloaded a lot of apps. To better organize your device, it’s a good idea to put them in folders.
Start by pressing and holding the home button until your app icons wiggle. Drag one app icon onto another to create a folder automatically. iOS will suggest a folder name, but you can change it to anything you like. When you’re done, press the Home button again to stop the icons from wiggling.
To access apps in a folder, tap the folder; it opens. Then tap an app, and it launches. You can put lots of apps in a folder, and they can even be on multiple “pages,” with nine apps per page. If a folder has more than one page, just swipe to see the next page.
Use Dictation
One way I save time on my iOS devices is by dictating. I have big, clumsy thumbs, and it’s a lot faster to talk to my iPhone than to type. You can use Dictation in most apps, but only with Apple’s built-in keyboard. If you’ve installed a third-party keyboard, switch back to the default Apple keyboard, as only Apple’s keyboard can access the microphone.
Tap the microphone button at the bottom of the keyboard, and you’ll see that the keyboard goes away and is replaced by a large area that shows a line. Start speaking; the line changes into waves that move as you speak, and your words are typed wherever the cursor is. When you’re finished, tap Done and the keyboard comes back; you may need to correct some typos. But speaking a text message, tweet or email can be a lot faster than typing it; just make sure to proofread it, so there are no “voice-os,” or transcription mistakes.
Here are a few tips for dictating.
When you want to capitalize a word, say “CAP.” For example, saying “I am sending you the latest CAP annual CAP report,” types “I am sending you the latest Annual Report.”
You need to speak your punctuation. Say “PERIOD,” “COMMA,” “QUESTION MARK,” and also “SMILEY FACE,” and “FROWNY FACE.”
You can go to a new paragraph by saying “NEW PARAGRAPH.”
Good results with dictation depend on your learning how to speak to your device. You can learn a lot more about dictation in an article I wrote for TidBITS a couple of years ago.
With these four simple tips, you can save time using your iOS devices, making it quicker and easier to work with.
What are some other time-saving tactics you use to make managing your iOS device easier? Let us know in the comments below.

