Protecting Your Mac from Network Attacks
- Using the VirusBarrier X6 Overview Screen
- Status Indicators on the Overview Screen
- Firewall Protection
- Trojan Horse Protection
- Antivandal Protection
- Blocked Addresses and Trusted Addresses
- Surf Filters
- Privacy Protection
- Understanding Alerts
In addition to its powerful anti-malware features, VirusBarrier X6 protects your Mac from network attacks and web threats using a number of powerful features. These features can be broken down into four groups:
- Firewall, which defines the network communications that your Mac will allow;
- Antivandal tools, which monitor communications for several types of network attacks;
- Surf tools, which watch for "social engineering" attacks based on your online behavior, and protect against web threats; and
- Privacy protectors, which let you decide which programs can connect to a network, and which data they're forbidden from sending.
These four defenses protect you against virtually every kind of attack possible, including Trojan horses, ping attacks, and port scans. Together with its malware protection, VirusBarrier X6 offers total network and malware protection for your Mac.
Launching VirusBarrier X6 brings you to the Overview screen, which you can always return to by clicking the Overview button in the middle of the top row of buttons. The screen is divided into columns: to the left of the central Orb are Malware Protection tools, and to the right are the Network Protection tools we'll discuss in this chapter. Malware protection is discussed in Protecting Your Mac from Viruses and Malware.
Using the VirusBarrier X6 Overview Screen
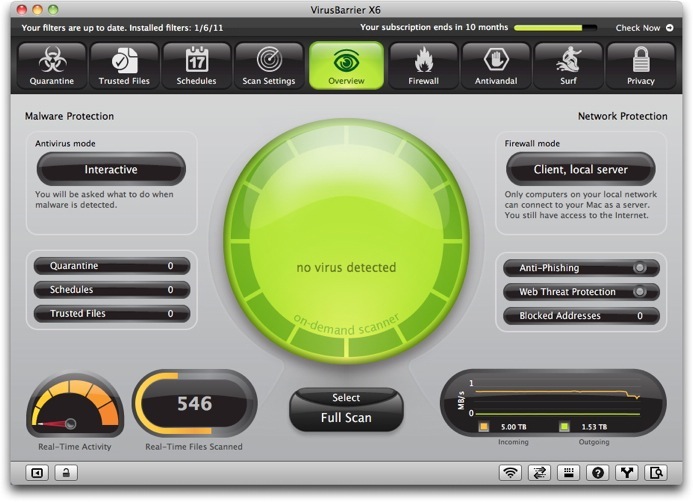
The Overview screen gives quick access to:
- Virus protection tools, which are discussed in Protecting Your Mac from Viruses and Malware;
- VirusBarrier X6's functions, settings and logs;
- Several helpful network utilities, such as Whois and Traceroute;
- Visual indicators of what sorts of protection are enabled;
- Information about the program itself, such as when it was last updated;
- A way of managing multiple configurations, so you can quickly change protection settings.
Central to the Overview screen are sections that control VirusBarrier X6's four lines of network defense. Controls for Firewall, Antivandal, Surf and Privacy protection appear as large buttons at the top right of the Overview screen; they are green when selected and black when unselected. Controls for monitoring are the smaller buttons in the bottom-right corner. In between those two groups are helpful indicators that lead you to relevant controls when clicked.
|
The Firewall section gives you access to rules that define which programs can send and receive information to and from your Mac. |

|
The Antivandal section gives you ways to stop certain types of network attacks and choose policies to determine how to handle attacks when they occur. |

|
The Surf section blocks certain types of information from being sent and received when you surf the Internet, protecting you from phishing attempts, ads, and cookies. It also lets you hide certain information your browser customarily transmits. |

|
The Privacy section gives you access to settings that prevent specific data from being sent over the Internet and local networks, and its Anti-Spyware tools protect you against programs that secretly connect to remote computers. |
You can access Monitoring functions through buttons in the bottom-right corner of the Overview screen. See Using VirusBarrier X6 Monitoring Tools for more on using these features.
VirusBarrier X6 lets you create different configurations, which are groups of settings for the program's various features. To see a list of configurations, click the small arrow button in the bottom-left corner of the Overview screen. (You can also toggle between showing and hiding the Configurations list by pressing Command-K or choosing View > Hide/Show Configurations.)

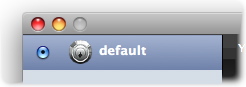
At first there is only one configuration, named according to the settings you chose in the Setup Assistant, when first launching the program, or "default" if you did not run the Setup Assistant. The radio button shows which configuration is currently active.
At the bottom of the Configurations list is an action button that let you duplicate, edit and remove configurations. For more information, see VirusBarrier X6 Preferences and Configurations.

At the very top of the screen is the NetUpdate Status Bar, which shows the dates of the latest VirusBarrier filters installed on your Mac, and the date of the latest filters available. VirusBarrier X6 uses Intego NetUpdate, installed with the program, to update filters and virus definitions as well as Intego programs themselves. It checks for updates automatically, and you can have it check immediately by clicking the Check Now... button in the upper-right corner. To hide the NetUpdate Status Bar, choose View > Hide NetUpdate Status Bar. For more on using NetUpdate, see the Intego Getting Started Manual.
Status Indicators on the Overview Screen
The status of various VirusBarrier X6's network protection features appears as a stack of clickable indicators in the right column of the Overview screen.
The top indicator tells you which Firewall mode you've selected; clicking it leads you to a screen where you can change that setting. (The large Firewall button at the top of the screen leads to the same place.)
The first indicator of the middle group tells you whether Anti-Phishing protection is enabled. "Phishing" is a kind of attack where a cyber-criminal attempts to trick you into entering private information, such as financial data or a password, in order to gain access to personal data, such as that for e-mail accounts or even bank accounts. Clicking this button leads you to a screen where you can add sites that you trust, and should therefore be exempted from Anti-Phishing protection. (You can also reach this screen by clicking the large Surf button at the top of the screen, and then clicking the Anti-Phishing tab.)

The second indicator in that group tells you whether Web Threat Protection is enabled. Clicking this button leads you to a screen where you can add sites that you trust, and should therefore be exempted from Web Threat protection. (You can also reach this screen by clicking the large Surf button at the top of the screen, and then clicking the Web Threats tab.)

The bottom indicator in this group shows the number of addresses that have been blocked, that is, forbidden to communicate with your computer. These addresses are blocked either because VirusBarrier X6 found them to be malicious, or because you added them manually. Clicking this button leads you to a screen that shows you which addresses are blocked, and details about why they were blocked and how long they will continue to be blocked. (You can also reach this screen by clicking the large Antivandal button at the top of the screen, and then clicking the Blocked Addresses tab.)

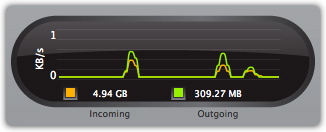
The last indicator in the Network Protection column is the Network Traffic indicator, which updates in real time to show how much data is entering and leaving your computer. This indicator is not a button, so clicking it does nothing; for more details on your network traffic, click the Traffic monitoring button in the bottom-right corner of the screen.
Firewall Protection
VirusBarrier X6 includes a personal firewall, a powerful feature that filters all data packets entering or leaving your Mac through the Internet or a local TCP/IP network. It also protects you from Trojan horses by blocking the ports they use.
To view or change Firewall settings, click the Firewall button.
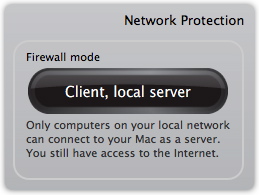
When you click the Firewall button, VirusBarrier X6 presents its Simple mode for controlling Firewall settings. There are five preset firewall settings that cover all the situations that you will encounter in normal use, each accompanied by an animation that graphically shows the effect of applying the setting. The screen closest to you represents your Mac; the globe represents the Internet; the screen halfway between the two represents the limit of your local network. Here the default setting, "Client, local server", shows how your computer can receive information from beyond the local network, but that computers beyond your local network cannot access your Mac.
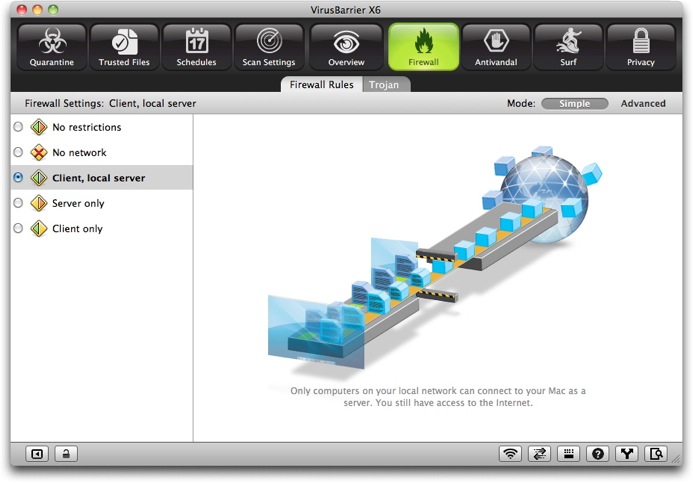
The five standard firewall settings are:
- No restrictions: VirusBarrier X6's firewall allows all incoming and outgoing network data to be sent and received.
- No network: VirusBarrier X6's firewall prevents all data from entering or leaving your computer to or from the Internet or a local TCP/IP network. This is useful if you are away from your computer and wish to protect it totally.
- Client, local server: VirusBarrier X6's firewall allows your Mac to function as a client and local network server. Your Mac can access the Internet as a client computer, and as both a client and server on a local network.
- Server only: VirusBarrier X6's firewall allows your Mac to function only as a server: all client functions, including your ability to surf the Internet, are blocked.
- Client only: VirusBarrier X6's firewall allows your Mac to function only as a client on a local network or the Internet. The server and file-sharing functions of your Mac are blocked.
These five settings are sufficient for most people. But if you want more control over access to your computer - if, for example, you're running a gaming party and want to forbid all traffic except for communications that are part of the game - then you need to switch to VirusBarrier X6's Advanced mode.
Advanced Mode
VirusBarrier X6 also offers an advanced firewall mode you can use to create your own rules to choose exactly which types of traffic you want to allow or block to and from your Mac. For more on using Advanced Mode, see Appendix: Creating Custom Firewall Rules.
Trojan Horse Protection
Trojan horses are applications that are surreptitiously installed on your computer, either by attachments you receive with e-mail messages, or by programs you download from malicious web sites. In some cases, programs install a specific type of Trojan horse, known as spyware, which sends your personal information to a server. Since the connection is made from your computer, it is generally trusted.
VirusBarrier X6 knows how to spot the actions of the most common Trojan horses and stop them in their tracks. Some such programs send information about users' browsing habits to a central server; other Trojan horses open "back doors" in your computer that allow hackers to take control of it or steal files. In addition, VirusBarrier X6 recognizes the actions of Windows Trojan horses, so if you are running Windows in virtualization - with a program such as VMware Fusion or Parallels Desktop - and sharing your Mac's Internet connection in NAT mode, you'll be protected.
To see VirusBarrier X6's Trojan Horse controls, click the Trojan tab at the top of the Firewall screen.
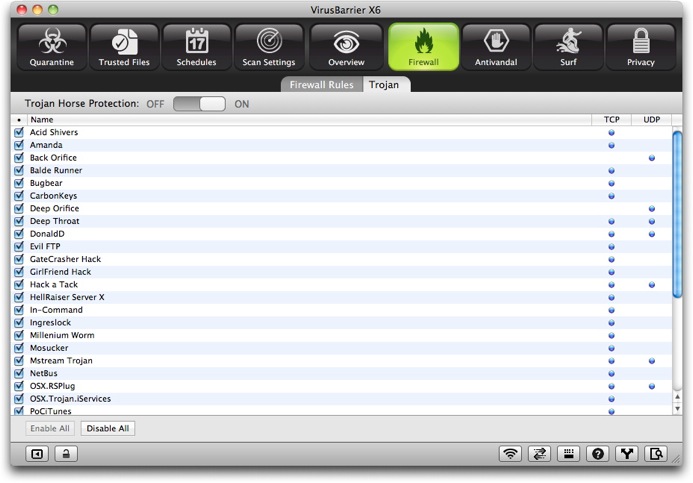
To turn on Trojan horse protection, set the Trojan Horse Protection slider to On, then click the checkboxes of individual Trojans to select them. The Enable All and Disable All buttons at the bottom are handy shortcuts that select or deselect all checkboxes at once.
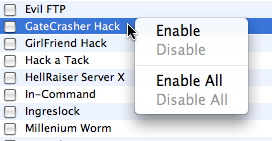
You can also enable Trojan blocking for an individual Trojan horse, or for all Trojan horses, by holding down the Control key on your keyboard and clicking on the name of a Trojan, and choosing the appropriate command from the contextual menu that displays.
Antivandal Protection
VirusBarrier X6's Antivandal watches over data entering your Mac and filters it, looking for signs of intrusion. This filtering is transparent: the only time you'll see signs of it working is if it detects suspicious data, in which case an alert displays. Otherwise, Antivandal silently monitors your Mac's network activity at all times.
To go to the Antivandal screen, click the Antivandal button.

The Antivandal Policy tab controls how data entering your computer is filtered. The Blocked Addresses and Trusted Addresses tabs store specific hosts, or IP addresses, that you deem suspicious or trustworthy.
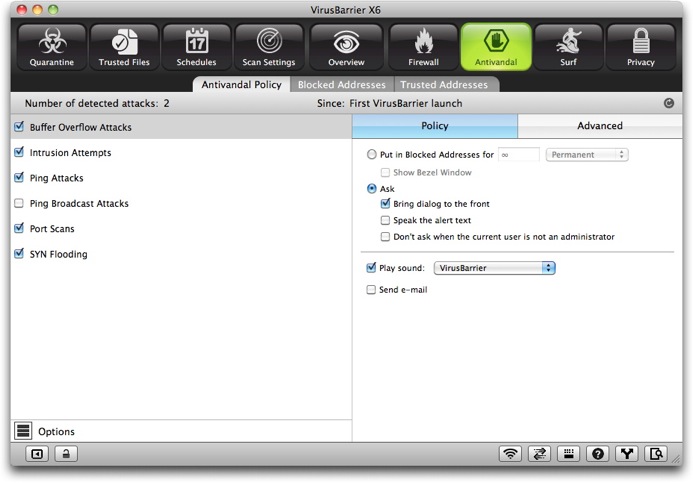
Antivandal Policy
The Antivandal Policy panel provides tools to prevent six types of intrusions.

- Buffer Overflow Attacks: Attacks that may occur when certain software has flaws in the way it handles memory, allowing malicious users to get into your Mac.
- Intrusion Attempts: Attempts to access your Mac through a preset number of incorrect password requests within a given period of time. Different settings are available for AppleShare IP (ASIP), FTP, HTTP, IMAP, POP and SMTP.
- Ping Attacks: Your Mac receives a number or frequency of ping requests so great that responding would cause a strain on your Mac.
- Ping Broadcast Attacks: Ping requests to broadcast addresses, where a single ping is multiplied throughout your local network.
- Port Scans: Attempts by remote computers to search your Mac's ports for vulnerabilities. You may want to leave this unchecked if your computer is functioning as a server.
- SYN Flooding: Multiple TCP requests sent by an attacker who then doesn't complete the final stage of the exchange, causing the target computer to consume resources.
Clicking the checkbox next to each of these enables or disables protection for that intrusion type. Clicking on the name of the intrusion type shows the notification and action policies for that intrusion type. Here, for example, we see the policy for Buffer Overflow Attacks.
These options are described later in this chapter, in Understanding Alerts.
While an intrusion type is selected, clicking the Advanced tab in the right-side pane brings up additional options that are specific to that intrusion type. These are:
- Buffer Overflow Attacks: No advanced settings.
- Intrusion Attempts: You can separately set the number of incorrect password attempts permitted for AppleShare IP (ASIP), FTP, HTTP, IMAP, POP and SMTP.
- Ping Attacks: Ping flood sensitivity, measured in milliseconds (ms) permitted between ping attempts. If your computer is on a network, it is normal that your network administrator ping your computer from time to time. But if your computer is isolated, pings are rarer. One exception is if you have a DSL or cable connection; your ISP might ping your computer to check if it is on line.
- Ping Broadcast Attacks: No advanced settings.
- Port Scans: A slider lets you adjust the sensitivity from low to high in increments according to an internal calculation.
- SYN Flooding: Sensitivity, measured in number of attempted connections allowed per second.
Options
Click the Options button in the bottom-left corner of the Antivandal Policy screen to adjust additional Filtering settings.
The options appear in the pane to the right.
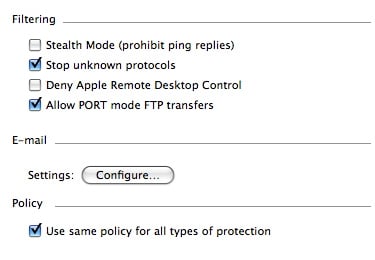
- Stealth mode (prohibit ping replies): If this is checked, your computer will be invisible to other computers on the Internet or on a local network. You will not, however, be anonymous - any requests you send to other hosts will include your computer's IP address.
- Stop unknown protocols: If this is checked, VirusBarrier X6 automatically blocks any unknown protocols.
- Deny Apple Remote Desktop Control: If this is checked, VirusBarrier X6 blocks all access to your Mac by Apple Remote Desktop software.
- Allow PORT mode FTP transfers: If this is checked, you will be able to make FTP transfers when functioning in Client Only firewall mode.
The second part of this screen allows you to be notified by e-mail when an attack is detected. See later in this chapter, Understanding Alerts, for more information.
Unifying Policy Options
Each type of intrusion has settings that determine how you're alerted and what actions are taken when that type of intrusion is detected.
The "Use same policy for all types of protection" checkbox unifies all notifications and actions. With this box unchecked, you could, for example, choose to receive an e-mail when a buffer overflow attack is detected, but only see an alert box when an intrusion attempt occurs. Checking the box tells VirusBarrier X6 that you want to get the same sort of response no matter what type of intrusion occurs.
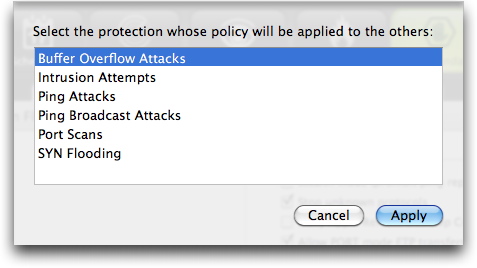
When you activate this option, you'll see a dialog box that asks which settings should become the model that other intrusion types will follow.
Blocked Addresses and Trusted Addresses
The Blocked Addresses list ensures that once an attempted attack or intrusion has been foiled, communication between the attacking machine and your Mac won't occur for a period of time that you define.
The Trusted Addresses list is the opposite of the Blocked Addresses list: it lists "friendly" computers that are allowed to connect to your Mac. While the Blocked Addresses list protects you from foes, the Trusted Addresses list opens the door to your friends. VirusBarrier X6's Antivandal tool will not block access to computers listed in the Trusted Addresses list, nor will it set off alerts for any actions they carry out. However, computers in the Trusted Addresses list will still be affected by all active Firewall rules.
The interface for the Trusted Addresses window is essentially the same as for the Blocked Addresses window, so we'll examine them both at the same time, pointing out differences as necessary. Here's the Blocked Addresses window.

The panel on the left displays information about the various IP addresses that are currently in the Blocked Addresses list or Trusted Addresses list, if any.
- Checkbox: You can temporarily disable a Blocked/Trusted Address by unchecking this box, which is checked by default when you add a host to either list. When disabled, clicking it enables the item again. (This checkbox only appears if the IP address is set to be blocked permanently.)
- Intruder/Host: The second column shows the intruding IP address (in the Blocked Addresses list) or friendly IP address (in the Trusted Addresses list).
- Remaining Time: If you've set this IP address to be blocked or allowed for a specific period of time, this column shows how much time is remaining, updated every second. Otherwise, this column says "Permanent Host" to indicate that the IP address will be there until you remove it manually.
Blocked/Trusted Address Information
Clicking an item in the Blocked/Trusted Address lists shows some additional information on the right side of the panel. Double-clicking the item opens a new window with the same information.
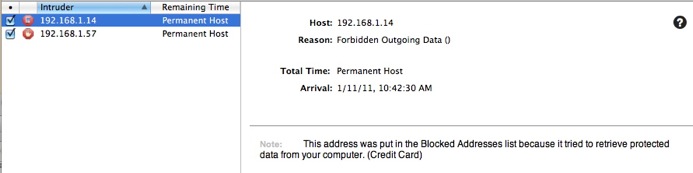
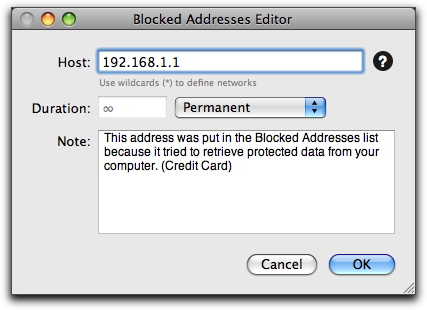
- Host: The host's IP address. If you opened a new window by double-clicking the item, you can manually change the IP address listed. By clicking the DNS lookup button (the ?), you can toggle from the numerical IP address to the actual domain name of the offender, if there is one. You can display this address in large type by moving your cursor over the word "Host", clicking, and selecting Large Type from the contextual menu that appears.
- Reason: Why the IP address was added to the Blocked Addresses list. This text doesn't appear in the Trusted Addresses list, as all items there are added manually.
- Total Time: The amount of time the host is to remain in the Blocked/Trusted Address list. Clicking the words Total Time changes the display to show Remaining Time; clicking again shows Elapsed Time, indicating how long the offender has been in the Blocked Addresses list. Clicking Elapsed Time will display the Total Time once again.
- Arrival: When the address was added to the Blocked/Trusted Addresses list.
- Departure: If you specified an amount of time for an IP address to remain in the Blocked/Trusted Addresses list, the time it will be released is given here.
- Note: Any comments you have entered for this IP address. VirusBarrier X6 will also automatically add comments to this field when it puts an item in the Blocked Addresses list, as in the example above.
A Note About DNS Lookups
In various places throughout VirusBarrier X6's interface you'll see a question mark in a dark circle. Clicking it toggles nearby information from a numerical IP address to its associated domain name and back again.

Be aware that IP addresses do not always have a one-to-one relationship to domain names. For example, a large domain might have www.example.com hosted on one IP address, forums.example.com hosted on another, and blog.example.com hosted on another.
Meanwhile, small domains often share one IP address with others, all hosted as "virtual domains" on a single computer. In such cases a domain lookup gives an IP address that actually leads to the larger, unexpected machine name, for example apache2-vat.market.example.com.
As a result, entering an IP address could block (or allow) traffic from unintended domains, while entering a domain might not block (or allow) all desired traffic. This is the nature of the Internet domain structure, and isn't an error of VirusBarrier X6. If you have problems with unexpectedly blocked or permitted traffic, try using a domain name instead of an IP address, or vice-versa.
Adding Addresses
There are two ways to manually add addresses to the Blocked Addresses list or Trusted Addresses list. (VirusBarrier X6 can also add addresses automatically to the Blocked Addresses list in response to Alerts. For more details, see later in this chapter, Understanding Alerts.)
The first way to add an address to the Blocked Addresses list or Trusted Addresses list is by selecting an IP address in the Log window and choosing Add to Blocked Addresses or Add to Trusted Addresses from the contextual menu. For more on this, see Using VirusBarrier X6 Monitoring Tools.
You can also manually add addresses to the Blocked/Trusted Addresses list by clicking the + button at the bottom of the list. A window appears.
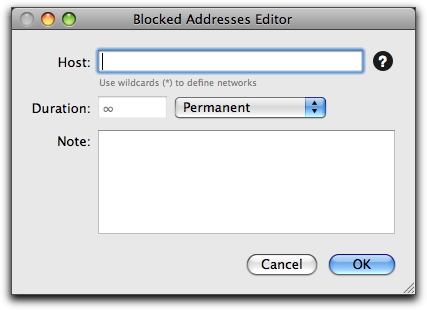
Enter an IP address in the Host field, and select the time this address is to remain in the Blocked Addresses list or Trusted Addresses list by entering a number in the Duration field. Then, select a time unit from the popup menu. If you do not know the numerical IP address of the host you wish to add, enter its name and click the ? button. VirusBarrier X6 queries your Internet provider's DNS server and enters the correct number in the field. You can also add comments, such as the reason for adding the address, in the Note field. If you decide you do not wish to add this address to the Blocked Addresses list or Trusted Addresses list, click Cancel.
Using Wildcards
You can use wildcards to indicate ranges of IP addresses in the Blocked Addresses list or Trusted Addresses list. To do so, enter the first part of the IP address you wish to block, followed by asterisks, For example, 192.168.1.* will block all IP addresses from 192.168.1.0 to 192.168.1.255 inclusive; 192.168.*.* will block IP addresses from 192.168.[0-255].[0-255]; and so on.

Removing and Moving Addresses
To remove an address from the Blocked Addresses or Trusted Addresses list, click the address you want to remove, then click the - button.
Another way to remove an address is by clicking it while holding down the Control key on your keyboard, then selecting Remove... from the resulting contextual menu. From this contextual menu, you can also move an address from the Blocked Addresses list to the Trusted Addresses list, or vice-versa.

Editing an Address
There are three ways to edit an address in the Blocked Addresses or Trusted Addresses list:
- Click the address you would like to edit, then click the Edit... button at the bottom left side of the pane,
- Double-click the address, or
- Click the address while pressing the Control key on your keyboard, then select Edit... from the contextual menu.
The Blocked/Trusted Addresses Editor window appears. You can change the address, add or change comments, or change the amount of time you want the item to remain on the Blocked/Trusted Addresses list.
Trusting an AppleTV
There is one option available in the Trusted Addresses list that is not present in the Blocked Addresses list: Trust AppleTV. The AppleTV is a device made by Apple that serves as a set-top portal to movie and TV show rentals from the iTunes Store, and that can also stream music and videos from an iTunes library on any Mac or PC. The AppleTV has a particular way of acting on the network, and in some cases VirusBarrier X6 would see this as a threat because of the way it polls computers. Checking Trust AppleTV on the Trusted Addresses list ensures that VirusBarrier X6 does not see your AppleTV as hostile.

Note: if you have trusted IP addresses on your local network, by adding 192.168.1.* to the Trusted Addresses list, and the AppleTV is on the same network, you won't need to check this option.
The Contextual Menu
As you have seen above, you can click an item in the Blocked/Trusted Addresses list while pressing the Control key on your keyboard to raise a contextual menu. There are four functions in this menu that have not yet been discussed: Copy to Clipboard, Find Domain Info, Find Route, and Show in Google Earth.
- Copy to Clipboard: Puts the IP address on the Mac OS X Clipboard, where it can be pasted into other programs, such as a text editor.
- Find Domain Info: Opens VirusBarrier X6's Whois window and performs a search on the selected IP address. See Using VirusBarrier X6 Monitoring Tools.
- Find Route: Opens VirusBarrier X6's Traceroute window and performs a search on the selected IP address. See Using VirusBarrier X6 Monitoring Tools.
- Show in Google Earth: Launches the Google Earth program, if you have it installed, and attempts to find the geographic location of the selected IP address.
Surf Filters
VirusBarrier X6 provides protection against phishing, web threats (threats that arise from booby-trapped web pages), as well as providing three filters that help you control the information your Mac sends and receives while surfing the Internet.
To see VirusBarrier X6's Surf settings, click the Surf button.

VirusBarrier X6's Anti-Phishing protection keeps you safe from phishing (attempts to trick you into entering personal information on bogus web sites that impersonate real sites). VirusBarrier X6 blocks such sites, protecting you from this type of scam. Nevertheless, you should never click a link in an unsolicited e-mail message if you have doubts about its veracity.
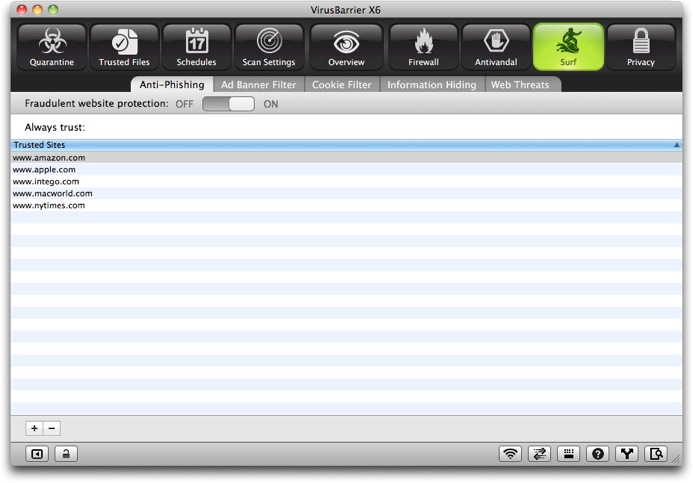
To activate VirusBarrier X6's Anti-Phishing protection, move the Fraudulent website protection slider to ON. You can manually add sites that you always want to trust by clicking the + button at the bottom of the window, then typing the URL of a site you trust. The only reason you might want to do this is if certain sites are incorrectly flagged as being phishing sites.
VirusBarrier X6 offers protection from web threats, such as cross-site scripting attacks, drive-by downloads, clickjacking, as well as web pages with malicious JavaScript or malicious Java applets.
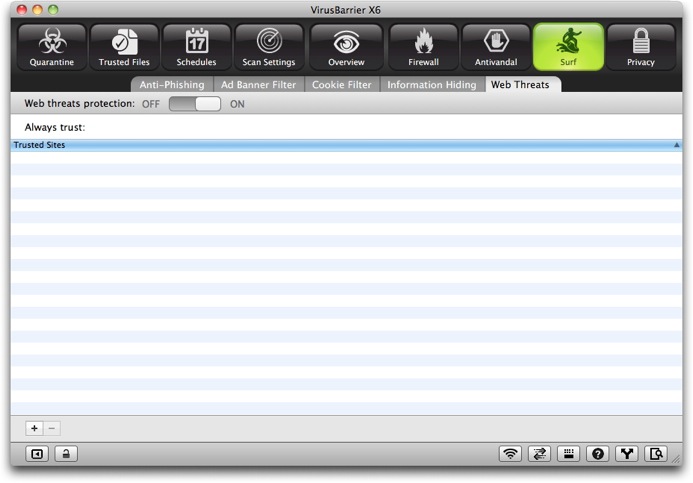
To activate VirusBarrier X6's Web Threat protection, move the Web threats protection slider to ON. You can manually add sites that you always want to trust by clicking the + button at the bottom of the window, then typing the URL of a site you trust. The only reason you might want to do this is if certain sites are incorrectly flagged as being malicious.
Three other Surf filters help you choose what type of information you want to send about your Mac to web servers, and help keep your surfing ad-free:
- The Ad Banner Filter hides ad banners on web sites that you visit;
- The Cookie Filter prevents your Mac from sending certain information to web sites that track your movements;
- The Information Hiding filter cloaks certain facts about your Mac, web browser, and the last web site you have visited.
Surf filters affect all computer programs that communicate using the HTTP protocol. Web browsers are the most common programs using HTTP, but it's also part of iTunes, RSS newsreaders, and a lot of other software that has Internet browsing capabilities. If you have unexpected difficulties with such programs - downloading music through iTunes, or accessing specific RSS feeds, for example - try disabling the surf filters temporarily.
Ad Banner Filter
The Ad Banner Filter is a list of rules that VirusBarrier X6 uses to filter unwanted web material such as graphic ads known as "ad banners," helping you surf much faster and with less distraction. VirusBarrier X6 blocks these ads, and replaces them with tiny, transparent graphics. VirusBarrier X6 contains an internal list of ad banner strings to filter, but you can also add custom strings to filter more ads you encounter when surfing.
Click the Ad Banner Filter tab to view the filter window. Here it is, populated with sample data:

To enable the Ad Banner filter, move the Banner advertisement filter slider to ON.
Adding Rules to the Ad Banner Filter
The Ad Banner filter already contains a set of rules, which is kept up-to-date when you update your VirusBarrier X6 Filters but you can easily add your own. To add rules to the Ad Banner filter, click the + button. A new line is added to the ad banner list for you to edit.
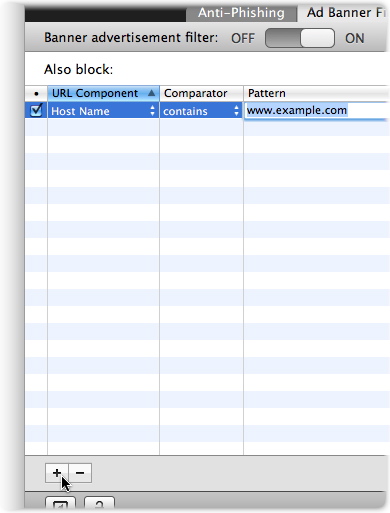
The list contains four columns: a checkbox, URL Component, Comparator and Pattern. The pattern, obviously, is how you define what you want blocked.
The URL Component popup menu has three options. VirusBarrier X6 searches each ad banner filter in the selected element:
- Host Name: The Internet domain - that is, anything in a Web address between the http:// and the first following "/". The default value is www.example.com. Note that such an entry wouldn't block (for example) http://forums.example.com; to block both, you should simply enter example.com.
- Path: Any part of the URL following the host name, such as /ads/ in http://www.example.com/home/graphics/ads/6542.html.
- URL: The entire URL, such as http://www.example.com/home/graphics/ads/6542.html.
The Comparator popup menu lets you choose whether content should be blocked based on an exact match ("is") or when your text matches at least a portion of the URL ("contains").
Activating or Deactivating Ad Banner Rules
Each ad banner rule appears on a line in the Ad Banner window. A checkbox at the left of each line allows you to activate or deactivate the filter for each ad banner rule. When you add a new ad banner rule, the box is checked, indicating that the filter is active for this rule. To stop blocking certain ad banners, uncheck the checkboxes for the ad banners in question.

You can also enable ad banner blocking for an individual ad banner rule, or for all ad banner rules, by holding down the Control key on your keyboard and clicking the name of an ad banner rule. A contextual menu displays.
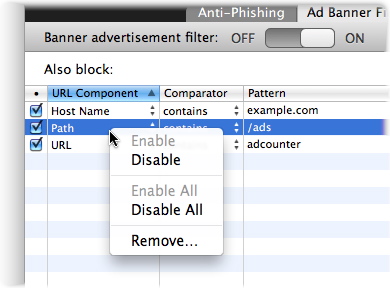
Select DisPatternable to disable protection for the selected ad banner rule, or select Disable All to disable protection for all ad banner rules. (If the Rule was already disabled, the Enable and Enable All choices would be available.)
To remove ad banner rules, either choose the Remove option in the contextual menu or click the - button below the list of ad banner rules.
Note that the Ad Banner filter doesn't know what content it's filtering, only that the URL matches the criteria you specified. Therefore, you might occasionally have difficulty seeing information on Web pages that coincidentally match your criteria, but aren't actually ad banners. If this is the case, try turning off the Ad Banner filter temporarily. You can do this from the VirusBarrier X6 application, or from the Intego menu in your menubar.
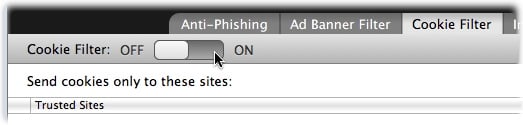
Cookie Filter
VirusBarrier X6 includes a Cookie Filter, which prevents your Mac from sending tracking information, called "cookies," to all web sites except for those you specify.
The Cookie Filter is useful when you want to surf in extreme privacy, only telling a few, trusted sites about your actions. However, many Web sites - particularly those that require a password - won't work correctly unless you specifically include them in the list of trusted sites.
To turn on the Cookie Filter, click the Cookie Filter tab and move the Cookie Filter slider to ON.
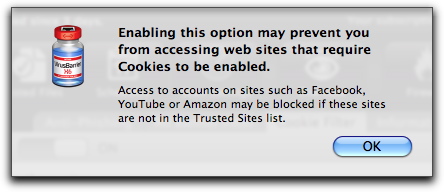
You'll see a warning that certain sites won't function properly unless you add them to the Trusted Sites list. Click OK to continue.
To add a server to the Cookies Filter list, click the + button at the bottom of the list. A dummy server address (www.example.com) displays: change it to the site of your choice.
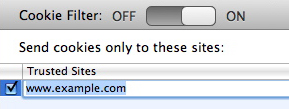
Erase the dummy server address and enter the name of the server you want to allow cookies to be sent to. You can also drag a URL from a browser, or even a URL in text format, to this field to add it to the list.
As with the Ad Banner filter, you can enable or disable individual servers by clicking the checkboxes next to them, or by holding down the Control key while clicking on them and using the contextual menu, or clicking with your right mouse button.
Cookie Counter
VirusBarrier X6 can also count the number of cookies for all users on your Mac, if you check the Count the cookies received checkbox at the bottom of the cookies filter screen. A display tells you how many cookies your Mac has accepted since you first installed VirusBarrier X6, or last reset the counter. At any time you can reset the counter to zero by clicking the small arrow to the right.

Information Hiding
All Web browsers reply to requests from web sites, telling which platform you are using (Mac, Windows, Linux, etc.) and which browser and version you are using. This information can help the site deliver information in the best way, for example by turning on features that only work for the Web browser that you're using. On the other hand, some sites limit access by platform and browser, in some cases forbidding access to everybody using a Mac. VirusBarrier X6 can hide some information concerning your computer, possibly permitting access where it would otherwise be denied.
To see and change Information Hiding settings, click the Information Hiding tab.

Check the Hide information about my computer and web browser checkbox to reply to such web site requests by sending only generic information. For example, your computer will reply to the web site that you're using a Mozilla browser, but with no version number or platform.
Some sites also keep track of the last site you visited. Again, this can improve your web experience if, for example, a shopping site offers you discounts if you come from a specific Web site. But unscrupulous sites might use this feature to follow your browsing habits in ways you don't want. By checking the Hide information about the last web site visited checkbox, VirusBarrier X6 prevents your Mac from replying to this type of request.
Privacy Protection
VirusBarrier X6's privacy protectors examine both incoming and outgoing data packets, looking for specific types of data and helping protect your privacy. To see and change your Privacy settings, click the Privacy button.
Anti-Spyware
VirusBarrier X6 lets you control access from your Mac to the Internet and local networks by individual applications. While your firewall settings may allow general network access, the Anti-Spyware tab lets you choose how VirusBarrier X6 reacts when specific applications try to access the network. This helps you in two ways:
- You can prevent users from accessing the network with specific applications.
- If an application attempts to connect to the network behind your back, VirusBarrier X6 stops it in its tracks, alerts you, and waits for you to decide whether to allow it to do so or to block it.
Your Mac has many applications that access the Internet or other networks, including web browsers, e-mail programs, FTP (file transfer) programs and instant messaging applications. But there may also be programs that connect to the network without telling you, in order to verify the serial numbers of software installed on your computer, collect and send personal information without your awareness, or open a backdoor on your Mac to provide access to hackers or vandals. VirusBarrier X6 notifies you of such attempts and allows you to decide whether to allow them.
To turn on the Anti-Spyware feature, move the Spyware protection slider to ON.

Anti-Spyware works by first asking you to make a list of applications for which you want to apply settings. These are known as "defined" applications, while all those that aren't on the list are "undefined". In the following example, Safari is defined, while the Firefox web browser (which isn't on the list) is undefined.

Once you've built this list, you can finely control communications from defined applications and set a general policy for communications from undefined applications. Two typical configurations would be:
- You run a computer lab and want people to be able to send e-mail using Apple's Mail program, but not browse the Web or play network games. You would define Mail as Allowed, but deny all outgoing connections from other programs.
- You suspect that an application you downloaded to your Mac is sending unauthorized communications, perhaps from hidden spyware built into the program. You define that program and deny all communications from it, but allow all communications from undefined applications.
Four behavior options are available for undefined applications:

- Allow outgoing connections: VirusBarrier X6 allows all applications to access the Internet or any other network. However, any firewall rules you may have defined concerning access to and from specific ports still function. For example, if an FTP program attempts to connect to a Web page, VirusBarrier X6 does not block the application, but if you have set up a firewall rule blocking port 20, the standard FTP port, the data does not go through. If the FTP program attempts to make a connection to a different port, it is not blocked.
- Deny outgoing connections: VirusBarrier X6 blocks all access to the Internet or other networks. This supersedes all firewall rules you have defined.
- Ask (Allow on time-out): VirusBarrier X6 asks you for each application that attempts to connect to the Internet or other network. If you do not respond within 90 seconds, the application will be allowed to access the Internet, but only this time.
- Ask (Deny on time-out): VirusBarrier X6 asks you for each application that attempts to connect to the Internet or other network. If you do not respond within 90 seconds, the application will be denied access, but only this time.
Options
The Options button in the lower-left corner of the Anti-Spyware pane allows you to configure some general Anti-Spyware settings.

The one option that's special to Anti-Spyware is Trust System Processes, which allows communications from the many parts of Mac OS X itself that request Internet or network access. Such requests might relate to printing services, domain name resolution, checks for software updates or clock synchronization. These are requests that come from parts of Mac OS X, not separate applications. To trust these processes, and not be asked when they attempt to connect to the Internet or network, check the Trust System Processes checkbox.
The other options relate to alerts and feedback when connections are blocked. Choose those that suit the way you want to be alerted to unauthorized or blocked connections. For more about these options, see Understanding Alerts later in this manual.
Applications: Adding, Removing and Changing Settings
After you have chosen to allow or deny network access to undefined applications, define an application by clicking the + button, then navigating through the Mac OS X dialog box to the application itself to add it. (You can also add applications by dragging their icons from the Finder.) Repeat the process for all the applications you wish to add. To remove an application from the list, click it and then click the - button at the bottom of the application list.
You can then change the settings for each application to allow or block communications from the application as a whole, or over specific ports. Similar to the process above, where you specify what should happen when undefined applications attempt outgoing communications, here you define what you'd like to happen when a specific application attempts communication from an undefined port. Then you define a list of ports for that specific application that are exceptions to the general rule.
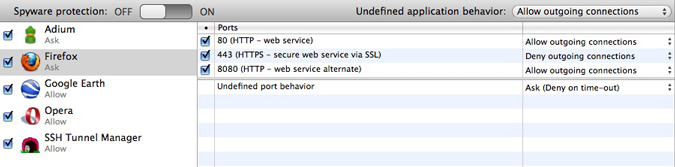
In the above example:
- Five applications (listed on the left) have specific rules governing them; outgoing connections are allowed from all other applications.
- Firefox is permitted to send two kinds of communications, via ports 80 and 8080.
- Communications by Firefox via port 443 are forbidden.
- Communications by Firefox via any other port raise an alert on your Mac's screen; if you don't respond to allow the communication within 90 seconds, it is denied.
This list of ports contains three columns:
- The first column, containing checkboxes, indicates the port behavior that is currently activated for the application. If the box next to a port is checked, the behavior you have specified is active. If you want to deactivate this behavior, then uncheck the box. You can reactivate it later by checking the box.
- The second column, Ports, provides information on the ports that the application uses to access the network. It tells you the port number, and, in some cases, the protocol used and a brief description. (This description appears automatically when you enter a port number that VirusBarrier X6 recognizes.) You can add a port number, or a range of port numbers, for example 110-123.
- The third column contains either "Allow outgoing connections" or "Deny outgoing connections." You can change from one to the other at any time by clicking the text.
To view an application on the Applications list in the Finder, hold down the Control key on your keyboard and click on the name of an application. A contextual menu appears. Select Show in Finder, and a Finder window opens revealing the location of the application. This helps you find applications that were added following alerts or time-outs.
Note: one way to use the Anti-Spyware feature of VirusBarrier X6 is to turn it on and have the program ask you whether to allow applications to connect to the Internet. Each time this happens - only once per application, and per port - you'll add the applications you want to allow, and slowly build up your list. By doing this, however, you'll see just how many applications connect to remote servers. Bear in mind that, for many applications, these connections are merely to check for updates, as many programs have built-in update features. VirusBarrier X6 has no way of knowing what type of information is being sent or requested.
Data Vault
The Data Vault ensures that any sensitive information you choose to protect cannot leave your Mac and go onto a network. You decide what to protect - your credit card number, passwords, or key words that appear in sensitive documents - and VirusBarrier X6's data filter checks each outgoing packet to make sure that no documents containing this information are sent. Not only does this protect you from accidentally sending documents containing this information, but it also protects against anyone who has network access to your Mac from taking copies of them.
To reach the Data Vault pane, click the Privacy button then click the Data Vault tab.

How the Data Vault Works
VirusBarrier X6 examines all data packets that are sent from your computer to the Internet or a local network. If any of the data you indicated in the filter is found, the packet is blocked.
The Data Vault only blocks data that corresponds exactly to the text you indicated, including punctuation and case. For example, if you entered your credit card number as protected data, VirusBarrier X6 prevents it from leaving your computer and can warn you in several ways if you choose. But if you enter the same number in a secure web page, your browser encrypts this number. The data therefore no longer corresponds to the protected data, and is sent. The same is true for data that is encoded in other manners, or compressed.
In extremely rare instances, the Data Vault stops data that matches your criteria but not your intention. For example, graphic files (such as images on web sites) are essentially just strings of data thousands of characters long. It's possible that a graphic file could coincidentally contain a piece of data you want protected, and would therefore be blocked by the Data Vault. (If you decided to block the name "Jodie", for example, a graphic file containing the string "Cg34gb$sEbOJodie8%" would be stopped.) If you find yourself unable to send or receive a specific piece of information, try turning off the Data Vault momentarily, then turn it on after the information has been transferred.
Move the Data protection slider in the upper-left corner to ON to enable the Data Vault. You can turn it off at any time, for example to temporarily allow your protected data to be sent. You can also turn it off through the Intego menu in your menubar.
What to Protect
The Data Vault includes labels for the six most common types of sensitive information:
- Credit Cards
- E-mail Addresses
- Home Addresses
- Names
- Social Security Numbers
- Telephone
However, these labels are merely for convenience. VirusBarrier itself doesn't treat these types differently from one another, or differently from any additional types you might decide to enter later - for example, "Wall-safe combination," "Children's names" or "Passwords."
Adding Data to the Vault
To add data to the Data Vault, click the + button below the Options icon. A new entry named "untitled data" appears in the filter list.
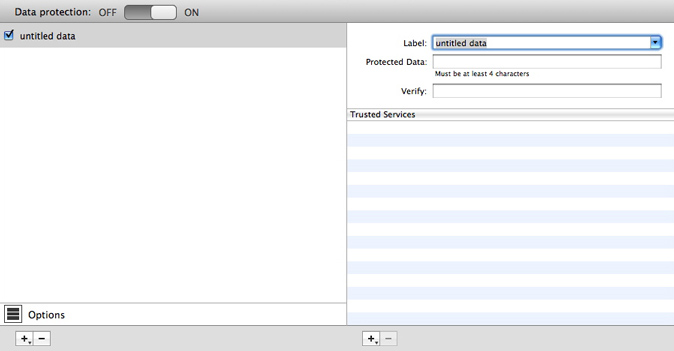
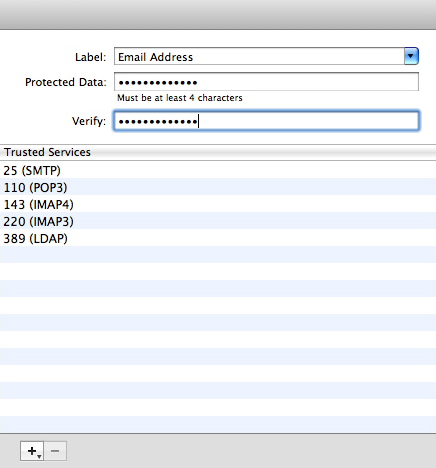
Enter a description for your protected data in the Label field, or choose it from the popup menu: you'll notice that it is echoed in the vault list. Then enter the actual data you wish to protect in the Protected Data field. This text is hidden so nobody watching over your shoulder or who later has access to your Mac can see it. You must enter the data a second time in the Verify field. If the Protected Data and Verify fields do not match, a window displays, giving you the choice of either resetting the protected data, in which case you will have to retype both data fields, or clicking OK. If you click OK, you will have to retype the verified protected data.
You must enter your text exactly as it will be found in your documents for the filter to protect it. For example, a credit card number may be found as ####-####-####-#### or as #### #### #### ####. If you protect only the first example, the filter does not look for the second one. Also, this data is case sensitive. If you need to protect a key word, such as a project name, you must enter it in all possible cases that you may use: i.e., Marketing Study, marketing study, MARKETING STUDY.
The Trusted Services section allows you to choose to block data for all but the selected services. To do this, click the + button below the Trusted Services list. Then, type the port number of the service. Alternately, click the + sign and hold the mouse button down for a few seconds: you'll be able to choose from a popup list of common services. (Some of them, such as Mail in the example below, add several ports in one go.) You can add a single port number, or a range of port numbers, for example 110-123. Data to this port (or these ports) will not be blocked. To add another service, repeat the above operation. You can add as many services as you wish.
You can also drag and drop services from the Services Library. This is particularly helpful if you do not know the specific port numbers you wish to add to the list. To display the Services Library, choose Window > Services Library, or press Option-Command-6. Select the desired service, then drag it onto the Trusted Services list.
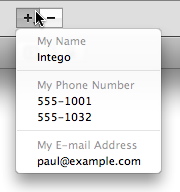
You can add certain personal information from your card in Apple's Address Book, if you have filled one out. To do this, click and hold the + button below the Data Vault list in the left column, and you'll see items divided into three groups: My Name, My Phone Number and My E-mail Address. Select one of these to add it as protected data.
Once you have finished entering this information, your data is protected. You can go back at any time to edit the data item by clicking on it in the Data Vault list and changing information in its pane to the right.
Activating, Deactivating and Deleting Data Items
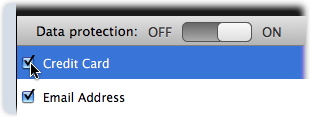
Each item of protected data appears on a line in the Data Vault window. A checkbox at the left of each line allows you to activate or deactivate the filter for each data item. When you add a new data item, the box is checked, indicating that the filter is active for this item. If you wish to send that data over the Internet or a local network, you must uncheck the checkbox for the item in question, or deactivate all the Data Vaults by moving the Data protection slider to OFF as mentioned earlier.
You can also activate or deactivate Data Filters for individual protected data items, or for all protected data items, by holding down the Control key on your keyboard and clicking the name of a data item, or by clicking with your right mouse button. A contextual menu displays.
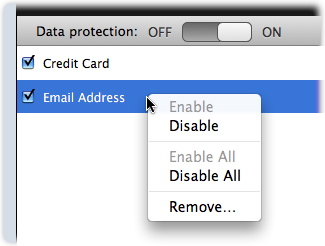
Select Disable to disable protection for the selected data item, or select Disable All to disable protection for all data items. (If the selected item in the above example had been disabled already, the choices for Enable and Enable All would be available.)
If you'd like to permanently remove the item from the Data Vault list, either Control-click as described above and choose Remove..., or select the data item and click the - button. In either case, a dialog box asks you to confirm that you really want to remove the data item.
Data Vault Options
When protected data attempts to enter or leave your Mac, you have several options as to how you're notified, and what to do about future attempts. To see these options, click the Options button in the lower-left of the data screen. Changes to Data Vault options affect all Data Vaults.

To understand these options, see the next section, Understanding Alerts.
Understanding Alerts
VirusBarrier X6 constantly monitors your computer's network activity to both the Internet and local networks, and will look out for specific types of data that indicate an intrusion or attack. If any suspicious data is found, VirusBarrier X6 displays an alert, asking you whether you wish to allow the data to be sent or deny it. Just like the malware alerts explained in Protecting Your Mac from Viruses and Malware, VirusBarrier X6 displays alerts when certain network events occur.
Alert Settings
Network alerts are displayed when certain network events occur. This includes when Trojan horses are spotted, when protected data is being sent from your Mac, when the Anti-Spyware feature detects an undefined application attempting to connect to the Internet, when the firewall blocks data and more.
Settings for these alerts appear in several places throughout VirusBarrier X6, as is described in relevant sections of this manual. To understand these settings better, we'll look at them as they appear in the Antivandal Policy section.
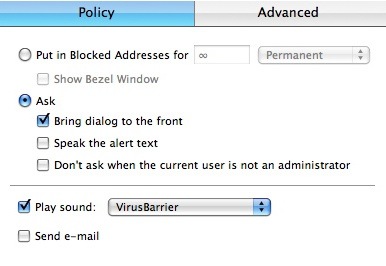
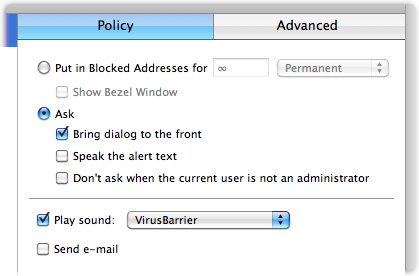
- Put in Blocked Addresses: If this radio button is on, the connection is automatically dropped when there is an alert, and the offending IP address is immediately placed in the Blocked Addresses list. A field to the right of this button allows you to specify the default time period that the offending IP address will remain in the Blocked Addresses list. You can choose any number of seconds, minutes, hours or days, or put the intruder in the Blocked Addresses list permanently. (Results from checking the Show Bezel Window checkbox are shown in the section below, "Examples of Alerts.")
- Ask: If this radio button is on, VirusBarrier X6 presents an alert dialog asking what to do. When an alert appears, it shows the Blocked Addresses time period selected by default, but this time can be changed in Policy tab for each type of attack. In addition, you have three options:
- Bring dialog to the front: The alert comes to the front automatically whenever there is an alert. If not, it remains in the background. If you take no action within 90 seconds, the alert automatically closes, and the connection is denied.
- Speak the alert text: VirusBarrier X6 uses Mac OS X's Text-to-Speech feature to speak the text of the alert.
- Don't ask when the current user is not an administrator: VirusBarrier X6 only gives the above options if the Mac OS X user has administrator's privileges. Otherwise, it automatically puts the offending host in the Blocked Addresses list.
- Play sound: VirusBarrier X6 plays the sound of your choice whenever there is an alert. You can select the sound you want from the popup menu to the right of the button. (The sound plays once when you make a selection.)
- Send e-mail: VirusBarrier X6 automatically sends an e-mail message to the address configured in the Options panel, within 30 seconds. (VirusBarrier X6 waits to see if there are other intrusion attempts, rather than sending an e-mail message each time.)
If you've requested e-mail notification, you must configure your e-mail settings to receive any alert notifications by e-mail. In the Policy section, you do that by clicking Options, then clicking the Configure... button.
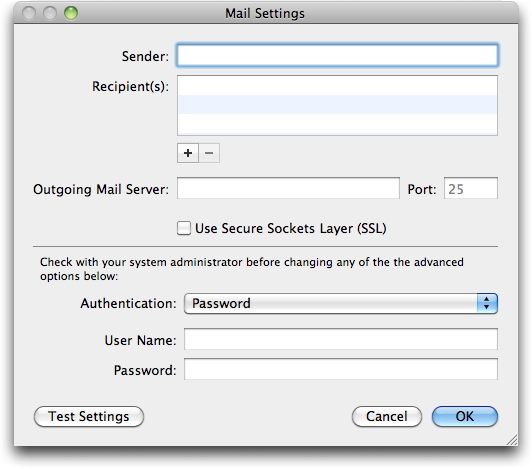
You must enter e-mail addresses for the Sender and Recipient(s), as well as the Outgoing Mail Server. Further, you'll need to enter a username and password that your mail server will accept. E-mail messages can be sent to multiple recipients. To add a recipient, click the + button. To remove a recipient, click the - button.
Examples of Alerts
The following is an example of an alert when the Put in Blocked Addresses radio button is selected and the Show Bezel Window checkbox is enabled.
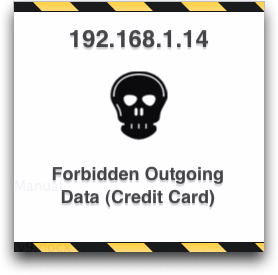
As you can see, you're given no options, only a notification. If the Show Bezel Window checkbox had been disabled, you'd have seen nothing, and VirusBarrier X6 would have silently added the IP address to the Stop List.
Here's an example of an alert when the Ask radio button is on, and the Bring dialog to the front checkbox is enabled.
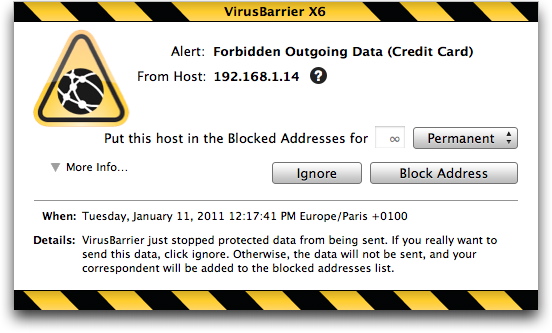
The top line shows the reason for the alert. The host is given as an IP address, but you could find out its associated domain name (if any) by clicking the "?" icon. We've already clicked the disclosure triangle to show Details, which gives further information.
Two buttons allow you to decide what action to take for this alert.
- Ignore: if you click this button, you will allow the data to be sent. Data transmission will continue as usual, unless VirusBarrier X6 detects another attempted intrusion, in which case another alert will appear.
- Block Address: if you click this button, the data being transferred will be refused and the intrusion will be blocked. When this happens, the packet is dropped, and it is as if the data was never transferred. If the suspicious packet is part of a file, this means that the file will not reach its destination. If it is a command, the command will not have a chance to be carried out, since it will not reach its target. In addition, the IP address that caused this alert will be automatically added to the Blocked Addresses list, and kept there for the default time that has been set. You can make changes to this time in the popup menu.
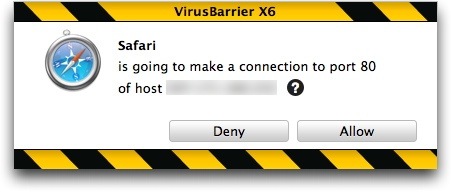
Here's an example of an alert that occurred when an application attempted to reach the Internet in violation of Anti-Spyware rules.
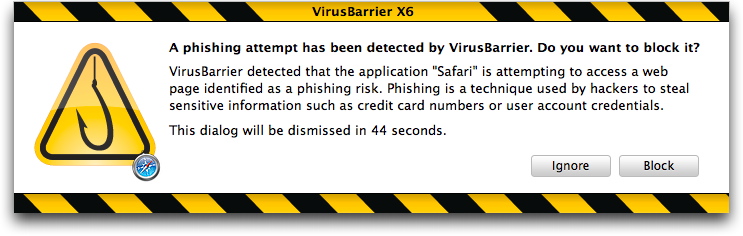
Finally, here's the type of alert you'll see when VirusBarrier X6 thwarts a phishing attempt. You have the option of blocking the site or ignoring it and visiting the site; do the latter at your own risk.