Protecting Your Server from Network Attacks
- Firewall Protection
- Trojan Horse Protection
- Antivandal Protection
- Blocked Addresses and Trusted Addresses
In addition to its powerful anti-malware features, VirusBarrier Server 3 protects your server from network attacks with tools that fall into two groups:
- Firewall tools, which define the network communications that your server will allow;
- Antivandal tools, which spot and block different types of network attacks.
These tools protect you against virtually every kind of attack possible, including Trojan horses, ping attacks, and port scans.
Firewall Protection
VirusBarrier Server 3 includes a two-way firewall that filters all data packets entering or leaving your server through the Internet or a local TCP/IP network. It also protects you from Trojan horses by blocking the ports they use.
To view or change Firewall settings, click the Firewall tab.
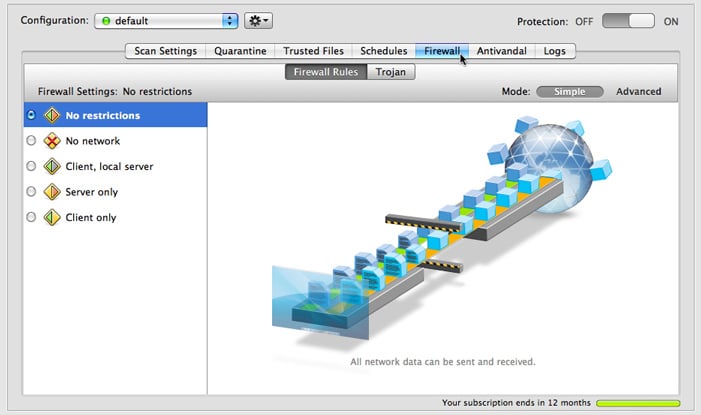
When you click the Firewall button, VirusBarrier Server 3 presents its Simple mode for controlling Firewall settings. There are five preset firewall settings that cover all the situations that you will encounter in normal use, each accompanied by an animation that graphically shows the effect of applying the setting. The screen closest to you represents your server; the globe represents the Internet; the screen halfway between the two represents the limit of your local network. Here the default setting, No restrictions, shows how your computer can send and receive information without blockage in either direction.
The five firewall settings are:
- No restrictions: VirusBarrier Server 3's firewall allows all incoming and outgoing network data to be sent and received.
- No network: VirusBarrier Server 3's firewall prevents all data from entering or leaving your server to or from the Internet or a local TCP/IP network.
- Client, local server: VirusBarrier Server 3's firewall allows your server to function as a client and local network server. Your server can access the Internet as a client computer (but not as a server), and as both a client and server on a local network.
- Server only: VirusBarrier Server 3's firewall allows your server to function only as a server: all client functions, including your ability to surf the Internet from this computer, are blocked.
- Client only: VirusBarrier Server 3's firewall allows your server to function only as a client on a local network or the Internet. The server and file-sharing functions of your server are blocked.
These five settings are sufficient for most uses, but if you want more granular control over the firewall you need to switch to VirusBarrier Server 3's Advanced mode.
Advanced Mode
VirusBarrier Server 3 also offers an advanced firewall mode you can use to create your own rules to choose exactly which types of traffic you want to allow or block to and from your server. For more on using Advanced Mode, see Creating Custom Firewall Rules.
Trojan Horse Protection
VirusBarrier Server 3 knows how to spot the actions of the most common Trojan horses and stop them in their tracks. Some such programs send information about users' browsing habits to a central server; other Trojan horses open "back doors" in your computer that allow hackers to take control of it or steal files. In addition, VirusBarrier Server 3 recognizes the actions of Windows Trojan horses, so if you are running Windows in virtualization - with a program such as VMware Fusion or Parallels Desktop - and sharing your server's Internet connection in NAT mode, you'll be protected.
To see VirusBarrier Server 3's Trojan Horse controls, click the Trojan tab at the top of the Firewall screen.
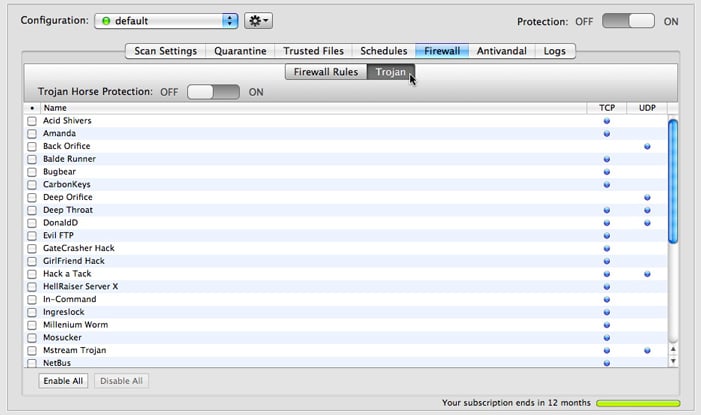
To turn on Trojan horse protection, set the Trojan Horse Protection slider to ON, then click the checkboxes of individual Trojans to select them. The Enable All and Disable All buttons at the bottom are handy shortcuts that select or deselect all checkboxes at once.
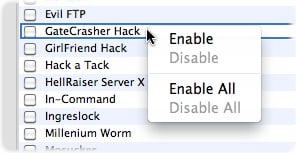
You can also enable Trojan blocking for an individual Trojan horse, or for all Trojan horses, by right-clicking on the name of a Trojan, and choosing the appropriate command from the contextual menu that displays.
Antivandal Protection
VirusBarrier Server 3's Antivandal watches over data entering your server and filters it, looking for signs of intrusion. This filtering is transparent: the only time you'll see signs of it working is if it detects suspicious data, in which case an alert displays. Otherwise, Antivandal silently monitors your server's network activity at all times.
To go to the Antivandal screen, click the Antivandal tab.
The Antivandal Policy tab controls how data entering your computer is filtered. The Blocked Addresses and Trusted Addresses tabs store specific hosts, or IP addresses, that you deem suspicious or trustworthy.
Antivandal Policy
The Antivandal Policy panel provides tools to prevent six types of intrusions.
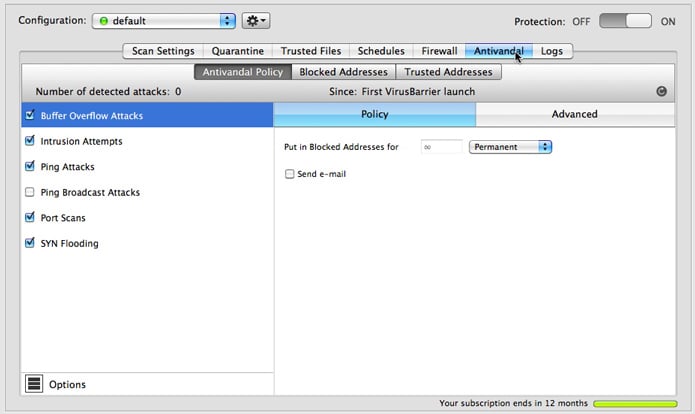
- Buffer Overflow Attacks: Attacks that may occur when certain software has flaws in the way it handles memory, allowing malicious users to get into your server.
- Intrusion Attempts: Attempts to access your server through a preset number of incorrect password requests within a given period of time. Different settings are available for AppleShare IP (ASIP), FTP, HTTP, IMAP, POP and SMTP.
- Ping Attacks: Your server receives a number or frequency of ping requests so great that responding would cause a strain on your server.
- Ping Broadcast Attacks: Ping requests to broadcast addresses, where a single ping is multiplied throughout your local network.
- Port Scans: Attempts by remote computers to search your server's ports for vulnerabilities. You may want to leave this unchecked if your computer is functioning as a server.
- SYN Flooding: Multiple TCP requests sent by an attacker who then doesn't complete the final stage of the exchange, causing the target computer to consume resources.
Clicking the checkbox next to each of these enables or disables protection for that intrusion type. By default, clicking on the name of any intrusion type shows the notification and action policies for all intrusion types in the mini-pane to the right. You can implement separate policies for each intrusion type by changing a setting in the Antivandal options: See the section "Unifying Policy Options" below for details.
The two settings allow you to determine how long an address should be considered blocked, and whether you should be informed of the action via e-mail. If you've requested e-mail notification, you must configure your e-mail settings to receive any alert notifications by e-mail. In the Policy section, you do that by clicking Options, then clicking the Configure... button. Enter the necessary information for your e-mail account in Mail Settings dialog that displays. (Before it sends an e-mail message, VirusBarrier Server 3 waits for 30 seconds to see whether there are other intrusion attempts and bundles them all together into one message, rather than sending separate e-mail messages for each one.)
While an intrusion type is selected, clicking the Advanced tab in the right-side pane brings up additional options that are specific to that intrusion type. These are:
- Buffer Overflow Attacks: No advanced settings.
- Intrusion Attempts: You can separately set the number of incorrect password attempts permitted for AppleShare IP (ASIP), FTP, HTTP, IMAP, POP and SMTP.
- Ping Attacks: Ping flood sensitivity, measured in milliseconds (ms) permitted between ping attempts. If your computer is on a network, it is normal that your network administrator ping your computer from time to time. But if your computer is isolated, pings are rarer. One exception is if you have a DSL or cable connection; your ISP might ping your computer to check if it is on line.
- Ping Broadcast Attacks: No advanced settings.
- Port Scans: A slider lets you adjust the sensitivity from low to high in increments according to an internal calculation.
- SYN Flooding: Sensitivity, measured in number of attempted connections allowed per second.
Options
Click the Options button in the bottom-left corner of the Antivandal Policy screen to adjust additional filtering settings. The options appear in the pane to the right.

- Stealth mode (prohibit ping replies): If this is checked, your computer will be invisible to other computers on the Internet or on a local network. You will not, however, be anonymous - any requests you send to other hosts will include your computer's IP address.
- Stop unknown protocols: If this is checked, VirusBarrier Server 3 automatically blocks any unknown protocols.
- Deny Apple Remote Desktop Control: If this is checked, VirusBarrier Server 3 blocks all access to your server by Apple Remote Desktop software.
- Allow PORT mode FTP transfers: If this is checked, you will be able to make FTP transfers when functioning in Client Only firewall mode.
The second part of this screen allows you to be notified by e-mail when an attack is detected; see the previous section for more information.
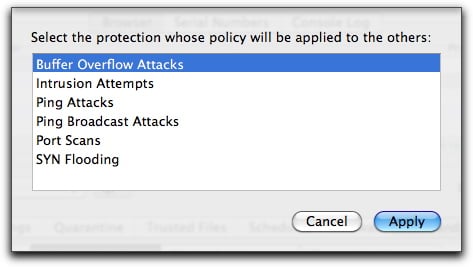
Unifying Policy Options
Each type of intrusion has settings that determine what actions are taken when that type of intrusion is detected.
The Use same policy for all types of protection checkbox unifies all notifications and actions. With this box unchecked, you could, for example, choose to receive an e-mail when a buffer overflow attack is detected, but not when an intrusion attempt occurs. Checking the box tells VirusBarrier Server 3 that you want to get the same sort of response no matter what type of intrusion occurs.
When you activate this option, you'll see a dialog box that asks which settings should become the model that other intrusion types will follow.
Blocked Addresses and Trusted Addresses
The Blocked Addresses list ensures that once an attempted attack or intrusion has been foiled, communication between the attacking machine and your server won't occur for a period of time that you define.
The Trusted Addresses list is the opposite of the Blocked Addresses list: it lists "friendly" computers that are allowed to connect to your server. While the Blocked Addresses list protects you from foes, the Trusted Addresses list opens the door to your friends. VirusBarrier Server 3's Antivandal tool will not block access to computers listed in the Trusted Addresses list, nor will it set off alerts for any actions they carry out. However, computers in the Trusted Addresses list will still be affected by all active Firewall rules.
The interface for the Trusted Addresses window is essentially the same as for the Blocked Addresses window, so we'll examine them both at the same time, pointing out differences as necessary. Here's the Blocked Addresses window.
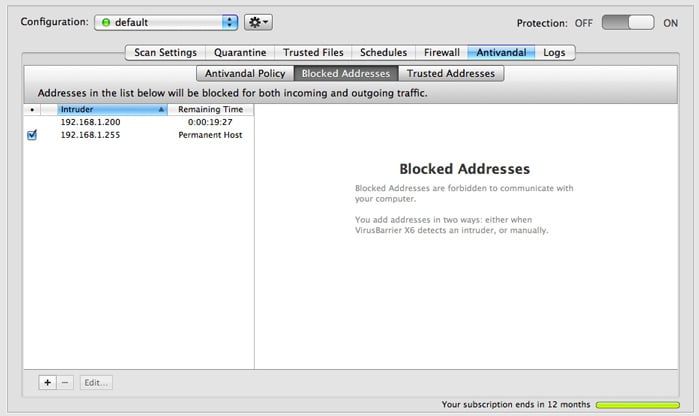
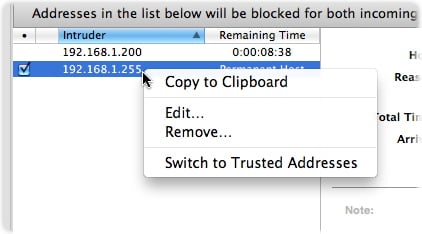
The panel on the left displays information about the various IP addresses that are currently in the Blocked Addresses list or Trusted Addresses list, if any.
- Checkbox: You can temporarily disable a Blocked/Trusted Address by unchecking this box, which is checked by default when you add a host to either list. When disabled, clicking it enables the item again. (This checkbox only appears if the IP address is set to be blocked permanently.)
- Intruder/Host: The second column shows the intruding IP address (in the Blocked Addresses list) or friendly IP address (in the Trusted Addresses list).
- Remaining Time: If you've set this IP address to be blocked or allowed for a specific period of time, this column shows how much time is remaining, updated every second. Otherwise, this column says Permanent Host to indicate that the IP address will be there until you remove it manually.
Blocked/Trusted Address Information
Clicking an item in the Blocked/Trusted Address lists shows some additional information on the right side of the panel. Double-clicking the item opens a new window with the same information.
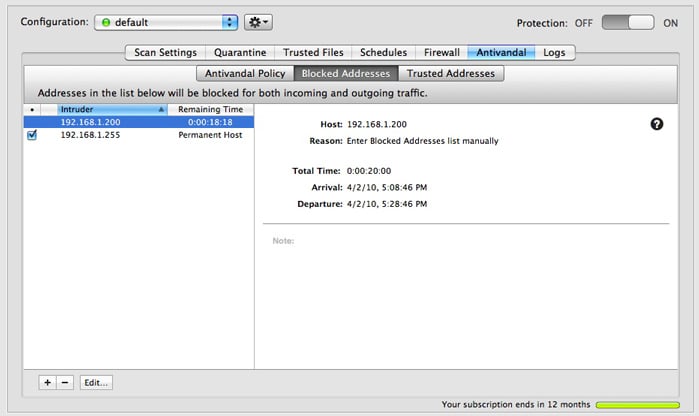
- Host: The host's IP address. If you opened a new window by double-clicking the item, you can manually change the IP address listed. By clicking the DNS lookup button (the ?), you can toggle from the numerical IP address to the actual domain name of the offender, if there is one. You can display this address in large type by moving your cursor over the word Host, clicking, and selecting Large Type from the contextual menu that appears.
- Reason: Why the IP address was added to the Blocked Addresses list. This text doesn't appear in the Trusted Addresses list, as all items there are added manually.
- Total Time: The amount of time the host is to remain in the Blocked/Trusted Address list. Clicking the words Total Time changes the display to show Remaining Time; clicking again shows Elapsed Time, indicating how long the offender has been in the Blocked Addresses list. Clicking Elapsed Time will display the Total Time once again.
- Arrival: When the address was added to the Blocked/Trusted Addresses list.
- Departure: If you specified an amount of time for an IP address to remain in the Blocked/Trusted Addresses list, the time it will be released is given here.
- Note: Any comments you have entered for this IP address. VirusBarrier Server 3 will also automatically add comments to this field when it puts an item in the Blocked Addresses list.
A Note About DNS Lookups
In various places throughout VirusBarrier Server 3's interface you'll see a question mark in a dark circle. Clicking it toggles nearby information from a numerical IP address to its associated domain name and back again.

Be aware that IP addresses do not always have a one-to-one relationship to domain names. For example, a large domain might have www.example.com hosted on one IP address, forums.example.com hosted on another, and blog.example.com hosted on another.
Meanwhile, small domains often share one IP address with others, all hosted as "virtual domains" on a single computer. In such cases a domain lookup gives an IP address that actually leads to the larger, unexpected machine name, for example apache2-vat.market.example.com.
As a result, entering an IP address could block (or allow) traffic from unintended domains, while entering a domain might not block (or allow) all desired traffic. This is the nature of the Internet domain structure, and isn't an error of VirusBarrier Server 3. If you have problems with unexpectedly blocked or permitted traffic, try using a domain name instead of an IP address, or vice-versa.
Adding Addresses
There are two ways to manually add addresses to the Blocked Addresses list or Trusted Addresses list. (VirusBarrier Server 3 can also add addresses automatically to the Blocked Addresses list in response to attacks, as defined by Antivandal policy.)
The first way to add an address to the Blocked Addresses list or Trusted Addresses list is by selecting an IP address in the Log window and choosing Add to Blocked Addresses or Add to Trusted Addresses from the contextual menu. For more on this, see Using VirusBarrier Server 3 Monitoring Tools.
You can also manually add addresses to the Blocked/Trusted Addresses list by clicking the + button at the bottom of the list. A window appears.
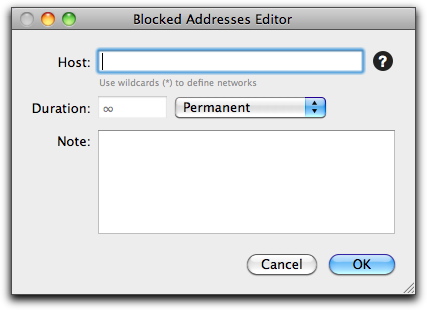
Enter an IP address in the Host field, and select the time this address is to remain in the Blocked Addresses list or Trusted Addresses list by entering a number in the Duration field. Then, select a time unit from the popup menu. If you do not know the numerical IP address of the host you wish to add, enter its name and click the ? button. VirusBarrier Server 3 queries your DNS server and enters the correct number in the field. You can also add comments, such as the reason for adding the address, in the Note field. If you decide you do not wish to add this address to the Blocked Addresses list or Trusted Addresses list, click Cancel.
Using Wildcards
You can use wildcards to indicate ranges of IP addresses in the Blocked Addresses list or Trusted Addresses list. To do so, enter the first part of the IP address you wish to block, followed by asterisks, For example, 192.168.1.* will block all IP addresses from 192.168.1.0 to 192.168.1.255 inclusive; 192.168.*.* will block IP addresses from 192.168.[0-255].[0-255]; and so on.

Removing and Moving Addresses
To remove an address from the Blocked Addresses or Trusted Addresses list, click the address you want to remove, then click the - button.
Another way to remove an address is by right-clicking it then selecting Remove... from the resulting contextual menu. From this contextual menu, you can also move an address from the Blocked Addresses list to the Trusted Addresses list, or vice-versa.
Editing an Address
There are three ways to edit an address in the Blocked Addresses or Trusted Addresses list:
- Click the address you would like to edit, then click the Edit... button at the bottom left side of the pane,
- Double-click the address, or
- Right-click the address, then select Edit... from the contextual menu.
The Blocked/Trusted Addresses Editor window appears. You can change the address, add or change comments, or change the amount of time you want the item to remain on the Blocked/Trusted Addresses list.