Protecting Your Server from Viruses and Malware
- Real-Time Scanning
- Running Scheduled Scans
- Scan Settings
- Quarantine Zone
- Trusted Files
- The VirusBarrier Server 3 Contextual Menu
VirusBarrier Server 3's anti-malware protection works in several ways. Its Real-Time Scanner constantly watches over your server, protecting it and the files it contains from viruses and malware. The Real-Time scanner ensures that your server is protected at all times by scanning every file that is created, copied, modified or saved. It does not, however, scan other files. This is why we suggest you run a full scan of all your files when you install VirusBarrier Server 3 and after each update to the program's virus definitions.
Real-Time Scanning
VirusBarrier Server 3's Real-Time Scanner scans your server whenever its contents change. Scans occur instantly, so you never have to worry about being protected.
To turn on the Real-Time Scanner, either:
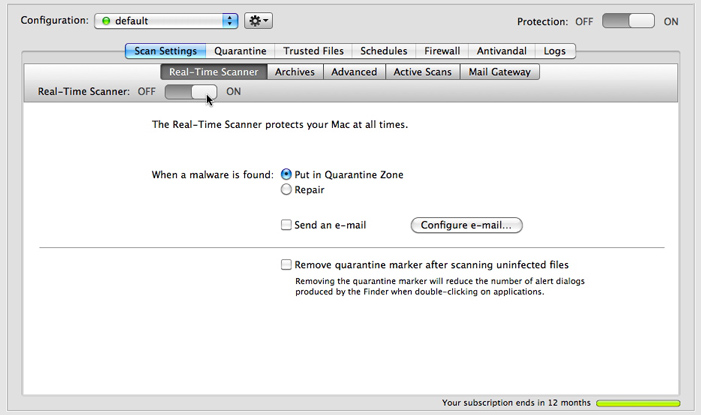
Click the Scan Settings tab in the Browser window, then click the Real-Time Scanner tab. In the resulting pane, move the Real-Time Scanner switch from Off to On.
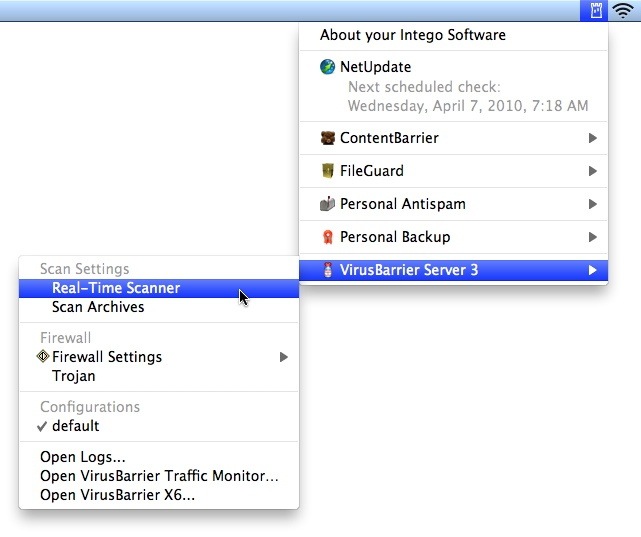
If you are on the server, you can choose the Intego menu in the menubar, then choose VirusBarrier Server 3 > Real-Time Scanner.
Running Scheduled Scans
VirusBarrier Server 3 can also be set to run automatically at pre-arranged times. To do so, click the Schedules tab while in the Browser window. The Schedules pane appears. There are three sections: Display, Events and Schedules.
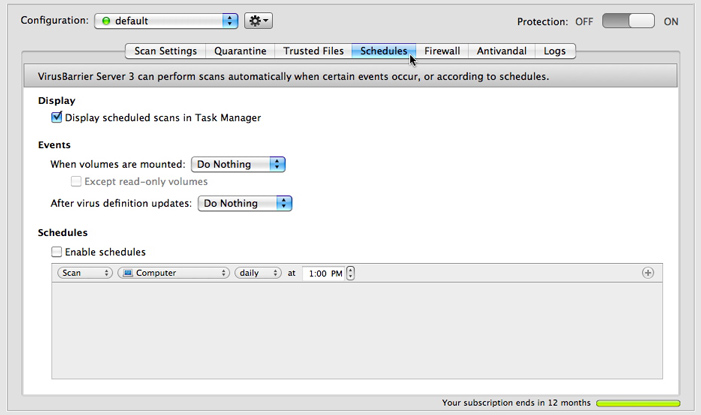
The Display section has only one checkbox: Display scheduled scans in Task Manager. When checked, you'll see a small window appear whenever your server executes scheduled scans; when unchecked, such scans will occur without notification (unless a virus is found).
- The Events section lets you direct VirusBarrier Server 3 to automatically run a scan, do repairs, or do nothing when certain events occur.
The Schedule section lets you determine when VirusBarrier Server 3 will run automated scans.
Below these settings is a scheduling selector, where you can say which folder should be examined, and when.
- The first popup menu lets you choose whether you'd like to Scan, Quick Scan, or Repair the selected files at the scheduled time. If you choose Quick Scan, you cannot choose specific folders to scan; the second menu will disappear. (Quick scans scan only those locations where malware is commonly installed. The files and folders scanned may change as new malware appears, and the locations scanned may be different with newer versions of VirusBarrier X6's virus definitions.)
- The second popup menu lists the areas you are most likely to want to scan. The default choice, Computer, directs VirusBarrier Server 3 to scan all folders for all users on your server.
- The third popup menu lets you choose whether you want to perform the operation daily, weekly, or monthly. If you select daily, you'll be able to choose the time you prefer; select weekly, you'll also choose your preferred day; select monthly, you'll choose which day of the month.
You can create multi-part schedules, for example to scan your Users folder every night, and your entire server once a week. To do so, click the + button to the right of the schedule item: another schedule item will appear beneath it. Make changes in that schedule item as you like. You can add as many schedule items as you like this way; to remove one of them, click the - button next to it.

The order of schedule items is not important; if you've scheduled two scans to run at the same time, they will occur simultaneously.
The first event, When volumes are mounted:, is triggered whenever you mount a new storage device, whether local (such as a hard drive) or remote (such as a network drive). If the Except read-only volumes checkbox is checked, VirusBarrier Server 3 will perform the action only on those volumes where it could change the drive being scanned (for example, to repair an infected file on a disk).
The second event, After virus definition updates:, lets you tell VirusBarrier Server 3 what to do after the program downloads and installs new virus definitions and threat filters. These are updated regularly, and especially when new malware is discovered to offer protection against that threat. Therefore, you should perform a new scan at those times to check for the new malware, either manually or (by checking this checkbox) automatically.
To turn off all pending schedules, uncheck the Enable schedules button.
Scan Settings
VirusBarrier Server 3 gives you a number of options to tell the program how it should scan your server, what types of files it should scan, and what types of malware it should look for. To access these settings, click the Scan Settings tab. On that pane, the Real-Time Scanner tab is selected.
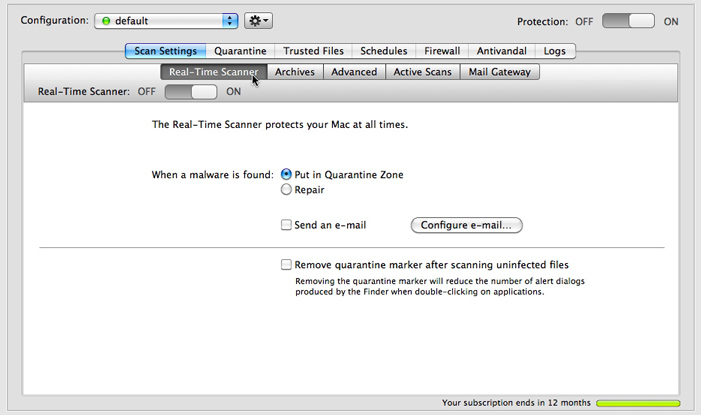
The Scan Settings pane contains five tabs:
- Real-Time Scanner, which controls how VirusBarrier Server 3 runs scans in the background;
- Archives, which tells VirusBarrier Server 3 whether to scan archives and what types of archives to scan;
- Advanced, which provides additional scan settings;
- Active Scans, which gives information on scans currently being performed;
- Mail Gateway, which gives further information on e-mail protection that VirusBarrier Server 3 is providing.
Real-Time Scanner Settings
In normal operation, you will not need to disable the Real-Time Scanner; this is only useful for troubleshooting when you have a problem, or to speed up the transfer of files that you know to be safe. You can disable the Real-Time Scanner either by moving the switch to OFF, or from the Intego menu by selecting VirusBarrier Server 3 > Real-Time Scanner.
When malware is found. Your options are:
- Put in Quarantine Zone: this ensures that the file cannot be opened or read. See the Quarantine Zone section below for more about using the Quarantine Zone.
- Repair: this tells VirusBarrier Server 3 to attempt to remove the malware. If, for any reason, the file cannot be repaired, it will be placed in the Quarantine Zone.
In addition, you can choose to have VirusBarrier Server 3 send you an e-mail whenever it discovers a virus. To set this up, check the Send an e-mail checkbox, then click the Configure e-mail... button next to it. Enter the necessary information for your e-mail account in Mail Settings dialog that displays.
The last section of the Real-Time Scanner settings tab, Remove quarantine marker after scanning uninfected files, tells VirusBarrier Server 3 to remove the Mac OS X dialog warning that asks you whether you're sure you want to open downloaded files.
Archive Settings
VirusBarrier Server 3 can look inside several popular types of archives, scanning not only the archive file itself, but also the files that it contains. To see these settings, click the Archives tab.
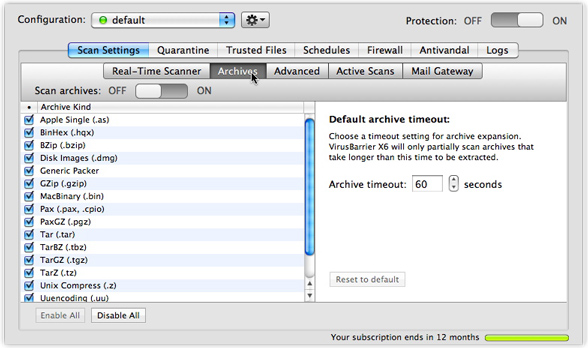
By default, VirusBarrier Server 3 will scan all archive types that it understands; however, you could choose to scan only certain archive types by unchecking different types of archives in the Archive Kind list.
The Default archive timeout setting lets you tell VirusBarrier Server 3 to stop scanning archives that take more than a certain amount of time to uncompress and scan. By default, this is set to 60 seconds. However, any files that have been uncompressed before the end of this timeout will be scanned.
Advanced Scan Settings
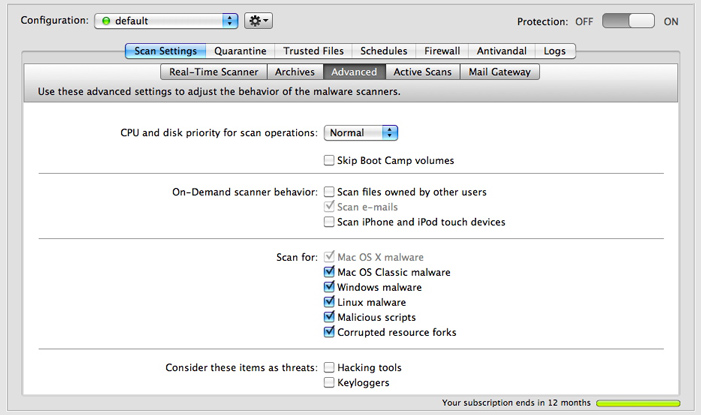
This tab lets you be more specific about how VirusBarrier Server 3 examines your server for malware. The options are:
CPU and disk priority for scan operations. You can choose Low, Normal or High from a popup menu. This setting tells VirusBarrier Server 3 to adjust its scanning so other applications don't get slowed down. This setting affects both the processor (CPU) for the scan and the reading of your hard disk(s). Note that this also applies to scans set to run automatically when you mount external disks or after you update VirusBarrier Server 3's filters. So if you want those scans to complete more quickly, you should choose Normal or High; if you don't care how long they take, or want your server to have more priority, choose Low.
The Skip Boot Camp volumes setting tells VirusBarrier Server to not scan Boot Camp volumes during scans.
Three options affect On-Demand scanner behavior:
- Scan files owned by other users allows VirusBarrier Server 3 to scan files owned by all users. If you select this option, and you're not already logged in as the server's administrator, you'll immediately be required to enter an administrator password; if you don't have that password, the checkbox will revert to its unchecked state. If you don't check this option and VirusBarrier Server 3 finds an infected file owned by a different user or by the system, VirusBarrier Server 3's alert and Quarantine Zone window will display a crossed-out pencil icon, signifying that you will need to enter an administrator's user name and password to perform any action on the file.
- Scan e-mails. VirusBarrier Server 3 scans incoming and outgoing e-mails, both for their content and any attachments they contain, during manual scans. You can't turn off this function; the check box serves as a reminder that VirusBarrier Server 3 will examine e-mail messages.
- Scan iPhone, iPod touch and iPad tells VirusBarrier Server 3 to show any iPhone, iPod touch or iPad that is connected to your server. To scan these devices, you must use the VirusBarrier X6 client program that is installed with the server software.
The Scan for section lets you choose to have VirusBarrier Server 3 scan certain types of files or applications:
- Mac OS X malware: this is dimmed, because it is always active. VirusBarrier Server 3 always scans for Mac OS X malware. This includes all types of malware that affects Mac OS X, such as Word and Excel macro viruses; the other categories are types of malware that cannot harm Mac OS X.
- Mac OS Classic malware: malware that only affects Classic Mac OS. If you or your users still use any Mac OS Classic applications you can check this; if not, leave it unchecked.
- Windows malware: checking this tells VirusBarrier Server 3 to look for viruses that affect Windows. Although these files can't damage your server, they could infect Windows computers on your network, and they could affect you if you use Windows on your Apple computer through a program such as Apple Boot Camp, VMware Fusion or Parallels Desktop. (VirusBarrier Server 3 does not, however, scan Windows virtual disks.)
- Linux malware: if this is checked, VirusBarrier Server 3 will scan for malware that affects the Linux operating system.
- Malicious scripts: checking this tells VirusBarrier Server 3 to scan for malicious scripts such as PHP, shell scripts, JavaScripts, Perl, etc.
- Corrupted resource forks: while this type of corrupted file is not necessarily malware, corrupted resource forks - parts of certain files - can cause Macs to crash in certain cases. Checking this can protect your Mac from crashes caused by this type of corrupted file.
A final section lets you tell VirusBarrier Server 3 to look for two other types of malware:
- Hacker tools are malicious programs that may not directly harm your Mac, but that may be used by hackers to attack other computers. It is especially useful to check this option if your server is publicly accessible.
- Keyloggers are programs that record all your keystrokes. While some such programs may be malicious, others may be installed intentionally to monitor computer users. If this is checked, users being monitored may be alerted to the existence of such software on their Mac.
Active Scan Settings
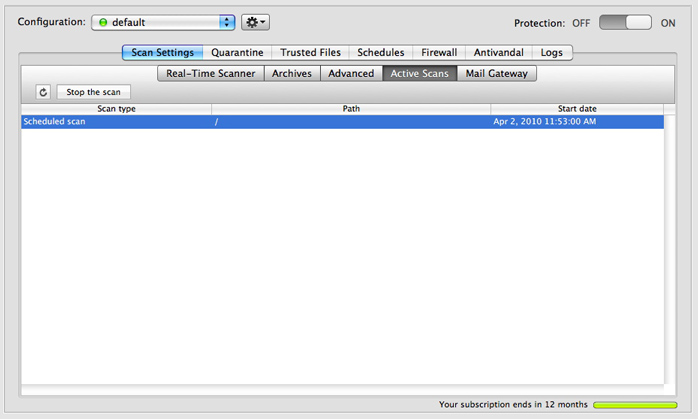
This tab will show any currently active scans, such as those set in a schedule, launched following an event such as a mounted volume or a virus definition update (see above), manual scans run locally using VirusBarrier X6, or command line scans run locally or remotely.
If you don't see a scan that's running, click the  button to refresh the screen.
If you wish to stop any scan that is running, select it then click Stop the Scan. This cannot be done for manual scans.
Mail Gateway
The Mail Gateway tab allows you to control settings for virus scans of e-mail messages and attachments. To activate the Mail Gateway, move the Activate Mail Gateway support switch to ON. In addition to turning on mail protection, this deactivates the built-in antivirus solution.
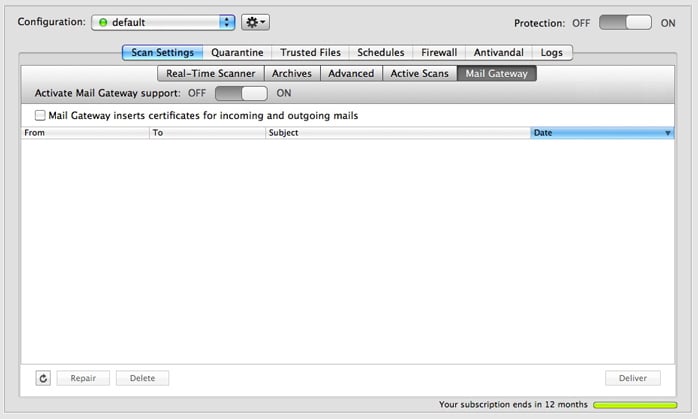
The Mail Gateway inserts certificates for incoming and outgoing mails control adds an X-SCANNED header to all messages that says they were scanned "by Intego VirusBarrier Server 3 Scanner at $mydomain". If VirusBarrier Server 3 finds an infected attachment and removes it, the e-mail message containing that attachment will display the text, "Attachment removed by Intego VirusBarrier Server 3 [name of attachment]".
Quarantine Zone
If you don't want to repair files automatically, you can have VirusBarrier Server 3 put them in its Quarantine Zone. When files are quarantined, they can't be opened or read, ensuring that they cannot infect your server. This is useful for administrators who want to check files before running VirusBarrier Server 3's repair functions.
As mentioned in the section about Scan Settings, you can tell VirusBarrier Server 3 to place malware in the Quarantine Zone when found. You can then check these files and decide what to do.
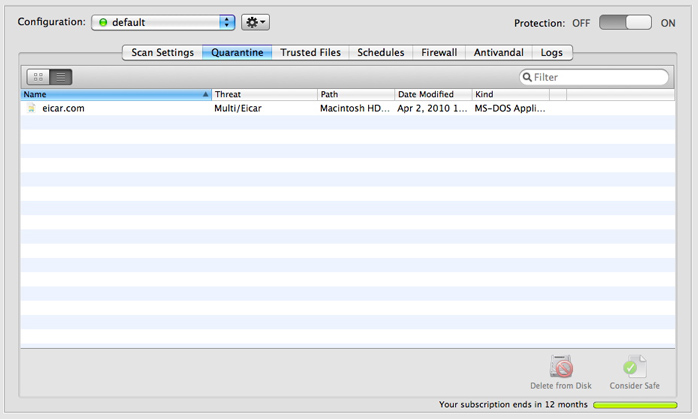
To act on any of the files, select one of them and then click the appropriate button at the bottom right of the window to:
- Delete from Disk, which removes the file from your server.
- Consider Safe which tells VirusBarrier Server 3 that you think this file is not infected, and adds the file to VirusBarrier Server 3's Trusted Files list. This may occur for false positives. However, be very careful when you click this button: only do so if you are sure the file is safe. If not, it may infect your entire server.
If you display the Quarantine Zone in list mode, a Threat column will tell you which types of malware your files are infected by.
Trusted Files
VirusBarrier Server 3 offers the option to add files, folders or volumes to a list of Trusted Files. VirusBarrier Server 3 will assume that these files are all safe and will not scan them. You should only use this for files that have already been scanned by VirusBarrier Server 3.
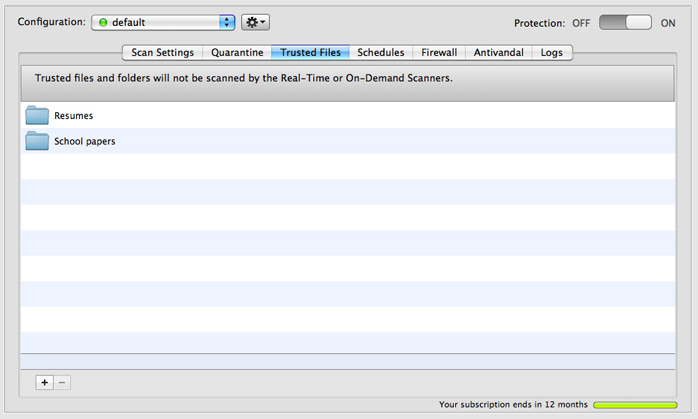
To add files to the Trusted Files list, click the small + button at the bottom-left corner of the screen, enter credentials to access the computer in question, navigate to the item you'd like to add, then click the Choose button.
Adding a folder or volume tells VirusBarrier Server 3 to trust all files contained in the selected item, including in any subfolders it contains now, or may contain in the future.
To remove an item from the Trusted Zone, click it to select it, then click the - button.
The VirusBarrier Server 3 Contextual Menu
You have access to a number of VirusBarrier Server 3's protections directly from the Finder using a Contextual Menu, via the VirusBarrier X6 program that's installed along with VirusBarrier Server 3. Control-click or right-click on any item - a file, folder or volume - and a contextual menu will open. In Mac OS X 10.6 ("Snow Leopard") these menu items are grouped at the bottom of the contextual menu; however, if you have enough such items, you'll find a Services menu item, and VirusBarrier Server 3's menu items will be in the Services sub-menu. In Mac OS X 10.5 ("Leopard"), the VirusBarrier Server 3 menu appears under a "More" menu.
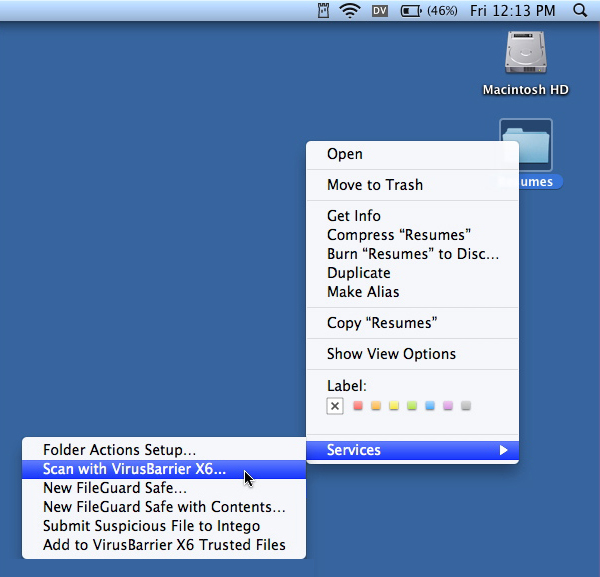
The contextual menu lets you do the following:
- Scan the selected item (and repair it if your settings allow).
- Send a copy of the item to Intego by selecting Submit Suspicious File to Intego. This is especially useful if you have files that you suspect are infected with new or unrecognized viruses. If you choose this option, Intego's virus experts can examine the file and produce the virus definitions you and other users will need to protect their systems, if necessary.
- Add the item to the Trusted Files list.