VirusBarrier Server 3 Preferences and Configurations
VirusBarrier Server Admin Preferences
VirusBarrier Server Admin preferences only offers one option: the choice of whether the program asks for an administrator password on launch. To access this setting, choose VirusBarrier Server Admin > Preferences, and check the option.

These preferences also give you access to NetUpdate, a program that checks if any Intego programs have been updated. This program is installed at the same time as VirusBarrier Server Admin or other Intego programs. It checks for updates for all Intego programs at the same time, and can download and install updates for the programs installed on your computer. To check for updates, click Check Now.
For more on using NetUpdate, see the Intego Getting Started Manual.NetUpdate Scheduling Preferences
Through the VirusBarrier Server Admin program, you can set how Intego NetUpdate checks for new versions of your Intego software. To do so:
- Click the Browser tab,
- Click your server in the upper-left pane,
- Click NetUpdate in the upper-right pane.
The Scheduling pane provides access to the following controls:
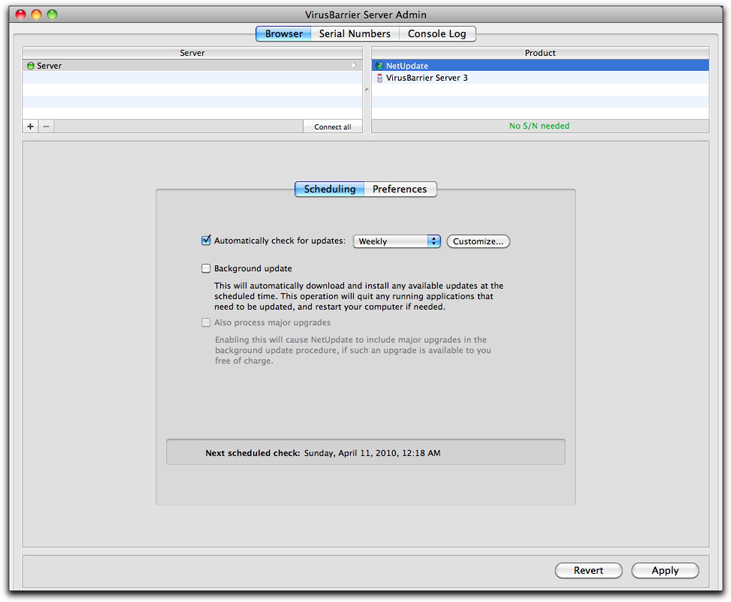
Automatically check for updates: Tells NetUpdate to automatically connect to the Intego NetUpdate server to check for updates with the frequency you specify.
The pop-up menu lets you quickly set that frequency to daily, weekly, or monthly. (In each case, the period starts from when you select something from the pop-up menu. For example, if you were to select daily at 1 pm on a Tuesday, the next check would occur at approximately 1 pm on Wednesday.) Clicking the Customize... button lets you be more specific about when the check should occur.
If you do not check this option at all, you can manually check for updates by connecting to your server via Apple Remote Desktop or a VNC client, opening the NetUpdate application (in the Applications folder) and clicking the Check now... button.
Background update: If you check this option, then when NetUpdate performs an update it will automatically quit any programs that need to be updated, and will restart your server if required.
Also process major upgrades: If you check this option, NetUpdate will also install major upgrades if these upgrades are available to you free of charge. Note that you must have Background update checked in order to access this option.
The Preferences pane has the following controls:
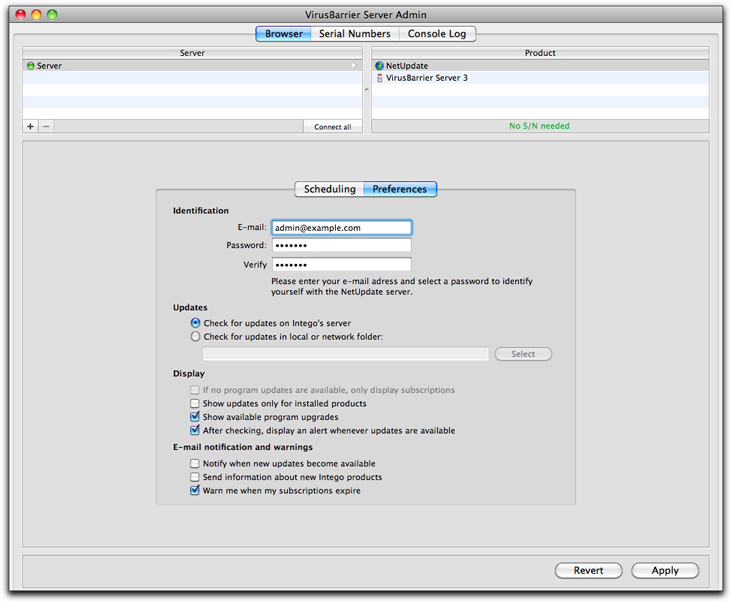
- Identification: Enter an e-mail address and password to identify yourself with the NetUpdate server. If you need to change the e-mail address, you can do so here.
Updates: You can have NetUpdate check for new software in two locations. The default choice, Check for updates on Intego's server, should be used in most cases. But if you are working on a network, and have multiple user licenses for Intego products, you can choose a NetUpdate folder anywhere on your network.
To do this, select Check local or network folder: and click the Select button to select a folder, or enter the folder's path in the text field. If you use a local NetUpdate folder on a remote volume, this volume must be mounted on each computer at check time to access the NetUpdate archives.
To use a local NetUpdate archive folder, first download update files to one computer. From NetUpdate on your server, select the update you want to download by checking it in the update list, then select File > Download Item to... and copy or move them to the NetUpdate archive folder you have set.
Note: when updating Intego software via update files located in a local NetUpdate folder, NetUpdate needs to check with the Intego server to verify the subscription rights of the program being updated. Computers updating Intego software in this manner therefore need to be able to access the Internet.
- Display: This section comprises four checkboxes:
- If no program updates are available, only display subscriptions: If this is enabled, only subscriptions display in NetUpdate's window.
- Show updates only for installed products suppresses display of Intego products that you don't own.
- Show available program upgrades tells you when Intego has an version of the program that is substantially improved beyond normal updates, and requires a fee to perform the upgrade.
- After checking, display an alert whenever updates are available will display an alert in the NetUpdate window whenever an update is available for your Intego products.
- Email Notification: Three email notification options are available on this pane:
- Notify when new updates become available: If you check this option, you will receive email messages whenever new updates to Intego products are released.
- Send information about new Intego products: Checking this box means that you allow Intego to use the email address you register to send you occasional messages presenting its new products.
- Warn me when my subscription expire: This setting helps you remember to renew your Intego subscription so you're never without the most up-to-date protection.
Working with Configurations
VirusBarrier Server 3 lets you save multiple configurations. Each configuration contains all the settings and preferences you have applied to VirusBarrier Server 3 in its different screens and preferences. You may also want a specific set for less protection when you are connected only to a local network, and additional protection when you're serving files to the Internet. You may want to have a configuration that sends you e-mail messages when any intrusions occur, for when you are not at your computer.
You see configurations when the Browser pane is active. VirusBarrier Server 3 comes with one configuration, called default. (You can't delete this configuration.)
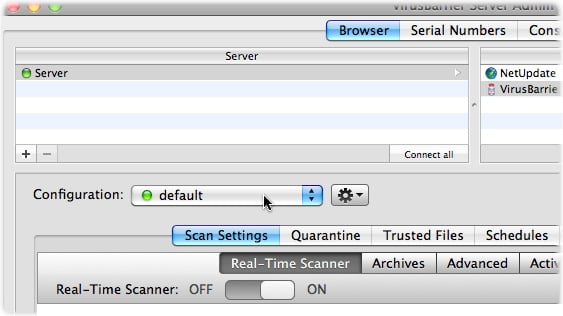
The action button next to the list lets you duplicate, edit, remove and hide configurations.

Creating, Editing and Deleting Configurations
You create a new configuration by clicking the action button and selecting Duplicate Configuration from the pop-up menu that appears.
This new configuration has the same name as the one you duplicated, with the word "copy" appended. Rename it by clicking the action button and selecting Edit Configuration from the pop-up menu. A window appears.
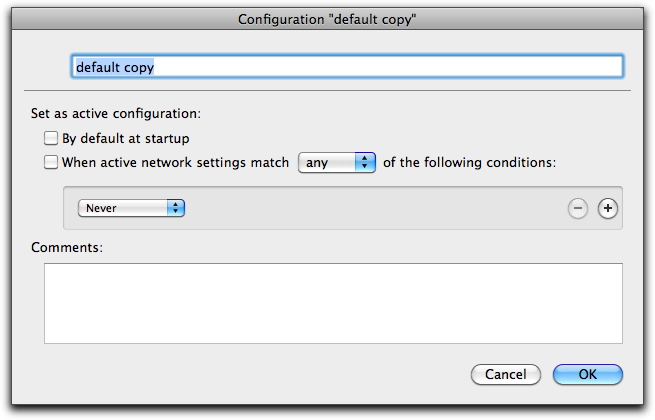
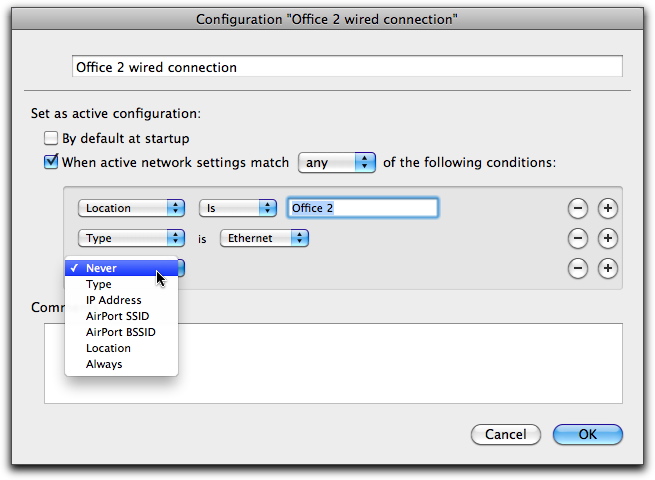
After the area where you can change the configuration's name follows the Save as active configuration section. By changing the two criteria in this section, you can determine when VirusBarrier Server 3 will automatically switch from one configuration to another. The options are:
- By default at startup, which takes effect when you restart your server.
- When active network settings match..., which lets you set conditions under which the configuration will change. checkbox it will automatically become active when any or all conditions you specify regarding the following networking criteria are true.
- Never: This condition will never be true, so the configuration will never turn on automatically.
- Type: Choices are Ethernet, AirPort, FireWire, PPP or Bluetooth.
- IP Address: You can choose a specific IP address, or a range. A Current button identifies the IP address your server has at the moment.
- AirPort SSID: The common name for a wireless network, such as "My AirPort". You can choose for this condition to be true when the SSID is, is not, or contains a text string you specify.
- AirPort BSSID: The MAC address of a wireless network connection point, expressed as a string of hexadecimal numbers.
- Location: The Location defined in your server's Network preferences.
- Always: The condition is always true.
You can add multiple criteria to this section by clicking the + sign to the right, or remove existing criteria by clicking the - sign.
The Comments field is a place for any description or notes you'd care to add: they don't affect operation of the configuration in any way.
To save your the changes you've made to the configuration, click the Apply button at the bottom-right of the VirusBarrier Server Admin window.
To make your new configuration become, active click the Action button and choose Set as Active Configuration.
You can now make any changes to VirusBarrier Server 3 that you want, and they are saved under the current configuration. To make another configuration active, simply switch to it using the pop-up menu, then choose Set as Active Configuration from the Action button. You can also select another configuration from the Configurations list in the Intego Menu, if you are working on the server whose configuration you wish to change. (For more information about the Intego Menu, see the Intego Getting Started Manual.)
To delete the active configuration, select Remove Configuration... from the pop-up menu. You'll see a dialog box that asks you to confirm the deletion. VirusBarrier Server 3 will switch to the default configuration after deletion of the current one.